Related Topics
Configure SAML Single Sign-On
To configure single sign-on (SSO) for Access Portal users:
- Configure the Security Assertion Markup Language (SAML) Service Provider settings on your Firebox.
- Connect to the configuration instructions page hosted on your Firebox.
- Give the SAML information on the configuration instructions page to your Identity Provider (IdP) administrator.
- In your account on the IdP website, the IdP administrator must configure the Firebox as a Service Provider (SP).
- On the Firebox, configure the SAML Identity Provider settings.
Your Identity Provider must meet the WatchGuard requirements for SAML 2.0 communication. For more information about SAML requirements, see SAML Requirements for Identity Providers.
Configure the SAML Service Provider Settings on Your Firebox
In the SAML configuration on the Firebox, you configure the Firebox as the Service Provider (SP) and a third-party service as the Identity Provider (IdP).
- Select Subscription Services > Access Portal.
- Select the User Connections Settings tab.
- Click Configure.
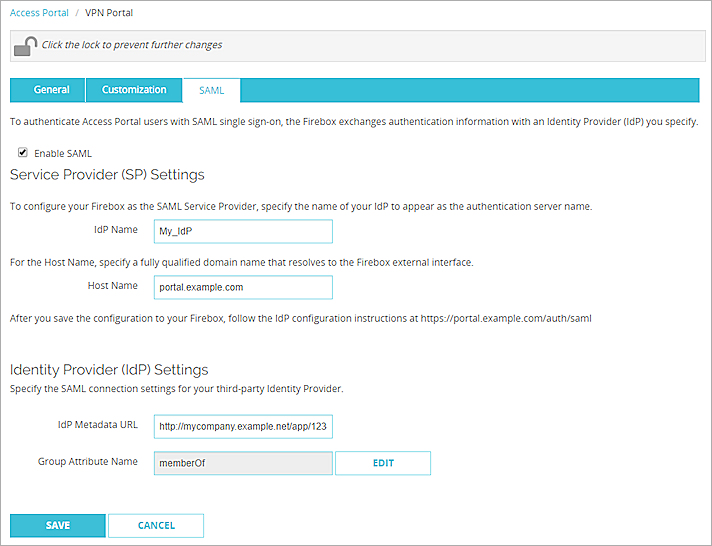
The VPN Portal page appears. - Select the SAML tab.
- Select Enable SAML.
- In the IdP Name text box, type the name of your IdP.
This name appears on the Access Portal login page as the authentication server name. - In the Host Name text box, type an FQDN that resolves to the Firebox external interface.
- Keep the IdP Metadata URL text box blank for now. You must complete the steps in the next sections before you can get the IdP Metadata URL from your IdP administrator.

- Click Save.
- Select Subscription Services > Access Portal.
- Select the User Connections Settings tab.
- Click Configure.
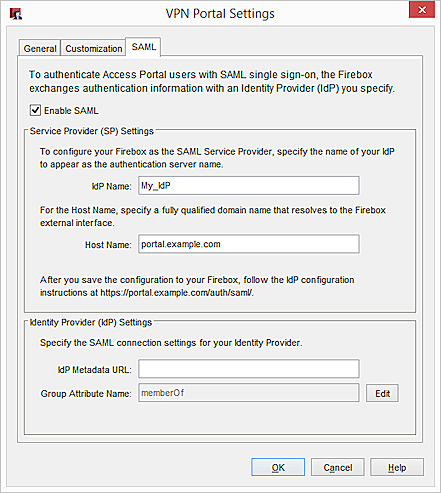
The VPN Portal Settings dialog box appears. - Select the SAML tab.
- Select Enable SAML.
- In the IdP Name text box, type the name of your IdP.
This name appears on the Access Portal login page as the authentication server name. - In the Host Name text box, type an FQDN that resolves to the Firebox external interface.
- Keep the IdP Metadata URL text box blank for now. You must complete the steps in the next sections before you can get the IdP Metadata URL from your IdP administrator.

- Click OK.
Next, you must connect to the Configuration Instructions Page hosted by the Firebox.
Connect to the Configuration Instructions Page
After you save the SAML configuration, the Firebox automatically generates a web page that includes additional SAML configuration information. You must give this information to your IdP administrator so the administrator can configure the account settings for your company on the IdP website.
To connect to the configuration instructions page:
- Go to http://[Host name or IP address for Firebox SAML]/auth/saml.
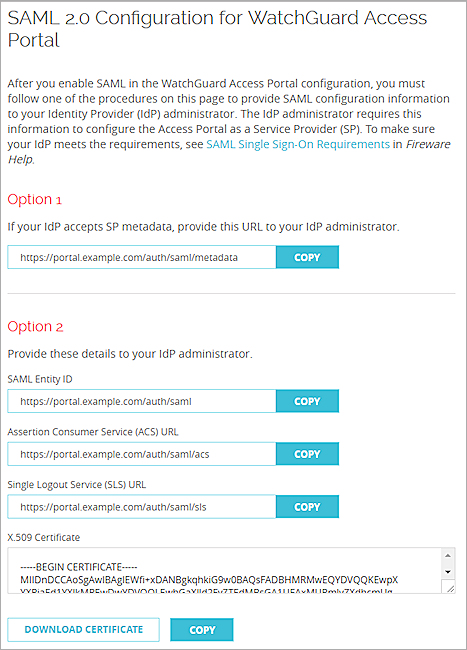
The configuration instructions page appears.

- Follow the instructions for either Option 1 or 2.
Option 1 — Automatic Configuration
If your IdP accepts SAML metadata from SPs, give the URL in the Option 1 section to your IdP Administrator.
Option 2 — Manual Configuration
If your IdP does not accept SAML metadata from SPs, give the URLs and certificate in the Option 2 section to your IdP Administrator.
Next, your IdP administrator must input the metadata URL from Option 1, or the URLs and certificate from Option 2, to the account settings for your company on the IdP website. The IdP administrator must also give you the IdP Metadata URL. For information about IdP configuration, see the documentation for your Identity Provider.
To complete the SAML setup, you must configure the Identity Provider settings on your Firebox.
Configure the SAML Identity Provider Settings on Your Firebox
- Select Subscription Services > Access Portal.
- Select the User Connections Settings tab.
- Click Configure.
The VPN Portal page appears. - Select the SAML tab.
- Select Enable SAML.
- In the IdP Metadata URL text box, type the metadata URL provided by your IdP.
- (Optional) To change the Group Attribute Name, click Edit and type the Group Attribute Name. Tip!Specify a different Group Attribute Name only if your IdP administrator specifies a name other than memberOf.

- Click Save.
- Select Subscription Services > Access Portal.
- Select the User Connections Settings tab.
- Click Configure.
The VPN Portal Settings dialog box appears. - Select the SAML tab.
- Select Enable SAML.
- In the IdP Metadata URL text box, type the metadata URL provided by your IdP.
- (Optional) To change the Group Attribute Name, click Edit and type the Group Attribute Name. Tip!Specify a different Group Attribute Name only if your IdP administrator specifies a name other than memberOf.

- Click OK.