Related Topics
Configure VPN Routes
For a BOVPN virtual interface, the Firebox uses the routing table to determine whether to send traffic through the VPN tunnel. For a BOVPN virtual interface, you do not explicitly configure the local and remote addresses for each tunnel route. Instead, for each BOVPN virtual interface, you can configure static routes that use this BOVPN virtual interface as a gateway. For each route, you specify a destination and a metric. Static routes that you add to this list also appear in the static routes list for the device.
IPv6 BOVPN virtual interface routes are 6in4 tunnel routes that use a GRE tunnel within the IPSec BOVPN tunnel. You can use an IPv6 BOVPN virtual interface route to send traffic between two IPv6 networks through an IPv4 BOVPN virtual interface tunnel. You cannot configure a BOVPN virtual interface route for traffic between an IPv4 network and an IPv6 network.
In Fireware Web UI, the static and dynamic routes for a BOVPN virtual interface appear in the route table. To see the routes, select System Status > Routes.
In Firebox System Manager, VPN routes you add appear in the IPv4 Routes section of the Status Report. Static and dynamic BOVPN virtual interface routes also appear in Firebox System Manager and WatchGuard System Manager. In the FSM Front Panel tab, when you expand the BOVPN virtual interface, the routes for that interface appear in the Route to section.
By default, the Firebox does not remove the static routes from the route table if the VPN is down. You can change this setting in the global VPN settings. For more information, see About Global VPN Settings.
Add VPN Routes
Before you can add VPN routes, you must add or edit a BOVPN virtual interface. For more information, see Configure a BOVPN Virtual Interface.
- Edit the BOVPN virtual interface.
- Select the VPN Routes tab.

- Click Add.
The VPN Route Settings dialog box appears.

- From the Choose Type drop-down list, select an option:
- Host IPv4 — Select this option if only one IPv4 host is behind the router or you want traffic to go to only one host.
- Network IPv4 — Select this option if you have a full IPv4 network behind a router on your local network.
- Host IPv6 — Select this option if only one IPv6 host is behind the router or you want traffic to go to only one host.
- Network IPv6 — Select this option if you have a full IPv6 network behind a router on your local network.
- In the Route To text box, type the network address or host address. If you type a network address, use slash notation.
For more information about slash notation, see About Slash Notation. - In the Metric text box, type or select a metric value for the route. Routes with lower metrics have higher priority.
- Click OK.
The route is added to the BOVPN virtual interface configuration.
- Edit the BOVPN virtual interface.
- select the VPN Routes tab.

- Click Add.
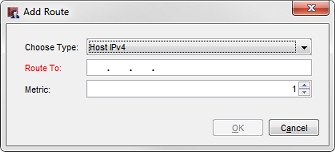
The Add Route dialog box appears.

- From the Choose Type drop-down list, select an option:
- Host IPv4 — Select this option if only one IPv4 host is behind the router or you want traffic to go to only one host.
- Network IPv4 — Select this option if you have a full IPv4 network behind a router on your local network.
- Host IPv6 — Select this option if only one IPv6 host is behind the router or you want traffic to go to only one host.
- Network IPv6 — Select this option if you have a full IPv6 network behind a router on your local network.
- In the Route To text box, type the network address or host address. If you type a network address, use slash notation.
For more information about slash notation, see About Slash Notation. - In the Metric text box, type or select a metric value for the route. Routes with lower metrics have higher priority.
- Click OK.
The route is added to the BOVPN virtual interface configuration.
On the VPN Routes tab, you can also add BOVPN virtual interface IP addresses. These are required if you want to configure dynamic routing to use the BOVPN virtual interface. For more information, see Configure BOVPN Virtual Interface IP Addresses.