Related Topics
Configure IPv4 and IPv6 Routing with BGP
To participate in BGP with an ISP you must have a public autonomous system (AS) number. For internal BGP between private networks you must use a private AS number. For more information, see About Border Gateway Protocol (BGP). You can configure BGP to do dynamic routing for both IPv4 and IPv6 networks.
If you enable BGP for a FireCluster, you must set the router-id in the BGP configuration to the IP address of the Firebox interface that connects to the router. This is to make sure that the routing protocol does not try to use the FireCluster management IP address as the router-id. Do not use the FireCluster management IP address or cluster IP address as the router-id. To set the router-id, use the command bgp router-id <ip-address> in your BGP configuration, where ip-address is the IP address of the Firebox interface that connects to the router.
If your Firebox has multi-WAN enabled, you can configure a loopback interface, and use the IP address of the loopback interface instead of the IP address of the physical interfaces in the dynamic routing configuration. For more information, see Configure a Loopback Interface.
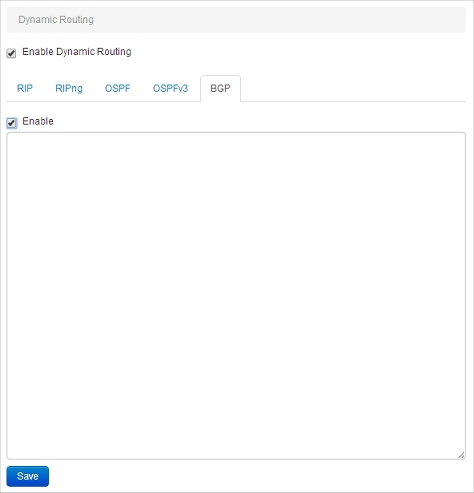
- Select Network > Dynamic Routing.
The Dynamic Routing page appears. - Select the Enable Dynamic Routing check box.
- Select the BGP tab.

- Select the Enable check box.
- Copy and paste your routing daemon configuration file in the text box.
For more information, see About Routing Daemon Configuration Files.
To get started, you need only three commands in your BGP configuration file. These three commands start the BGP process, set up a peer relationship with the ISP, and create a route for a network to the Internet. You must use the commands in this order.
router BGP: BGP autonomous system number supplied by your ISP
network: network IP address that you want to advertise a route to from the Internet
neighbor: <IP address of neighboring BGP router> remote-as <BGP autonomous number>
- Click Save.
If necessary, Fireware XTM automatically adds the required dynamic routing policy or enables an existing BGP dynamic routing policy, if one exists.
- Select Network > Dynamic Routing.
The Dynamic Routing Setup dialog box appears. - Select the Enable Dynamic Routing check box.
- Select the BGP tab.

- Select the Enable BGP check box.
- Click Import to import a routing daemon configuration file.
Or, copy and paste your configuration file in the text box.

For more information, see About Routing Daemon Configuration Files.
To get started, you need only three commands in your BGP configuration file. These three commands start the BGP process, set up a peer relationship with the ISP, and create a route for a network to the Internet. You must use the commands in this order.
router BGP: BGP autonomous system number supplied by your ISP
network: network IP address that you want to advertise a route to from the Internet
neighbor: <IP address of neighboring BGP router> remote-as <BGP autonomous number>
- Click OK.
If an enabled dynamic routing policy does not exist, Policy Manager asks if you want to add the required dynamic routing policy. - Click Yes to add the required dynamic routing policy.
Policy Manager adds the required dynamic routing policy, or enables an existing BGP dynamic routing policy, if one exists.
When you enable BGP, a dynamic routing policy called DR-BGP-Allow is automatically created. You can edit this policy to add authentication and restrict the policy to listen on only the correct interfaces.
After you configure the Firebox and the BGP router, you can look at the routes table to verify that the Firebox has received route updates from the BGP router.
To see the dynamic routes, from Firebox System Manager select the Status Report tab.
To see the dynamic routes, from Fireware Web UI select System Status > Routes.