
Related Topics
Deploy Firebox Cloud on AWS
Before You Begin
Before you can use Firebox Cloud, you must create an AWS account. When you set up your AWS account, you specify billing information and the security credentials you use to connect to the AWS Management Console.
For more information about how to get started with AWS, see:
http://docs.aws.amazon.com/gettingstarted/latest/awsgsg-intro/gsg-aws-intro.html
For information about the AWS Management Console, see:
http://docs.aws.amazon.com/awsconsolehelpdocs/latest/gsg/getting-started.html
Deployment Overview
To deploy your instance of Firebox Cloud on AWS you must complete these procedures:
Create a Virtual Private Cloud (VPC)
Use the VPC Wizard to create a VPC with public and private subnets.
Terminate the NAT instance
Terminate the NAT instance that was automatically created for the VPC by the VPC Wizard. You can terminate this default NAT instance because the instance of Firebox Cloud will complete NAT functions for subnets in this VPC.
Create an instance of Firebox Cloud
Launch an EC2 instance for Firebox Cloud with these properties:
- VPC Configuration — VPC with Public and Private Subnets
- AMI — WatchGuard Firebox Cloud
- Instance Type — If you select Firebox Cloud with a BYOL license, make sure to select the instance type that has the same number of vCPUs as the Firebox Cloud license you purchased.
- Network — A VPC with public and private subnets
- Interfaces — Eth0 must use a public subnet; Eth1 must use a private subnet
- Storage — Keep the default size
- Security Group — Allow all inbound traffic
For information about supported EC2 instance types for Firebox Cloud (BYOL) and Firebox Cloud (Hourly), see the Firebox Cloud product information in the AWS Marketplace.
Disable the Source/Destination checks for Firebox Cloud
For your Firebox Cloud to function as a NAT device for your VPC, you must disable the source/destination check for the instance of Firebox Cloud.
Assign an Elastic IP address to the instance of Firebox Cloud
Assign an Elastic IP (EIP) address to the eth0 interface for your instance of Firebox Cloud. You can use the EIP address that was allocated to the NAT instance you terminated or any other available EIP address.
Configure the default route for the private network
Change the routing for the private subnet so that it uses the instance of Firebox Cloud as the default gateway.
Check instance status
Check the state of the instance of Firebox Cloud to verify that it has powered up, that it has a public IP address and DNS server assigned, and the correct security group is configured.
Each of these procedures is described in detail in the next sections.
Create a VPC with Public and Private Subnets
If you do not already have a VPC with public and private subnets, you must create one.
To use the VPC Wizard to create a VPC:
- Log in to the AWS Management Console at aws.amazon.com.
- Select Services > VPC.
- Click Start VPC Wizard.
- At the left side of the page, select VPC with Public and Private Subnets.
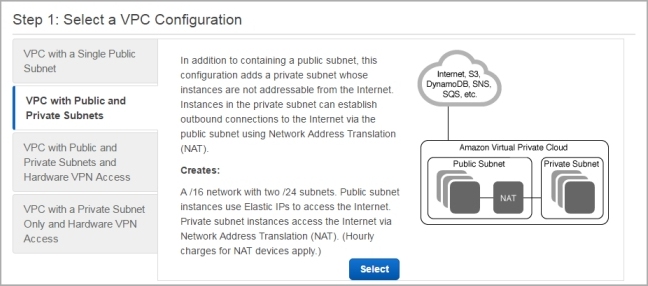
- Click Select.
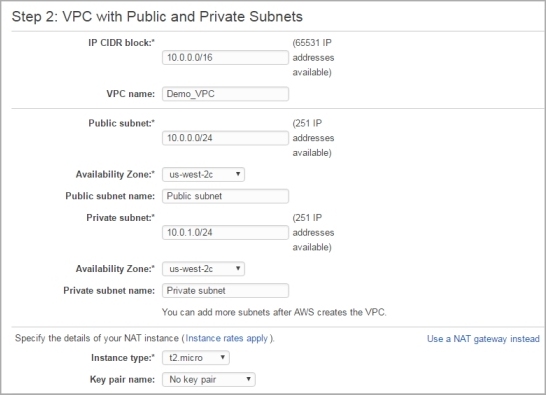
The public and private subnet configuration settings appear. - In the VPC name text box, type a name to identify your VPC.
- Configure the public and private subnets. You can use the default public and private subnets or select other subnets.
- Configure the Availability Zone for each subnet. Make sure that the public subnet and private subnet are in the same zone.
- In the NAT settings, click Use a NAT instance instead.
The NAT instance settings appear. You can use the default instance settings.
You will terminate the NAT instance later and use the instance of Firebox Cloud for NAT.
- Click Create VPC.
The wizard creates the VPC and the associated NAT instance. - Click OK to go to the VPC Dashboard.
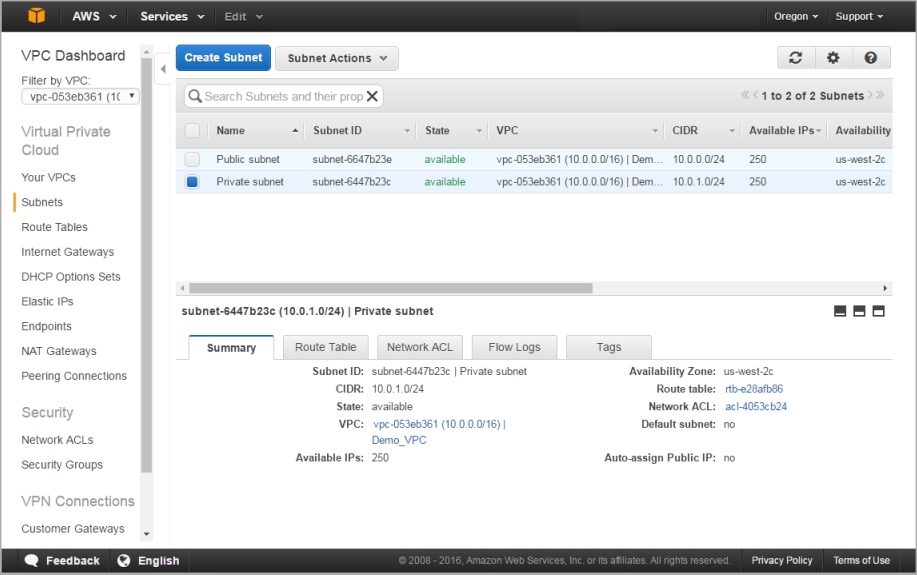
- Select Subnets to see the subnet and routing information for your VPC.
To filter the list, from the Filter by VPC drop-down list, select your VPC.
Terminate the NAT Instance
The VPC Wizard automatically creates a NAT instance for your VPC. This default NAT instance is not necessary because the Firebox will provide NAT services for the VPC. You can terminate the automatically created NAT instance from the EC2 Instances page.
By default, the automatically created NAT instance does not have a tag associated with it. If you have more than one untagged NAT instance, make sure you terminate only the instance associated with your VPC.
To verify which instance is the NAT instance:
- On the EC2 Instances page, select the instance.
The instance information appears at the bottom of the page. - Verify that the VPC ID for the instance matches your VPC.
- Verify the AMI ID is for a NAT instance. The AMI ID for the NAT instance begins with amzn-ami-vpc-nat.

When you terminate the NAT instance, you can also choose to release the Elastic IP (EIP) address assigned to the NAT instance. In this procedure, we do not release the EIP address, so it is still available for you to assign to the instance of Firebox Cloud later.
To assign the EIP associated with the NAT instance to your instance of Firebox Cloud, copy the EIP address before you terminate the NAT instance. This makes it easier to identify which EIP address you want to assign to the instance of Firebox Cloud.
To terminate the NAT instance:
- Select the NAT instance.
- Select Actions > Instance State > Terminate.
- Select Yes, Terminate.
Create an Instance of Firebox Cloud
From the EC2 dashboard, you can create an EC2 instance for Firebox Cloud.
To launch an instance of Firebox Cloud:
- Select Services > EC2.
- In the navigation pane, select AMIs.
- Select the WatchGuard Firebox Cloud AMI.

- Click Launch.

- Select the AWS instance type. If you selected Firebox Cloud with a BYOL license, select an instance that has the number of vCPUs your Firebox Cloud license supports.
- For information about the number of vCPUs for each Firebox Cloud model, see Introduction to Firebox Cloud
- For information about supported EC2 instance types for Firebox Cloud (BYOL) and Firebox Cloud (Hourly), see the Firebox Cloud product information in the AWS Marketplace .
- Click Next: Configure Instance Details.
The Configure Instance Details step appears.

- From the Network drop-down list, select your VPC.
- From the Subnet drop-down list, select the public subnet to use for eth0.
The subnet you select appears in the Network Interfaces section for eth0. - To add a second interface, in the Network interfaces section,
click Add Device.
Eth1 is added to the list of network interfaces. - From the Subnet drop-down list for eth1, select the private subnet to use for eth1.
- Click Next: Add Storage.

- Use the default storage size (5 GB). Click Next: Add Tags.

- In the Value text box, type a name to identify this instance.
- Click Next: Configure Security Group.

By default, the instance uses a security group that functions as a basic firewall. Because Firebox Cloud is a firewall, you must add a new security group that allows all traffic, and assign that security group to this EC2 instance.
- Select an existing security group or add a new security group that allows all traffic.
If you create a new security group, from the Type drop-down list, select All traffic. - Click Review and Launch.
The configured information for your instance appears. - Click Launch.
The key pair settings dialog box appears.
Select or Create a Key Pair for SSH Authentication
When you launch a new EC2 instance, you can select or create a key pair. The key pair is needed only for ssh connections to the Fireware command line interface (CLI) for Firebox Cloud. You do not need the key pair to connect to Fireware Web UI. If you proceed without a key pair, you can log in to Fireware Web UI, but you cannot connect to the CLI from outside of the VPC.
You can use an existing key pair if you have access to the private key file. Or you can create a new key pair and download the private key file.
To use an existing key pair:
- From the top drop-down list, select Choose an existing key pair.

- From the Select a key pair drop-down list, select an existing key pair.
- Select the check box to acknowledge that you have access to the selected private key file.
- Click Launch Instances.
To create a new key pair:
- From the top drop-down list, select Create a new key pair.

- In the Key pair name text box, type a name for the new key pair
- Click Download Key Pair.
The .PEM file that contains the private key is downloaded. - Save the private key to a location that is a secure and accessible; you cannot download the private key file again.
- Click Launch Instances.
Disable Source/Destination Checks
By default, each EC2 instance completes source/destination checks. For the networks on your VPC to successfully use your instance of Firebox Cloud for NAT, you must disable the source/destination check for the network interfaces assigned to the instance of Firebox Cloud.
To disable source/destination checks for the public interface:
- From the EC2 Management Console, select Instances > Instances.
- Select the instance of Firebox Cloud.
- Select Actions > Networking > Change Source/Dest. Check.
The confirmation message includes the public interface for this instance.

- Click Yes, Disable.
The source and destination checks are disabled for the public interface.
To disable source/destination checks on the private interface:
- From the EC2 Management Console, select Network & Security > Network Interfaces.
- Select the private interface of your VPC.
- Select Actions > Change Source/Dest. Check.
- Select Disabled.
- Click Save.
Assign an Elastic IP Address to the External Interface
You must assign an Elastic IP (EIP) address to the eth0 interface for the instance of Firebox Cloud. You can use the EIP address that was previously assigned to the NAT instance you terminated, or any other available EIP address. To make sure you assign it to the correct interface, find and copy the eth0 interface ID for your instance of Firebox Cloud.
To find the eth0 interface ID for your instance of Firebox Cloud:
- From the EC2 Management Console, select Instances.
- Select the instance of Firebox Cloud.
The instance details appear. - Click the eth0 network interface.
More information about the network interface appears. - Copy the Interface ID value.
To associate the Elastic IP address with the eth0 interface:
- From the EC2 Management Console, select Network & Security > Elastic IPs.
- Select an available Elastic IP address.
- Select Actions > Associate Address.
The Associate address page appears.
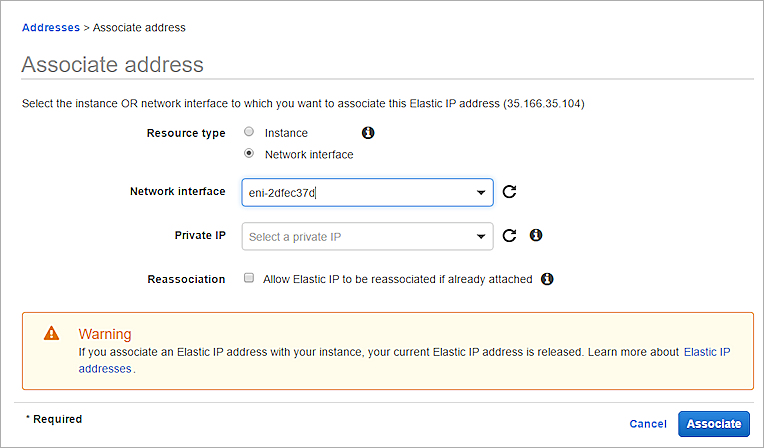
- In the Resource type settings, select Network interface.
- In the Network Interface text box, paste the Interface ID for eth0.
- Click Associate.
You can now use the EIP address to connect to Fireware Web UI for your instance of Firebox Cloud.
To connect to Fireware Web UI, open a web browser and go to https://<eth0_EIP>:8080.
If you change the EIP address that is associated with your instance of Firebox Cloud, you must use the AWS console to stop and restart the instance before Firebox Cloud can use the new EIP address.
Configure the Default Route
To enable Firebox Cloud to control outbound traffic from the private network connected to eth1, you must change the route table for the private subnet so that it uses Firebox Cloud as the default gateway.
To find the network interface ID of the private network:
- On the EC2 dashboard, select Network & Security > Network Interfaces.
- Find the private network interface for your instance ID. It is the interface that does not have a public IP address assigned.
- Copy the network interface ID.
To edit the route table:
- Select Services > VPC.
- Select Route Tables.
- To find the interface for the private network, select each route table for your VPC one at a time.
The route table details appear, with the interface information for each route table. - To see the routes for each network, select the Routes tab.
For the private interface, the default route status is Black Hole because the NAT target was set by the VPC Wizard to the NAT instance you terminated.

- On the Routes tab for the private network, click Edit.
- In the Target text box, paste the network interface ID for the private network interface.
The route status changes from Black Hole to Active.

- Click Save.
Verify the Instance Status
After you finish all the steps to deploy your instance of Firebox Cloud, review the instance details on the EC2 Instances page to verify that:
- Public IP address and Public DNS server are assigned
- The security group to allow all traffic is assigned
Activate your Firebox Cloud License (BYOL Only)
For Firebox Cloud with a BYOL license, you must activate the Firebox Cloud serial number in the WatchGuard portal. Before you can activate Firebox Cloud, you must have the Firebox Cloud serial number you received from WatchGuard and you must know the Firebox Cloud Instance ID.
To activate your Firebox Cloud license:
- Go to www.watchguard.com.
- Click Support.
- Click Activate Products.
- Log in to your WatchGuard Customer or Partner portal account. If you do not have an account, you can create one.
- If necessary, navigate to the Support Center and select My WatchGuard > Activate Product.
- When prompted, provide your Firebox Cloud serial number and Instance ID.
- When activation is complete, copy the feature key and save it to a local file.
Run the Firebox Cloud Setup Wizard
After you deploy Firebox Cloud, you can connect to Fireware Web UI through the public IP address to run the Firebox Cloud Setup Wizard. You use the wizard to set the administrative passphrases for Firebox Cloud.
To run the Firebox Cloud Setup Wizard:
- Connect to Fireware Web UI for your Firebox Cloud with the public IP address:
https://<eth0_public_IP>:8080 - Log in with the default Administrator account user name and passphrase:
- User name — admin
- Passphrase — The Firebox Cloud Instance ID
The Firebox Cloud Setup Wizard welcome page appears.
- Click Next.
The setup wizard starts. - Review and accept the End-User License Agreement. Click Next.
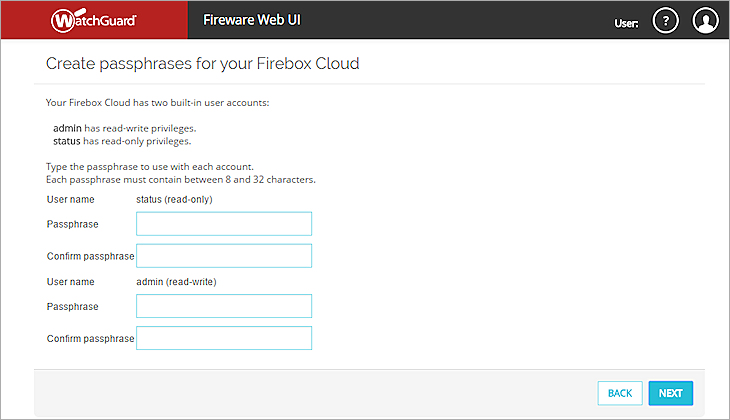
- Specify new passphrases for the built-in status and admin user accounts.
- Click Next.
The configuration is saved to Firebox Cloud and the wizard is complete.
Connect to Fireware Web UI
To connect to Fireware Web UI and administer Firebox Cloud:
- Open a web browser and go to the public IP address for your instance of Firebox Cloud at:
https://<eth0_public_IP>:8080 - Log in with the admin user account. Make sure to specify the passphrase you set in the Firebox Cloud Setup Wizard.
By default, Firebox Cloud allows more than one user with Device Administrator credentials to log in at the same time. To prevent changes by more than one administrator at the same time, the configuration is locked by default. To unlock the configuration so you can make changes, click ![]() .
.
If you prefer to allow only one Device Administrator to log in at the same time, select System > Global Settings and clear the Enable more than one Device Administrator to log in at the same time check box.
Add the Feature Key (BYOL Only)
If you activated a Firebox Cloud license in the WatchGuard portal, your feature key is available directly from WatchGuard. You must add this feature key to the Firebox Cloud configuration to enable all functionality and configuration options on Firebox Cloud.
After you add the feature key, Firebox Cloud automatically reboots with a new serial number.
To add the feature key, from Fireware Web UI:
- Select System > Feature Key.
The Feature Key Wizard page appears.
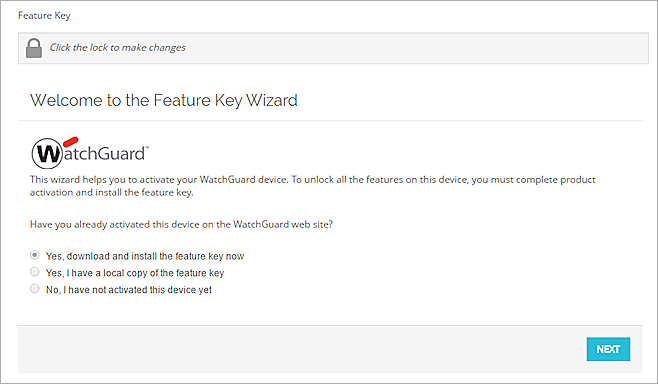
- To unlock the configuration file, click
 .
. - To download and install the feature key, click Next.
- On the Summary page, verify that your feature key was successfully installed.
When your feature key has been installed, Feature Key Retrieval Success appears on the Summary page.

- Click Next.
The wizard completes and Firebox Cloud reboots with a new serial number.
Next Steps
After you run the setup wizard and add the feature key you can log in to Fireware Web UI and configure the settings for your Firebox Cloud.
Enable Feature Key Synchronization
To enable Firebox Cloud to automatically check for feature key updates when services are about to expire:
- Select System > Feature Key.
- Select the Enable automatic feature key synchronization check box.
- Click Save.
Configure Firebox Cloud to Send Feedback to WatchGuard
To enable your Firebox Cloud to send feedback to WatchGuard:
- Select System > Global Settings.
- Select the Send device feedback to WatchGuard check box.
- Select the Send Fault Reports to WatchGuard daily check box.
Configure Firewall Policies and Services
Configure policies and services as you would for any other Firebox.
Firebox Cloud does not support every feature described in Fireware Help. For a summary of the differences between Firebox Cloud and other Firebox models, see Firebox Cloud Feature Differences.