
Related Topics
Quick Start — Set Up Threat Detection and Response
Before you can use Threat Detection and Response (TDR), you must activate the TDR subscription for a Firebox in your WatchGuard Portal account. When you activate the first TDR subscription for a Firebox in your account, your TDR account is automatically created and Host Sensor licenses are added to your TDR account. The number of Host Sensor licenses included with your TDR subscription depends on the Firebox model. You can purchase additional Host Sensor licenses as an upgrade.
Some steps to set up TDR require that you log in with a specific user role. The first user in a new TDR account has both the Administrator and Operator user roles. All other users have the Operator user role by default. A user with Administrator credentials can change the roles assigned to any user account.
To get started with TDR, complete these steps:
Threat Detection and Response is included in the Total Security Suite subscription. When you activate a Total Security Suite subscription, Host Sensor licenses are added to your TDR account. After you activate your TDR subscription, you must update the feature key on your Firebox.
- Log in to Fireware Web UI as a user with Device Administrator credentials.
- Select System > Feature Key.
- Click Get Feature Key.
The Feature Key page appears. - Verify that the Threat Detection & Response feature is enabled in the feature key.
- Start Firebox System Manager for your Firebox.
- Select Tools > Synchronize Feature Key.
- Type the credentials for a user with Device Administrator credentials.
- Select View > Feature Keys.
The Feature Key dialog box appears. - Verify that the Threat Detection & Response feature is enabled in the feature key.
If you are not a WatchGuard partner, skip this step and continue to Step 3.
If you are a WatchGuard Partner, your TDR account is a Service Provider account. In your TDR Service Provider account, you must add a separate customer account for each business or organization for which you manage TDR. To configure TDR to run on your own network, you must also add a customer account for your own internal network. You configure and manage TDR separately for each managed customer account.
- Go to the WatchGuard Portal at www.watchguard.com and log in to your WatchGuard Portal account as a user with Administrator credentials.
- In the Partner Portal, click Support Center.
- Select My WatchGuard > Manage TDR.
The Threat Detection & Response web UI appears. - In the TDR web UI, click Accounts.
- Click Add Account.
The Add Account dialog box appears.
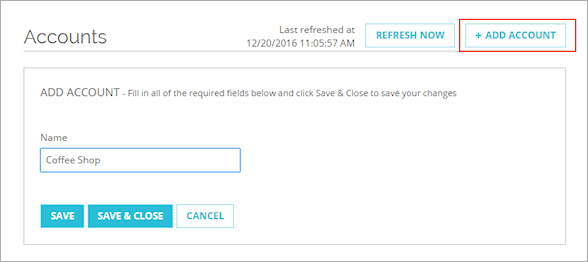
- In the Name text box, type business or organization name of the managed customer account.
- Click Save & Close.
The Account is added to the Accounts list and is also added to the drop-down list in the top navigation bar.
You must assign Host Sensor licenses to each customer account you manage. The number of Host Sensor licenses you assign to a managed customer account controls the maximum number of Host Sensors you can install on computers for that customer.
- From the TDR web UI left navigation menu, select Licenses.
The Licenses page appears and shows the Host Sensor licenses in your account. - In the Licenses list, find an unassigned license.
- On the line of the unassigned license, at the far right side, click
 .
.
A drop-down list with the available options appears. - Select Assign License.
The Assign License dialog box appears.

- In the Account text box, begin to type the name of the managed customer account.
Account names that contain the letters you type appear below the text box. - Select the customer account name from the list.
- In the Number of Hosts to Assign text box, type the number of Host Sensor licenses to assign to this account.
By default, the Number of Hosts to Assign is set to the total number of unassigned Host Sensor licenses in the license you selected. You can change this to a lower number if you plan to install Host Sensors on fewer computers for this customer. - Click Assign License.
The specified number of Host Sensor licenses are assigned to the managed customer account you selected.

To manage TDR for a customer, you must select the customer account to manage. The drop-down list at the top of the page has the name of your service provider account, and the names of each customer account you added.
To select a customer account to manage:
- From the drop-down list at the top of the page, select the customer account.

- To see a summary of status for this customer, select Dashboard in the left navigation menu.
After you select a managed customer account, the options available in the left navigation menu depend on the user role assigned to you in the Service Provider account. Your user account can be assigned one or both of these roles:
- If you have the Administrator (SP) user role, you are an Administrator of your managed customer accounts.
- If you have the Operator (SP) user role in your service provider account, you are an Operator of your managed customer accounts.
The first user in a TDR Service Provider account has both the Administrator (SP) and Operator (SP) user roles. All other users have the Operator (SP) user role by default.
After you select a managed customer account, complete the procedures to set up Host Sensors and Fireboxes for each managed customer.
To go back to your Service Provider account to manage accounts and licenses, select the name of your service provider account from the drop-down list at the top of the page.
If your Firebox does not run Fireware v11.12, upgrade the Firebox OS to v11.12 or higher.
For more information, see Upgrade Fireware OS or WatchGuard System Manager.
Next, enable Threat Detection and Response on your Firebox. To enable TDR on the Firebox, you must get the UUID from your TDR account and add it to the Firebox configuration.
- Go to the WatchGuard Portal at www.watchguard.com and log in to your WatchGuard partner or customer account as a user with Operator credentials.
- If you are a WatchGuard partner, in the Partner Portal click Support Center.
- Select My WatchGuard > Manage TDR.
- (Partners only) Select the managed customer account.
- Select Devices > Firebox.
The Account UUID appears at the top of the page.

- Copy the Account UUID.
- Open the Firebox configuration in Policy Manager or Fireware Web UI.
For information about how to connect to Fireware Web UI, see Connect to Fireware Web UI. - Select Subscription Services > Threat Detection.
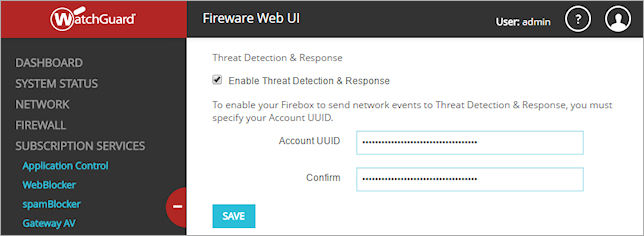
- Select the Enable Threat Detection & Response check box.
- In the Account UUID and Confirm text boxes, paste the Account UUID.
- Save the configuration to the Firebox.
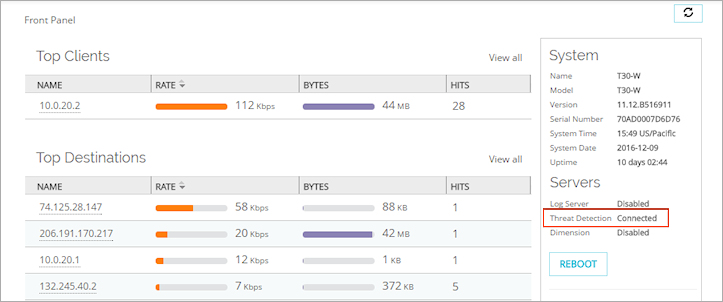
- To see the Firebox connection status to Threat Detection and Response in Fireware Web UI, select Dashboard > Front Panel.
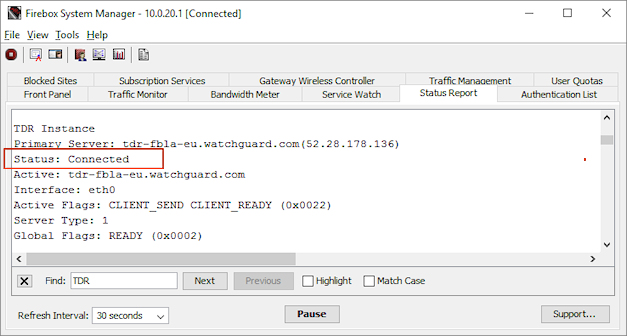
- To see the Firebox connection status to Threat Detection and Response in Firebox System Manager, select the Status Report tab and search for TDR.
- To see the Firebox connection status in the TDR web UI, select Devices > Firebox and verify that your Firebox appears in the Fireboxes list.

When you enable TDR on your Firebox, the Firebox configuration must include a policy to allow Host Sensors on your network to connect to your TDR account. If your Firebox runs Fireware v11.12.1 or higher, when you enable TDR, the WatchGuard Threat Detection and Response policy to allow Host Sensor connections is automatically added.
When you enable TDR in Fireware v11.12.1 and higher, the WatchGuard Threat Detection and Response policy is automatically added to the Firebox configuration.
If your Firebox runs Fireware v11.12.0, you must manually add an HTTPS packet filter policy with these settings:
- Connections are — Allowed
- From — Any-Trusted, Any-Optional (or the locations where your Host Sensors are installed)
- To — FQDNs tdr-hsc-na.watchguard.com and tdr-hsc-eu.watchguard.com
If your Firebox configuration includes an HTTPS proxy policy with content inspection and certificate validation enabled, add these FQDNs as destinations to the WatchGuard Threat Detection and Response policy or to the HTTPS policy you manually added:
tdr-frontline-eu.watchguard.com
tdr-frontline-na.watchguard.com
tdr-adhh-na.watchguard.com
tdr-adhh-eu.watchguard.com
These additional FQDNs allow Host Sensors to upload files for APT Blocker analysis, and allow Active Directory Helper to synchronize data with your TDR account.
Next, install a Host Sensor on the computer to protect. The information you need to install the Host Sensor appears on the TDR web UI page where you download the software. You can manually install a Host Sensor for Windows or Red Hat Linux.
For information about TDR Host Sensor OS compatibility, see the Threat Detection & Response Release Notes on the Fireware Release Notes page.
To install a Host Sensor for Windows or Mac:
- Go to the WatchGuard Portal at www.watchguard.com and log in to your WatchGuard account as a user with Operator credentials.
- If you are a WatchGuard partner, in the Partner Portal click Support Center.
- Select My WatchGuard > Manage TDR.
- (Partners only) Select the managed customer account.
- Select Configuration > Host Sensor.
- Click the Download button for the Microsoft Windows Host Sensor or the Mac Host Sensor.
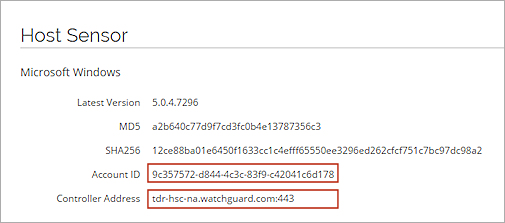
- On the Host Sensor page, find the Account ID and Controller Address.
- To run the installer, double-click the downloaded MSI or PKG file.
The Threat Detection and Response Setup dialog box appears. - Copy and paste the Account ID from the TDR Host Sensor page to the Account ID text box in the installer.
- Copy and paste the Controller Address from the TDR Host Sensor page to the Controller Address text box in the installer.
To verify the connection from the Host Sensor to your TDR account:
- In the TDR web UI, select Devices > Hosts.
- Verify the host appears in the list and that the Host Sensor is operational (
 ).
).
The Quick Start procedures describe the steps to set up your first Firebox and Host Sensor in your TDR account. To finish your installation, we recommend you complete these additional steps, as described in these topics: