Auvik is an RMM (Remote Monitoring and Management) tool used by MSPs (Management Service Providers) for asset management. RMM agents are installed on MSP customer endpoints to discover, monitor, and manage IT assets. Auvik can discover WatchGuard devices and use authentication credentials to retrieve specific device information, such as subscription status, renewal date, hardware model, and other device properties.
This document describes how to use Auvik to discover and monitor a Wi-Fi in WatchGuard Cloud access point.
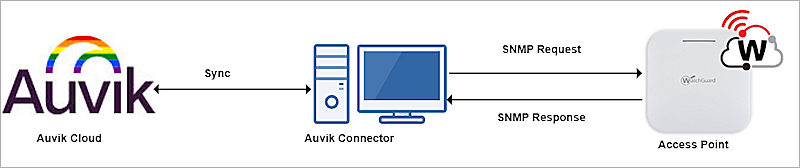
Integration Topology
This diagram outlines the topology used for the Auvik and WatchGuard access point integration.
Before You Begin
Before you begin these procedures, make sure that you have:
- Registered an Auvik account
- Upgraded your WatchGuard Cloud access points to firmware version 2.4.7 or higher
- Activated your access points with a WatchGuard USP Wi-Fi Management license and added the devices to WatchGuard Cloud
Additional charges might apply to use Auvik.
Configure SNMP for Access Points
Before you can use Auvik to discover the WatchGuard access point, you must configure SNMP settings for the device.
To configure SNMP for an access point, from WatchGuard Cloud:
- Select Configure > Devices.
- Select a cloud-managed access point.
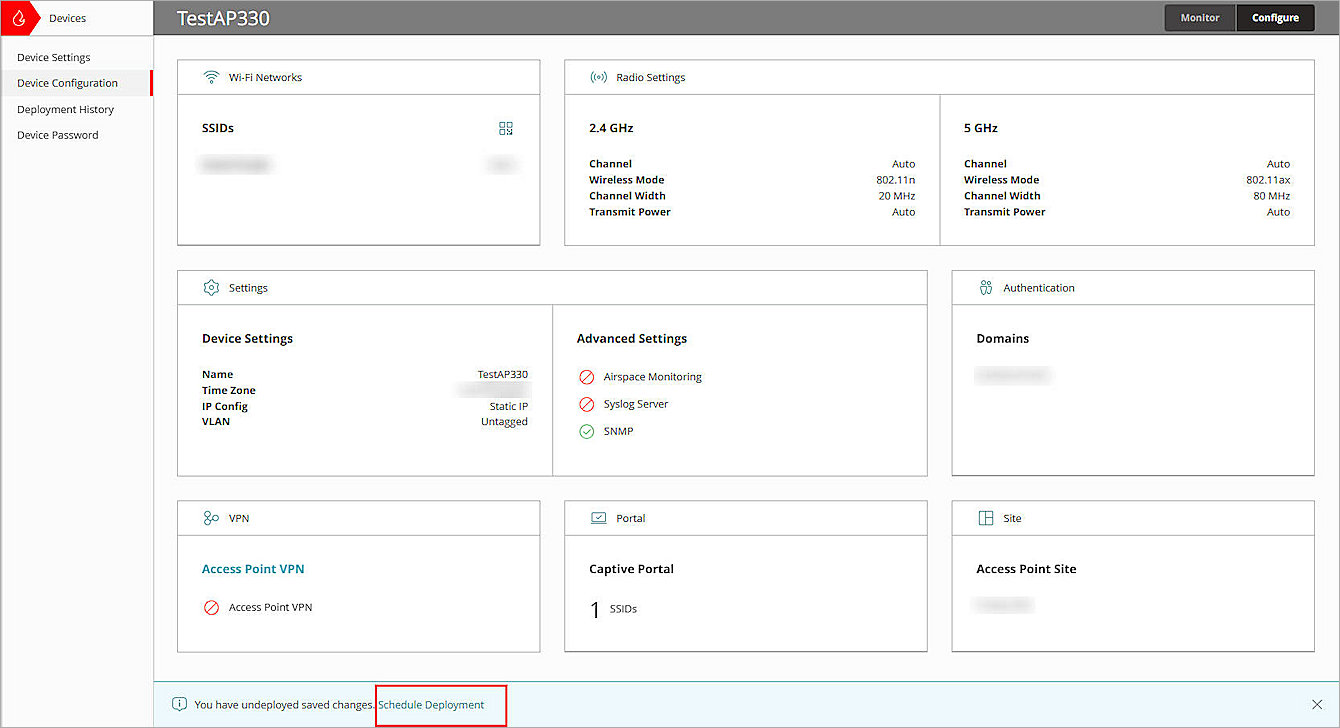
The Device Settings page opens. - Select Device Configuration.
-
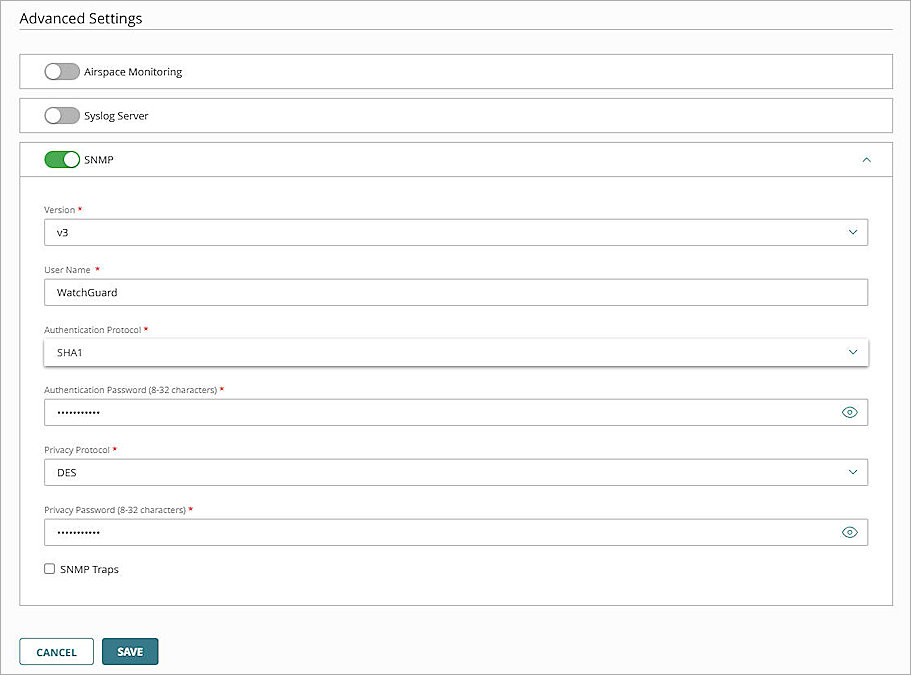
In the Settings tile, select Advanced Settings.
The Advanced Settings page opens. - Enable SNMP.
- From the Version drop-down list, select v3.
- To authenticate with the SNMP management system, in the User Name text box, type a user name. In this example, we type WatchGuard.
- From the Authentication Protocol drop-down list, select SHA1.
- In the Authentication Password text box, type an authentication password.
- From the Privacy Protocol drop-down list, select DES.
- To encrypt outgoing messages and decrypt incoming messages, in the Privacy Password text box, type a password.
- Click Save.
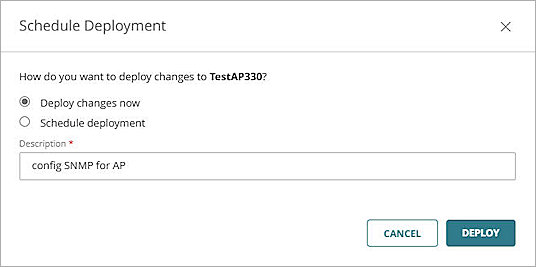
The SNMP settings for the selected access point are saved, and the Device Configuration page opens. - To apply the configuration to your access point, in the banner, click Schedule Deployment.
The Schedule Deployment dialog box opens. - Select Deploy Changes Now.
- In the Description text box, type adescription for this deployment. For this example, we type config SNMP for AP.
- Click Deploy.
For more information about how to configure SNMP for your access points in WatchGuard Cloud and view the details of the SNMP MIB file, go to Configure SNMP for Access Points.
Configure Auvik
To integrate Auvik with WatchGuard access points, you must:
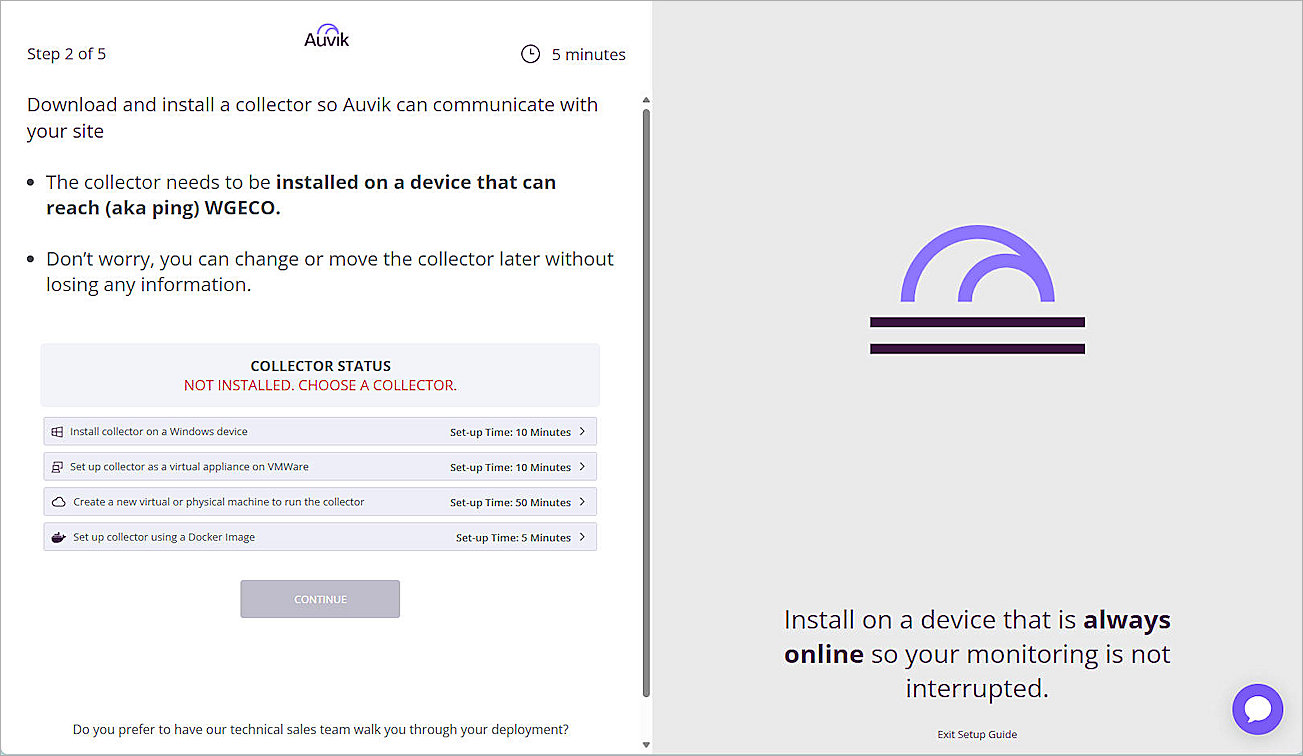
Install Auvik Collector
To install the Auvik collector:
- Log in to Auvik.
- From the navigation menu, select All Sites.
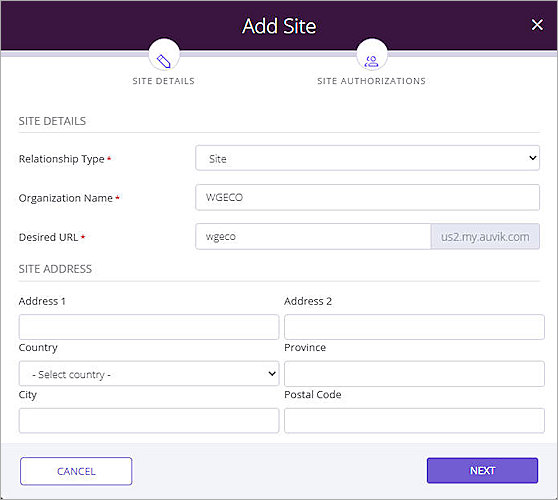
- Click Add Site.
The Add Site dialog box opens. - From the Relationship Type drop-down list, select Site.
- In the Organization Name text box, type an organization name. In this example, we type WGECO.
- In the Desired URL text box, type a URL. In this example, we type wgeco.
- Click Next.
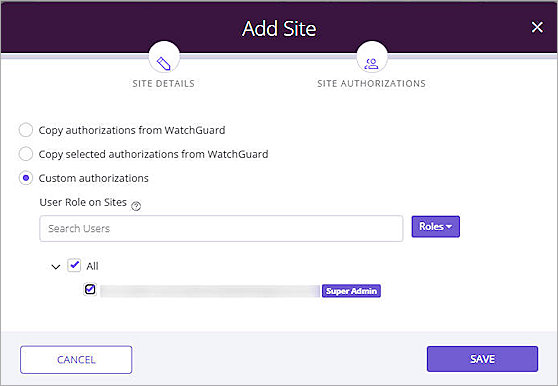
The site authorization setting opens. - Select Custom Authorizations, then select the All check box.
- Click Save.
The new site appears on the All Sites page. - From the Sites list, select the site you added. In this example, we select WGECO.
The collector setup wizard opens. - Download the appropriate Auvik collector and install it on a computer.
The Auvik collector connects to the Auvik Cloud, and the Auvik Collector Status changes to Online.The computer on which you install Auvik Collector must be in the same subnet as the WatchGuard access point.


Auvik SNMP Credential Settings
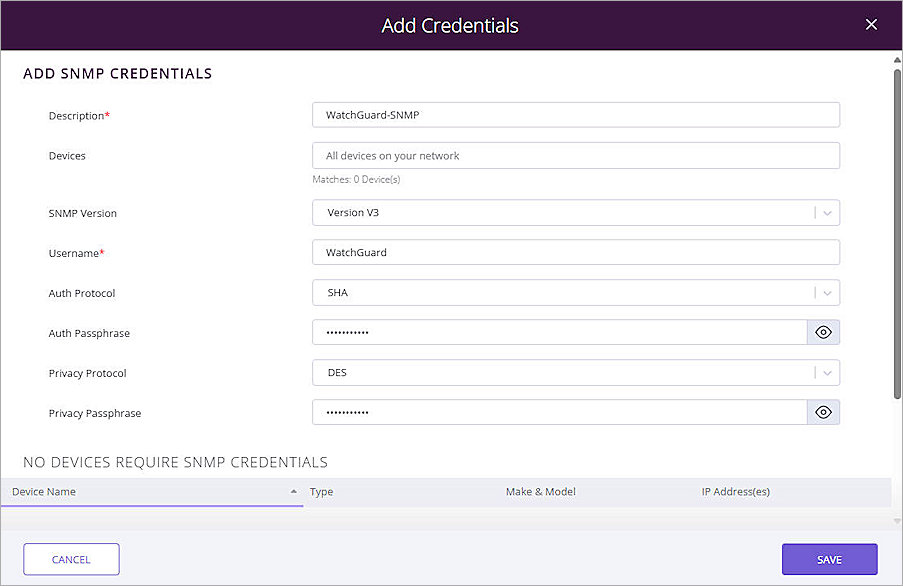
To configure the SNMP credential settings in Auvik:
- On the All Sites page, select the site you added Install Auvik Collector. In this example, we select WGECO.
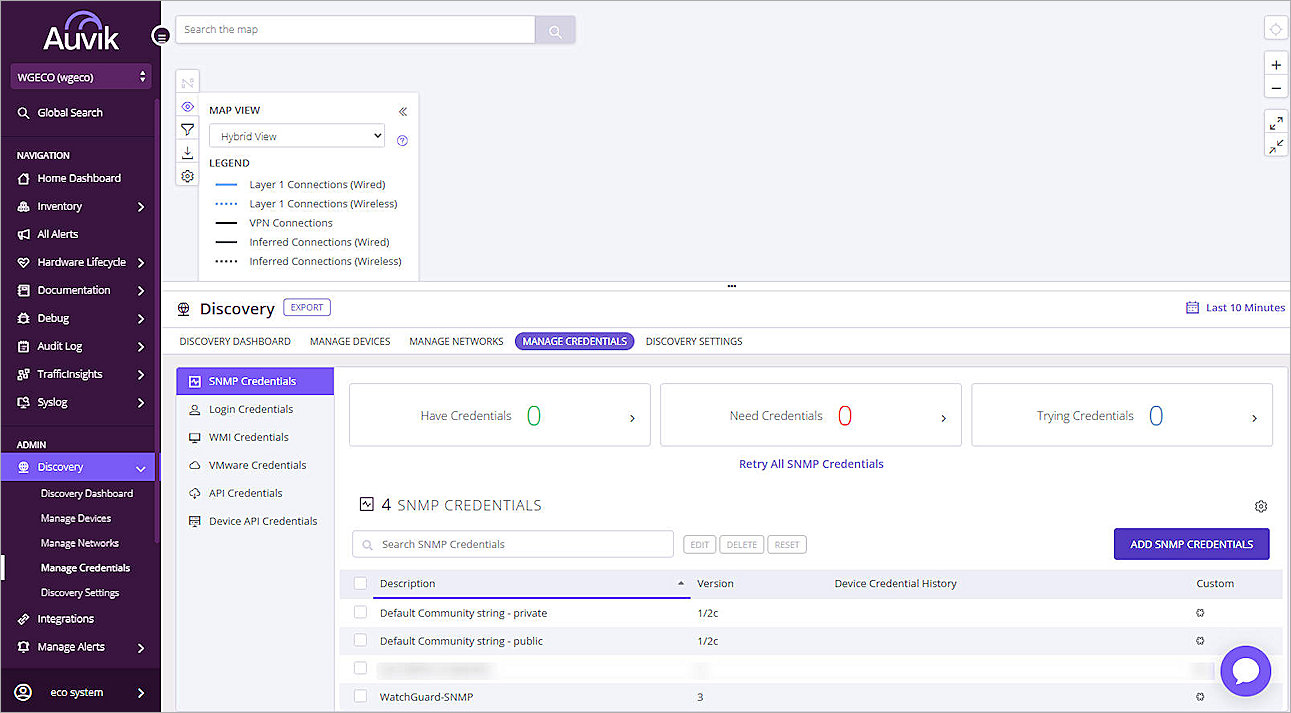
The site page opens. - From the navigation menu, select Discovery > Manage Credentials.
- Select SNMP Credentials.
- Click Add SNMP Credentials.
The Add Credentials dialog box opens. - In the Description text box, type a description for the SNMP credentials.
- From the SNMP Version drop-down list, select Version V3.
- In the Username text box, type the same user name you configured in Configure SNMP for Access Points. In this example, we type WatchGuard.
- From the Auth Protocol drop-down list, select SHA.
- In the Auth Passphrase text box, type an authentication password.
- From the Privacy Protocol drop-down list, select DES.
- In the Privacy Passphrase text box, type a privacy password.
- Click Save.
- Click Done.
The new SNMP credential appears on the SNMP Credentials page.

Add Auvik SNMP Poller
To add an SNMP Poller in Auvik:
- On the All Sites page, select the site you added in Install Auvik Collector. In this example, we select WGECO.
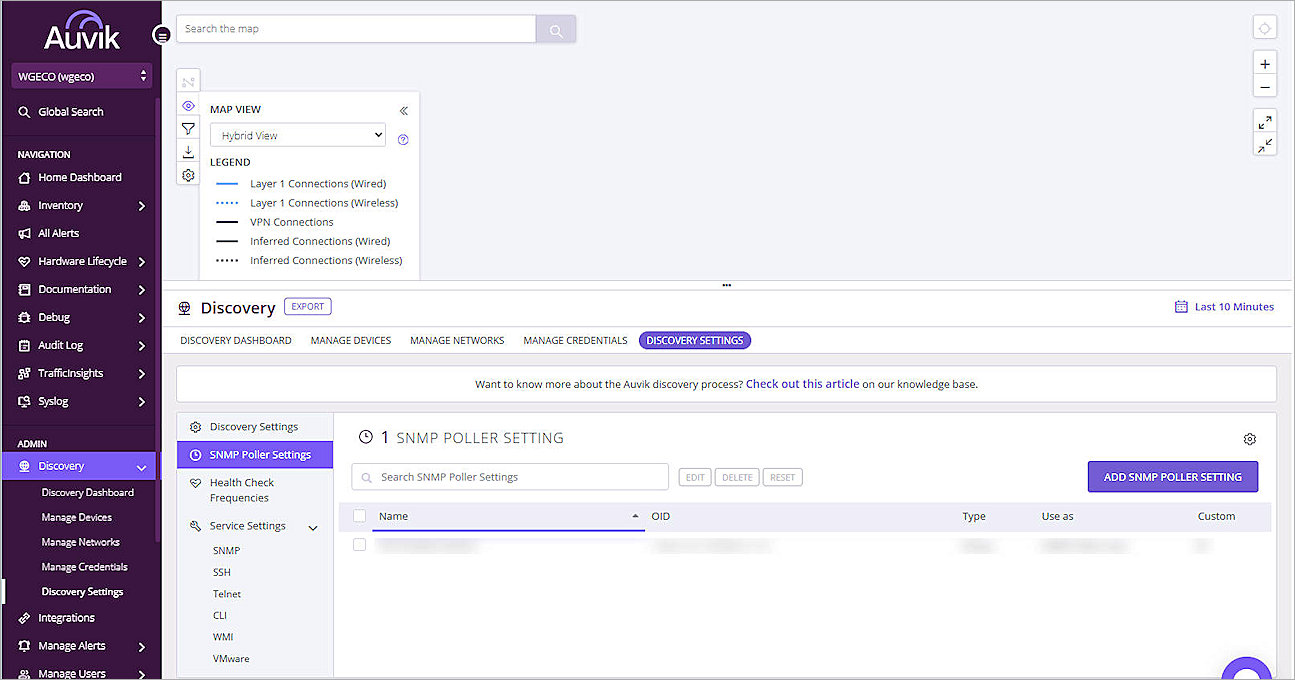
- From the navigation menu, select Discovery > Discovery Settings.
- Select SNMP Poller Settings.
The SNMP Poller Settings page opens. - Click Add SNMP Poller Setting.
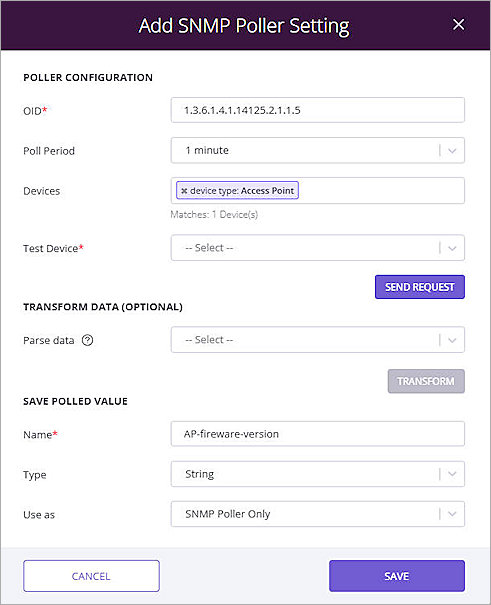
The Add SNMP Poller Setting dialog box opens. - In the OID text box, type the specific OID that you want to poll from the access point. In this example, we type 1.3.6.1.4.1.14125.2.1.1.5. This is the WatchGuard access point firmware version OID. For more information about the WatchGuard Access Point MIB File Summary, go to, Configure SNMP for Access Points.
- From the Poll Period drop-down list, select a poll period. In this example, we select 1 minute.
- (Optional) To filter the device list, in the Devices text box, select a filter. In this example, we select Access Point.
By default, the filter you select applies to all the devices on your network.
- In the Name text box, type a name for this poller. In this example, we type AP-Firmware-Version.
- From the Type drop-down list, select String.
- From the Use As drop-down list, select SNMP Poller Only.
- Keep the default values for the Parse Data and Test Device drop-down lists.
- Click Save.
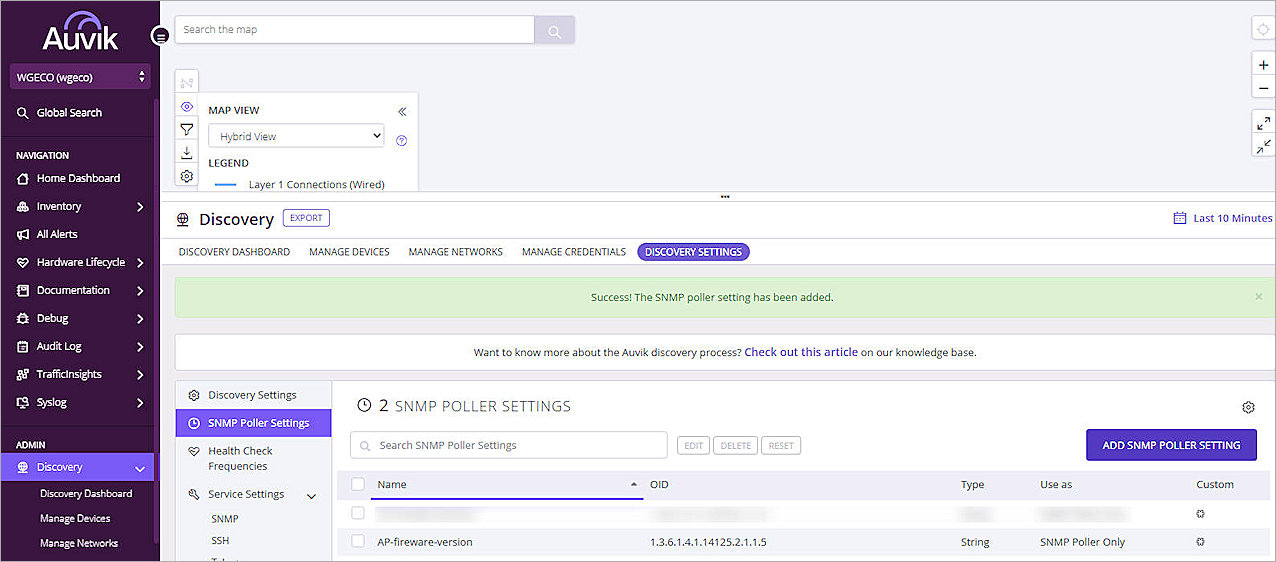
The new SNMP poller appears on the SNMP Poller Settings page.
Test the Access Point and Auvik Integration
To test Auvik integration with the WatchGuard access point:
- Log in to Auvik.
- From the navigation menu, select All Sites.
- From the Sites list, click the WGECO organization name.
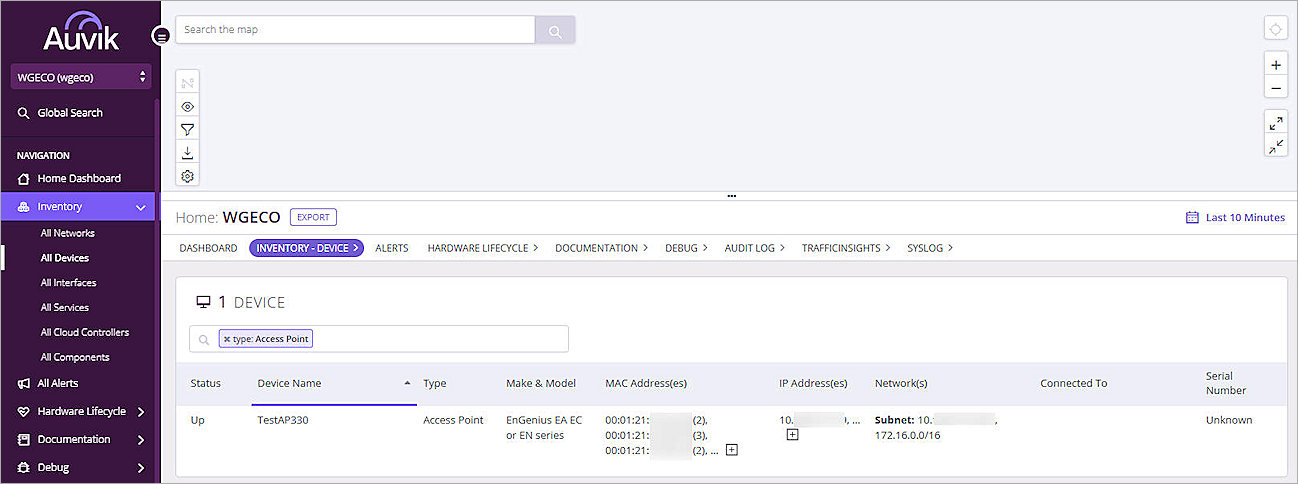
The site page opens. - From the navigation menu, select Inventory > All Devices.
- To search all your access points, in the search box, type Access Point.
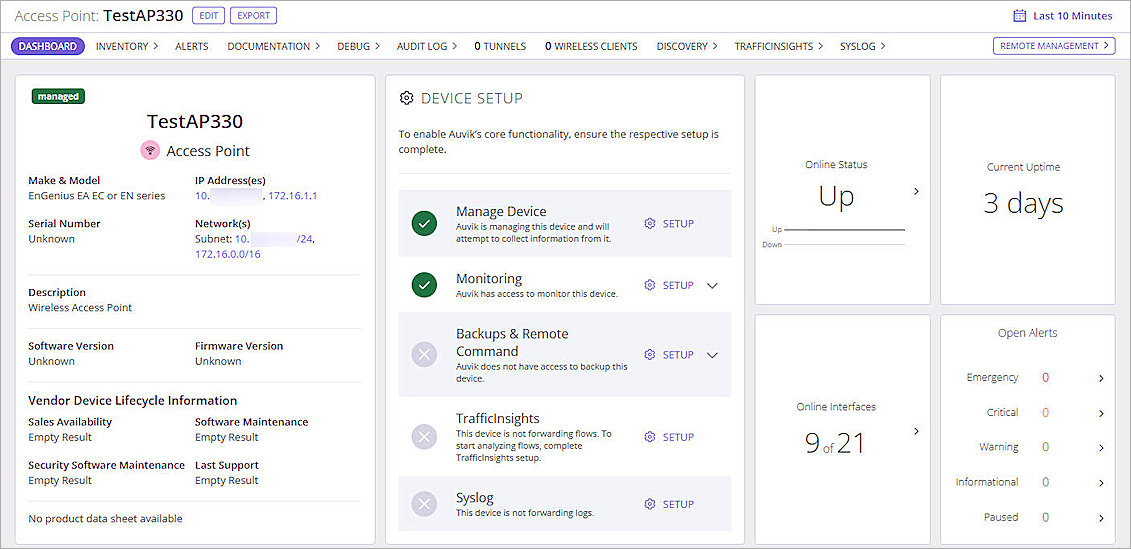
- To see detailed information about a device, click the device name.
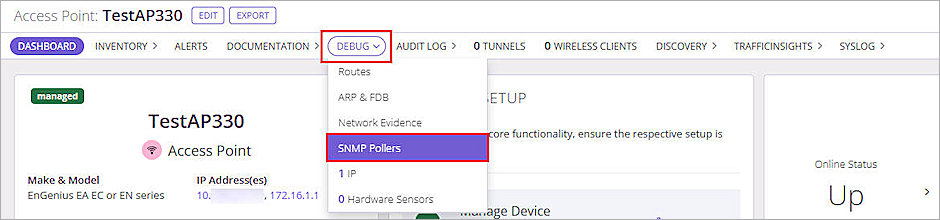
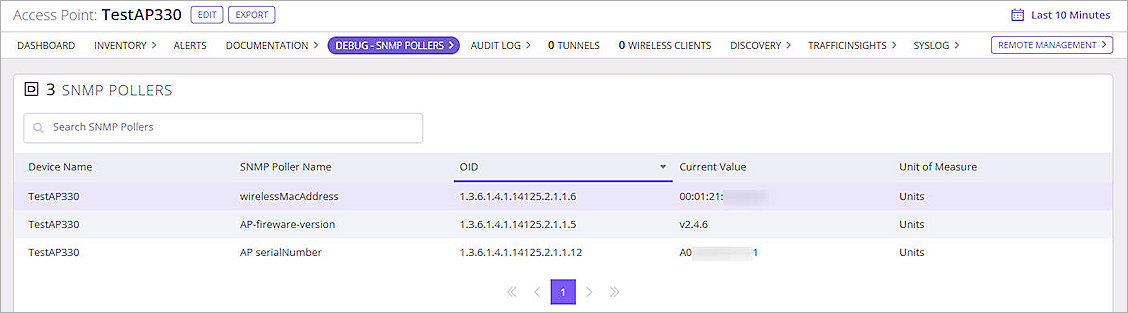
The detailed information about the selected device opens. - From the top navigation bar, select Debug > SNMP Pollers.
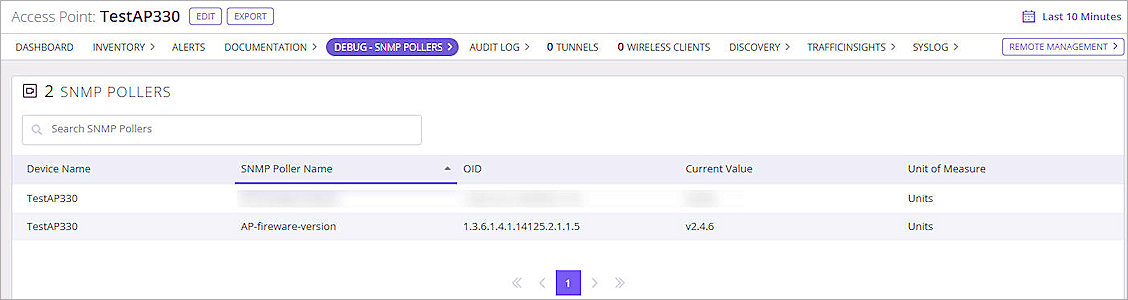
The device SNMP pollers page opens. - If you cannot see the current value of this poller, wait for the SNMP poll to complete. The waiting time depends on the Poll Period value you set in Add Auvik SNMP Poller.
- (Optional) You can add additional SNMP pollers to get more information from the access point.