WatchGuard provides integration instructions to help our customers configure WatchGuard products to work with products created by other organizations. If you need more information or technical support about how to configure a third-party product, go to the documentation and support resources for that product.
This document describes how to integrate Fastvue with your WatchGuard Firebox to gain visibility into your network traffic, web usage, and user activity.
Contents
Integration Summary
The hardware and software used in this guide include:
- WatchGuard Firebox
- Fireware v12.11 or higher
- Windows server
- Fastvue Reporter for WatchGuard
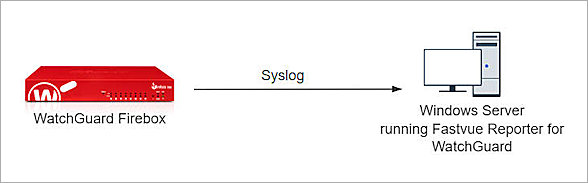
Integration Topology
This diagram outlines the topology used for the Fastvue Reporter and WatchGuard Firebox integration.
Before You Begin
Before you begin these procedures, make sure that:
- You have a Fastvue account
Firebox Configuration
This example uses the Firebox internal trusted IP address of 192.168.150.1 and the Windows server at 192.168.150.3.
Syslog logging output from the WatchGuard Firebox is unencrypted. We recommend that you do not send unencrypted log messages on public networks.
Enable Syslog
To enable Syslog for your Cloud-managed Firebox:
- Log in to WatchGuard Cloud with your WatchGuard Cloud operator account credentials.
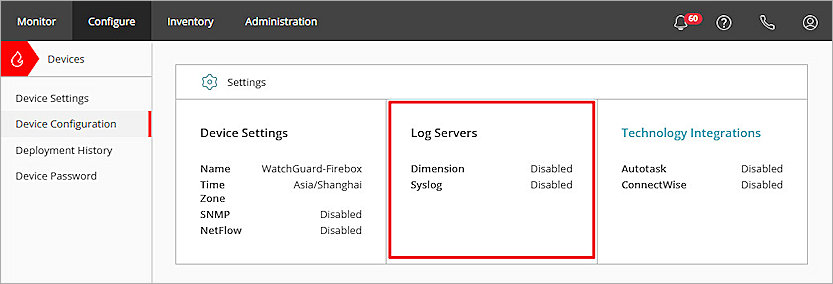
If you log in with a Service Provider account, you must select a Subscriber account from Account Manager. - Select Configure > Devices, then select the cloud-managed Firebox.
- Select Device Configuration.
The Firebox Device Configuration page opens. - Click the Log Servers tile.
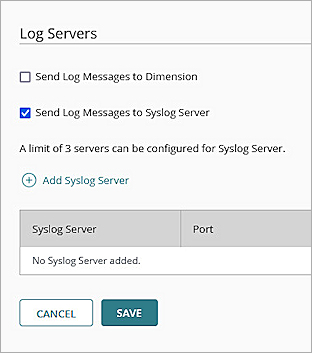
The Log Servers page opens. If the device is subscribed to a template that includes a log server, you cannot edit the page. To edit the page, you must remove the template. - Select the Send Log Messages to Syslog Server check box.
- Click Add Syslog Server.
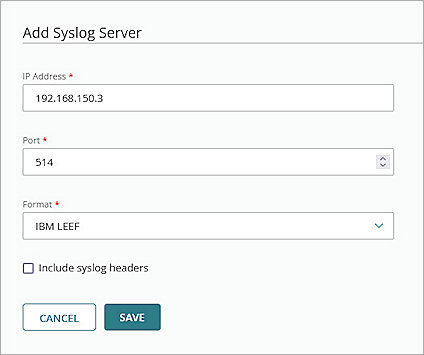
The Add Syslog Server page opens. - In the IP Address text box, type the IP address of your Windows server.
- In the Port text box, keep the 514 as default.
- From the Format drop-down list, select IBM LEEF.
- Clear the Include syslog headers check box.
- Click Save to save the Syslog Server configuration.
- Click Save to save the Log Servers configuration.
- To apply the configuration to your Firebox, in the message banner, click Schedule Deployment.
The Schedule Deployment dialog box opens. - Select Deploy changes now.
- In the Description text box, type a description for the deployment. For this example, we entered Configure Syslog for Fastvue.
- Click Deploy.
- Click Close.

Configure Outbound Policy
You can configure an Outbound policy to log all outbound traffic on your Firebox and report it to Fastvue.
To configure an outbound policy for your cloud-managed Firebox:
- Log in to WatchGuard Cloud with your WatchGuard Cloud operator account.
If you log in with a Service Provider account, you must select a Subscriber account from the Account Manager. - Select Configure > Devices, then select the cloud-managed Firebox.
- Select Device Configuration.
- Click the Firewall Policies tile.
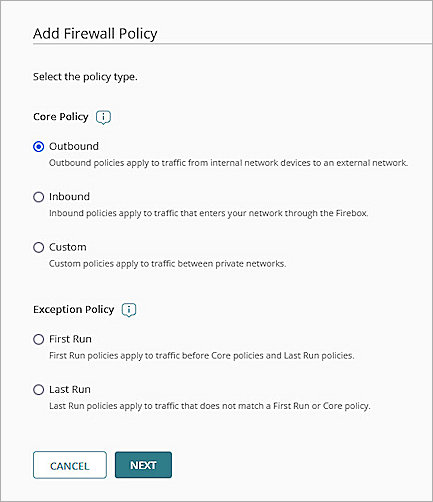
The Firewall Policies page opens. - Click Add Firewall Policy.
The Add Firewall Policy page opens. - Select Outbound.
- Click Next.
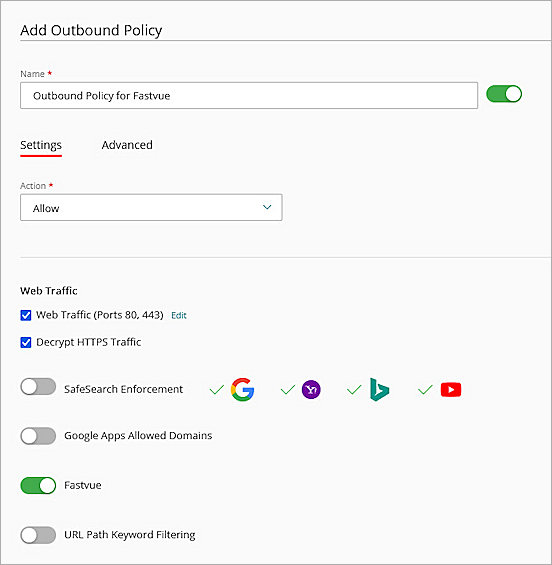
The Add Outbound Policy page opens. - In the Name text box, enter a name for the policy.
- Select the Settings tab
- In the Action drop-down list, select Allow.
- In the Web Traffic section, select the Web Traffic (Ports 80, 443) and Decrypt HTTPS Traffic check boxes.
- Enable the Fastvue toggle.
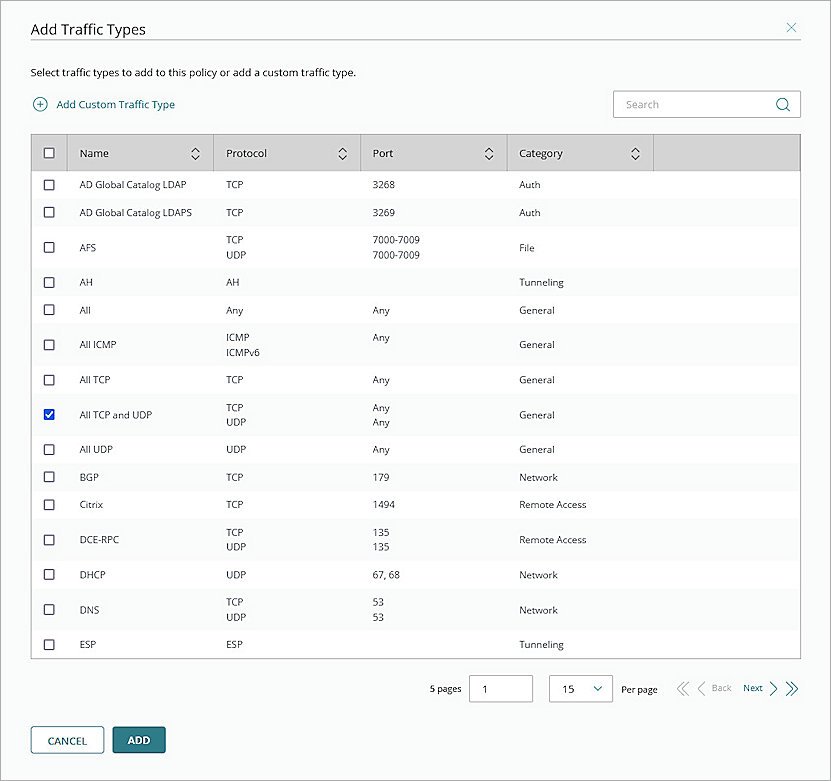
- In the Traffic Types section, click Add Traffic Types.
The Add Traffic Types page opens. - From the traffic types list, select All TCP and UDP.
- Click Add.
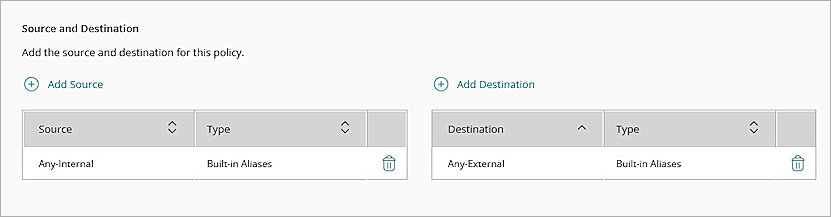
- In the Source and Destination section, click Add Source.
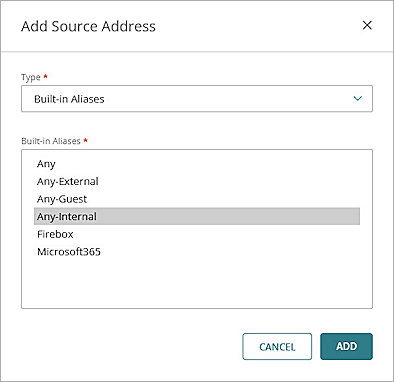
The Add Source Address dialog box opens. - In the Type drop-down list, select Built-in Aliases.
- From the Built-in Aliases drop-down list, select Any-Internal.
- Click Add.
- In the Source and Destination section, click Add Destination.
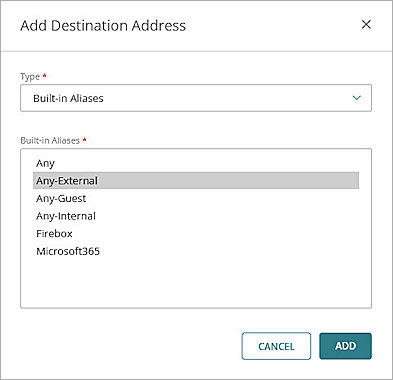
The Add Destination Address dialog box opens. - From the Type drop-down list, select Built-in Aliases.
- From the Built-in Aliases drop-down list, select Any-External.
- Click Add.
- Leave all other settings as their default values.
- Click Save to save the policy.
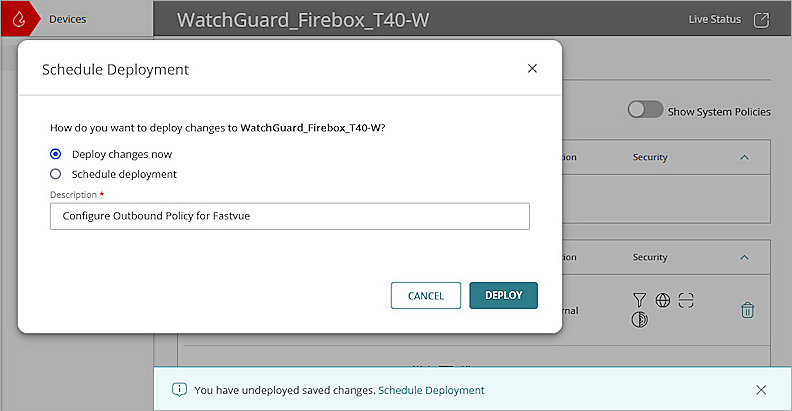
- To apply the configuration to your Firebox, in the message banner, click Schedule Deployment.
The Schedule Deployment dialog box opens. - Select Deploy changes now.
- In the Description text box, enter a description for the deployment. For this example, we entered Configure Outbound Policy for Fastvue.
- Click Deploy.
- Click Close.
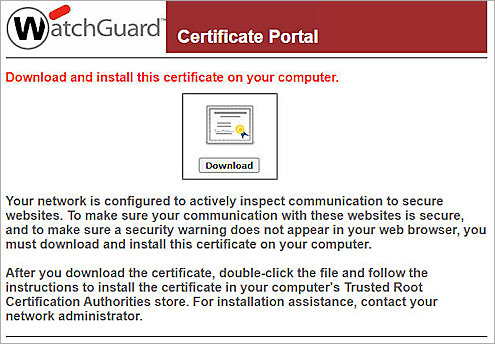
Install WatchGuard Proxy Authority Certificate
- Download the Proxy Authority certificate used for content inspection from the Certificate Portal at <Firebox Internal IP address>:4126/certportal, and install the certificate on the computer you want to do content inspection on.
Install the Proxy Authority certificate with your Trusted Root Certification Authorities, and restart the browser after installation.
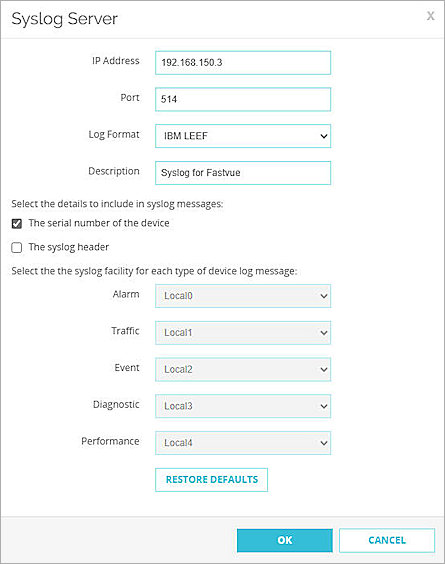
Enable Syslog
To enable syslog for your Firebox:
- Log in to Fireware Web UI at:
https://<your Firebox IP address>:8080 - Select System > Logging.
The Logging page opens. - Select the Syslog Server tab.
- Select the Send Log Messages to These Syslog Servers check box.
- Click Add.
The Syslog Server dialog box opens. - In the IP Address text box, type the IP address of your Windows server.
- In the Port text box, type 514. This is the default port of the Syslog protocol.
- From the Log Format drop-down list, select IBM LEEF.
- In the Description text box, enter a description to describe this syslog server.
- Select the The serial number of the device check box.
- Clear the The syslog header check box.
- Click OK.
- Click Save.
Configure Referer and Content Type Logging
To use Fastvue Site Clean technology, you must configure your Firebox to log referrer URLs and content types.
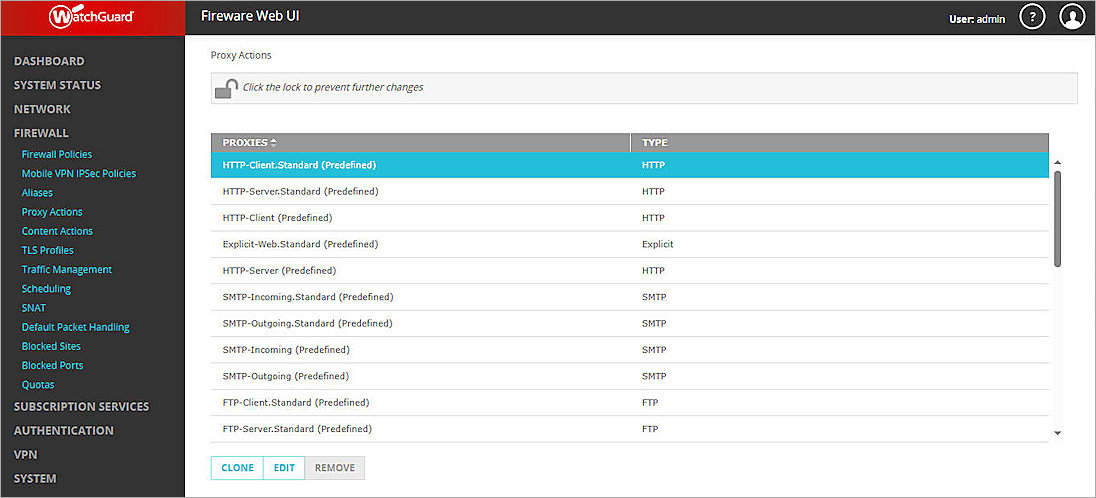
To configure referer and content type logging for HTTP Request:
- Log in to Fireware Web UI at:
https://<your Firebox IP address>:8080 - Select Firewall > Proxy Actions.
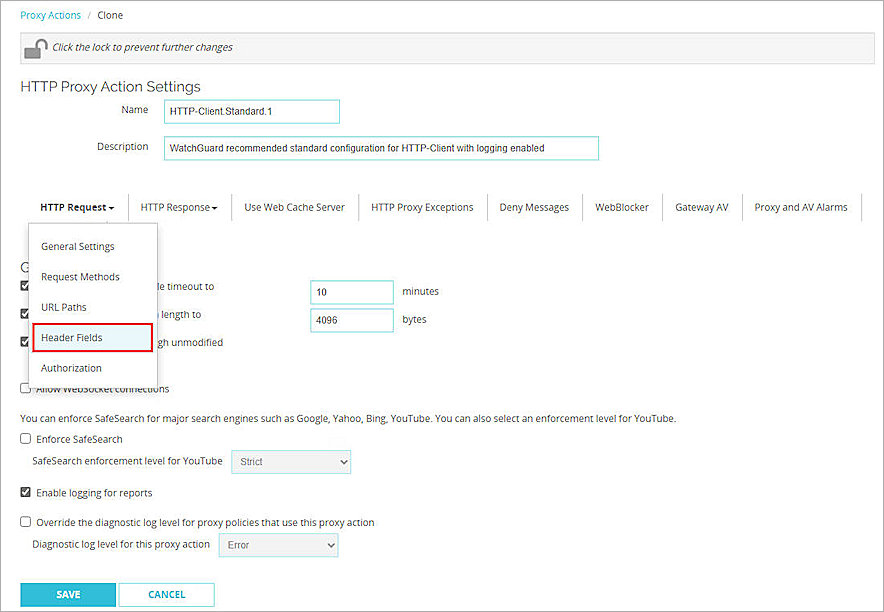
The Proxy Actions page opens - Select HTTP-Client.Standard (Predefined) and click Clone to clone a new HTTP proxy action template.
The Clone page opens - From the HTTP Request drop-down list, select Header Fields.
- Click Add.
The Add Rule dialog box opens. - Type Content-Type:* in both the Rule name and Value text boxes.
- From the Match type drop-down list, select Pattern Match.
- From the Action drop-down list, select Allow.
- Select the Log check box.
- Click OK.
- In the table, select the Enabled and Log check boxes for the rule named Referer:*.
- Click Save.
- (Optional) You can clone and set up proxy actions to better inspect your network. For the rest of this section, we outline an example configuration for an HTTPS-Client proxy action. For more information on proxy actions, go to WatchGuard Fireware Proxies.
- Select Firewall > Proxy Actions.
- Select HTTPS-Client.Standard (Predefined), then click Clone to clone a new HTTPS proxy action template.
The Clone page opens. - In the Domain Names section, click Add to add a new Domain Name for content inspection.
The Add Rule dialog box opens. - Click Save.
- (Optional) You can clone and set up proxy actions to better inspect your network. For the rest of this section, we outline an example configuration for an HTTPS-Client proxy action. For more information on proxy actions, go to WatchGuard Fireware Proxies.
- Select Firewall > Proxy Actions.
- Select HTTPS-Client.Standard (Predefined), then click Clone to clone a new HTTPS proxy action template.
The Clone page opens. - In the Domain Names section, click Add to add a new Domain Name for content inspection.
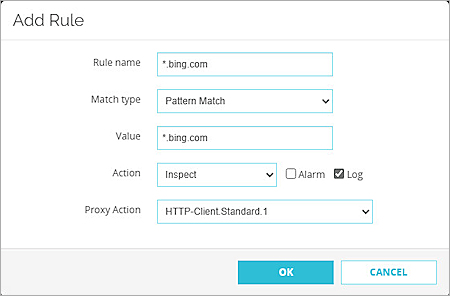
The Add Rule dialog box opens. - In the Rule Name and Value text boxes, enter a pattern of a domain in which you want to do a content inspection. For this example, we used *.bing.com.
- From the Match Type drop-down list, select Pattern Match.
- From the Action drop-down list, select Inspect.
- Select the Log check box.
- From the Proxy Action drop-down list, select the HTTP proxy action you just created. In this example, we selected HTTP-Client.Standard.1.
- Keep the default values for all other settings.
- Click OK.
- Repeat steps 16 through 23 to add more domain names.
- Click Save.


Configure Proxy Policy
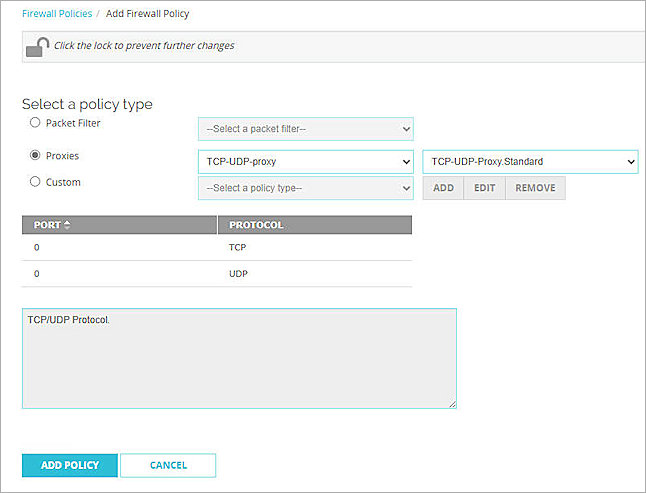
You can configure a TCP-UDP-Proxy to log all outbound traffic on your Firebox and report it to Fastvue.
To configure TCP-UDP-Proxy:
- Log in to Fireware Web UI at:
https://<Firebox IP Address>:8080 - Select Firewall > Firewall Policies.
The Policies page opens. - Click Add Policy.
The Add Firewall Policy page opens. - In the Select a policy type section, select Proxies.
- From the Select a proxy drop-down list, select TCP-UDP-proxy.
- From the Select a Proxy action drop-down list, select TCP-UDP-Proxy.Standard.
- Click Add Policy.
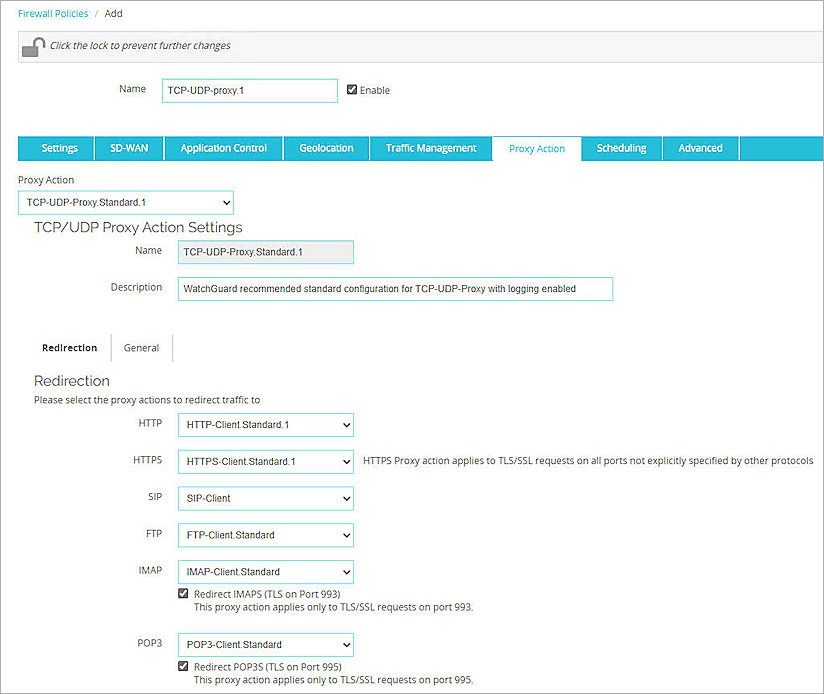
The Add page opens. - Select the Proxy Action tab.
- From the Proxy Action drop-down list, select Clone the current proxy action.
- From the HTTP drop-down list in the Redirection section, select the HTTPS-Client proxy action you just added. In this example, we selected HTTP-Client.Standard.1.
- (Optional) You can change the proxy actions of the redirection if you have other customized proxy actions. In this example, we selected HTTPS-Client.Standard.1 from the HTTPS drop-down list. For more information on proxy actions, go to About Proxy Actions.
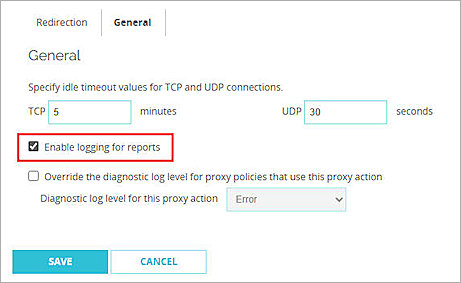
- Select the General tab.
- Select the Enable logging for reports check box.
- Keep the default values for all other settings.
- Click Save.
- (Optional) If you configured a custom HTTPS redirection, download the Proxy Authority certificate used for content inspection from the Certificate Portal at <Firebox Internal IP address>:4126/certportal, and install the certificate on the computer you want to do content inspection on.
Install the Proxy Authority certificate with your Trusted Root Certification Authorities, and restart the browser after installation.
Configure Fastvue Reporter for WatchGuard
Use these instructions to install and configure Fastvue Reporter for WatchGuard on your Windows server:
- Log in to your Fastvue account.
- On the Fastvue Downloads page, click Download to download Fastvue Reporter for WatchGuard.
- Run the installation wizard for Fastvue Reporter for WatchGuard.
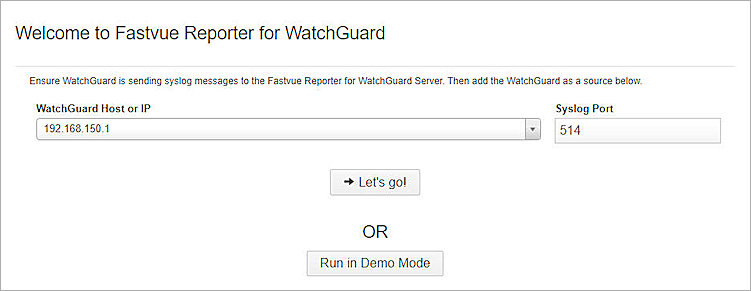
- Open Fastvue Reporter for WatchGuard.
The Fastvue Reporter WebUI is at http://localhost:80 - In the WatchGuard Host or IP text box, enter the Internal IP address of your Firebox.
- Click Let's go!.
Test the Integration
To test the Fastvue integration with WatchGuard Firebox:
- Open Fastvue Reporter for WatchGuard at:
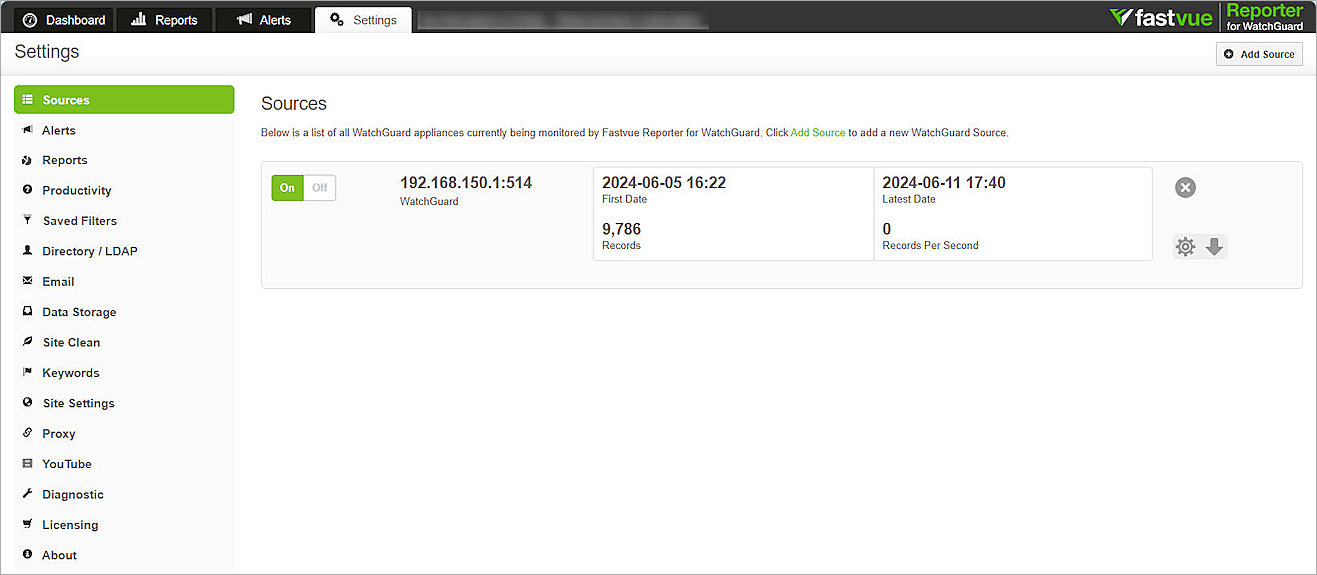
http://<your Windows Server IP address>:80 - Select Settings > Sources to check the records in the source page (it can take several seconds for the records to import).
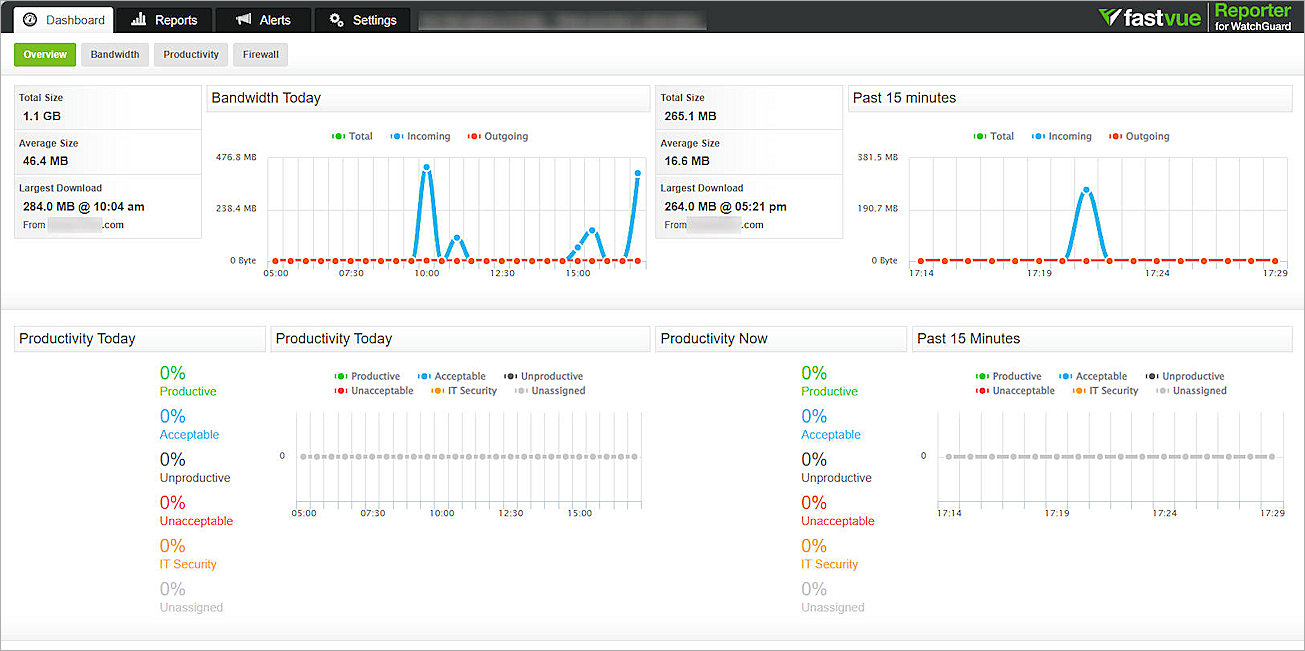
- Select Dashboard > Overview to check the network overview analytical charts.
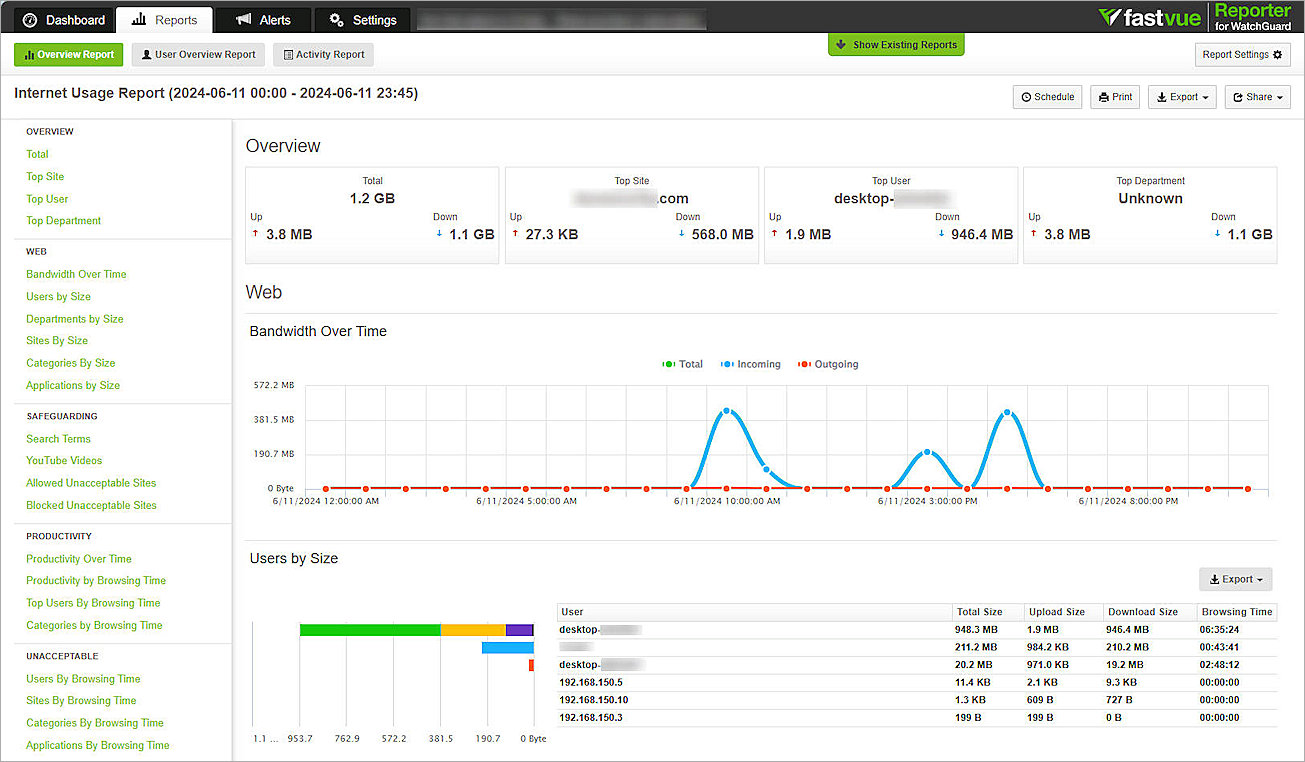
- Select Reports > Overview Report > All Usage.
- Use the Date From and Date To date pickers to select the start and end dates for the report.
- Click Run Report to generate the report.
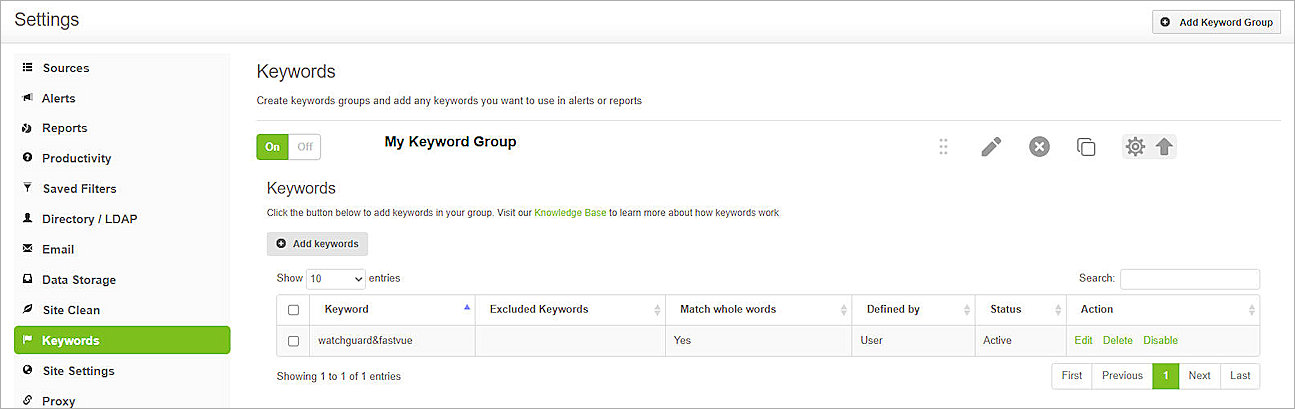
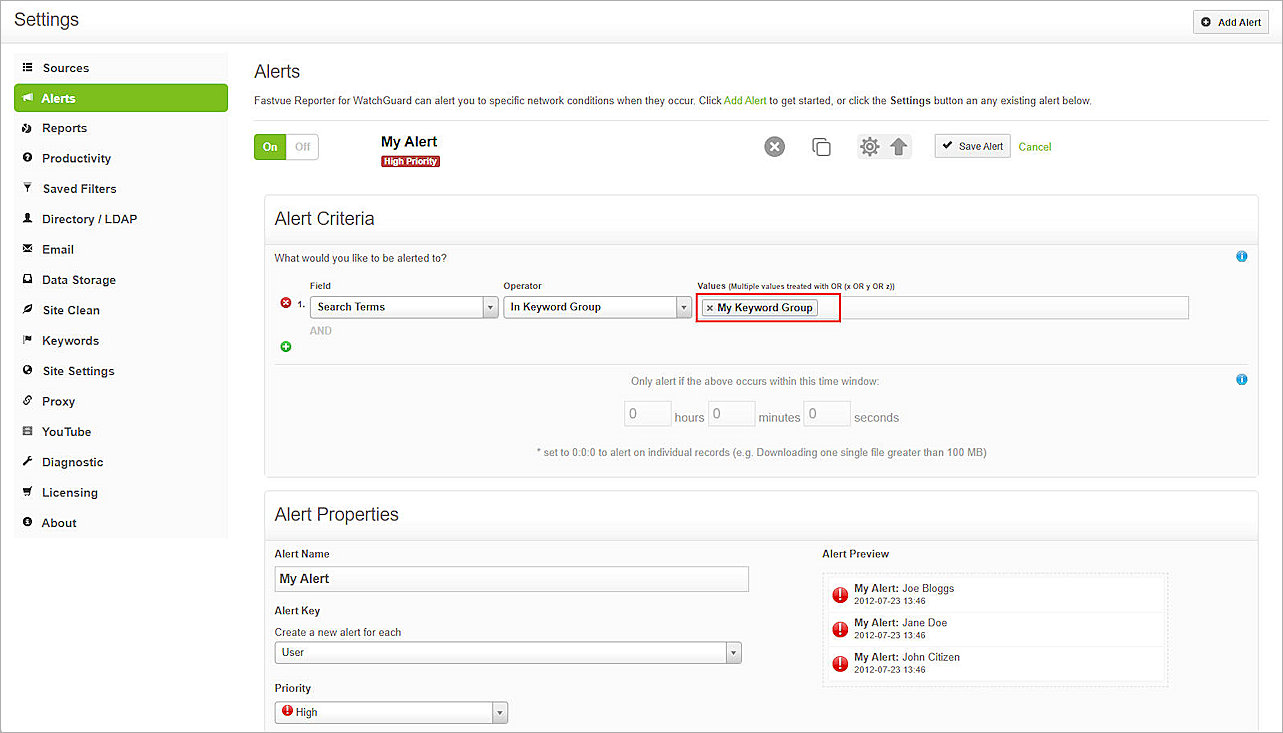
- (Optional) To test content inspection, add a custom keyword group or use the default keyword group. For this example, we added the keywords watchguard&fastvue in the keyword group My Keyword Group.
- (Optional) Add a custom alert with the keyword group you just created.
- (Optional) Use the computer with the Proxy Authority certificate installed to search for the keywords you added and to verify that alerts appear. In this example, we use Microsoft Bing to search for the keywords watchguard&fastvue.