Deployment Overview
This document describes the steps to integrate WatchGuard Email Protection with Microsoft Exchange.
Contents
Platform and Software
The platform and software used in this integration include:
- WatchGuard Email Protection administrative account
- Microsoft Exchange Server 2019
- DNS hosting provider
Before You Begin
Before you complete the procedures in this document, make sure that:
- You have a domain that is managed by your DNS hosting provider.
- You add Microsoft Exchange Server MX/TXT records in the DNS hosting provider.
- Your Microsoft Exchange Server 2019 can send email messages to an external mailbox and receive email messages from an external mailbox.
Add the Domain to Email Protection
To add your domain to Email Protection:
- Log in to Email Protection as an administrator.

- From the Scope Selection drop-down list, select the company domain you want to configure the Microsoft Exchange Server as a destination server for.
- From the navigation menu, select Customer Settings > Domains.
The Customer Settings - Domains page opens.
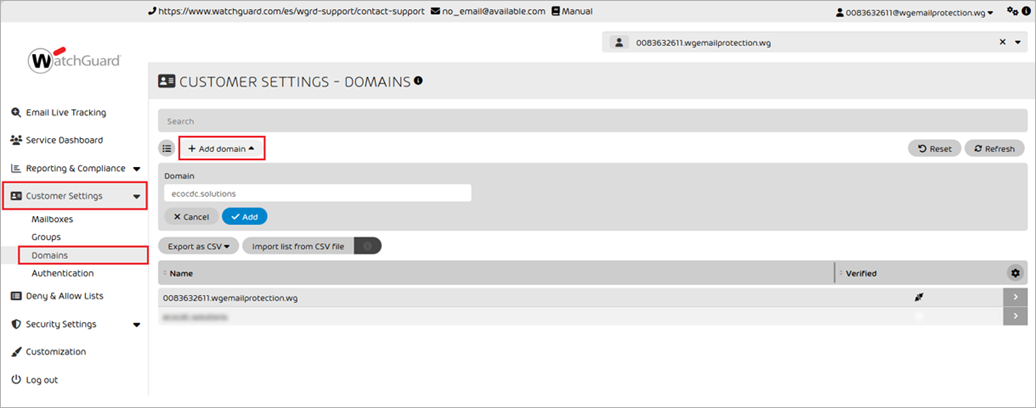
- Click Add Domain.
- In the Domain text box, type the name of the domain. Click Add.
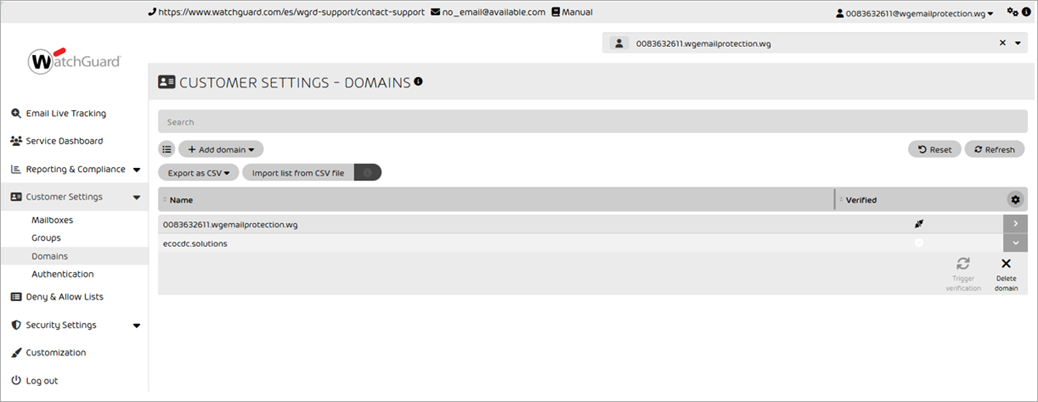
- Next to the new domain, click
 .
.
A menu opens. - To verify that the MX records point to Email Protection, click Trigger Verification.
If the domain passes verification, the domain status shows as Verified.
Add a Mailbox to Email Protection
To add a mailbox to Email Protection:
- From the navigation menu, select Customer Settings > Mailboxes.
The Customer Settings - Mailboxes page opens. - Click Add Mailbox.
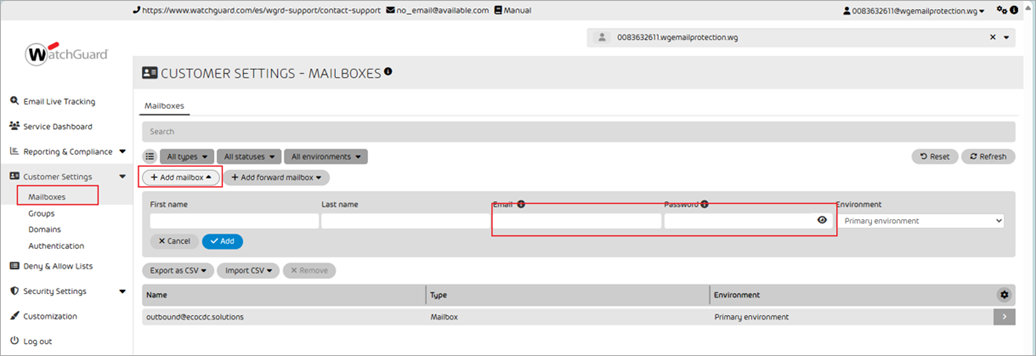
- In the Email text box, type an email address. The domain for the email address must be the same as the domain you added in Add the Domain to Email Protection.
- In the Password text box, type a password.
- Click Add.
The mailbox shows in the list.
Configure Spam and Malware Protection
To configure Spam and Malware Protection in Email Protection:
- From the navigation menu, select Security Settings > Spam and Malware Protection.
The Security Settings - Spam and Malware Protection page opens.
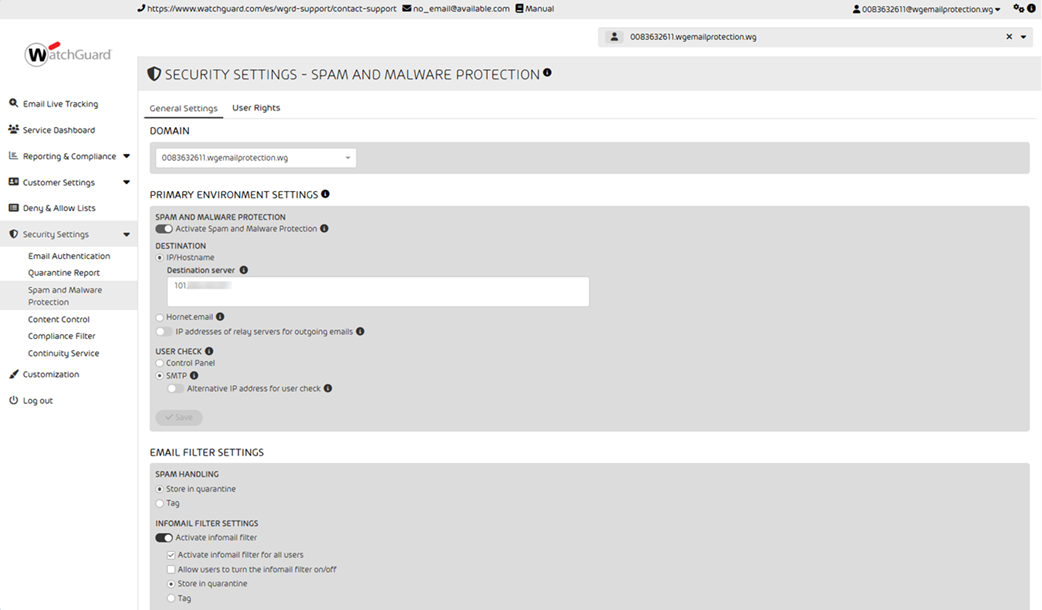
- Select the General Settings tab.
- From the Domain drop-down list, select the alias domain you want to activate Spam and Malware Protection for.
- From the Primary Environment Settings > Destination section, select IP/Hostname.
- In the Destination Server text box, type the domain or Exchange Server IP address. For example, we typed the Exchange Server IP address. When you update the destination server IP address, it might take some time to complete.
- If you configure the outgoing traffic relay in the server, enable IP Addresses of Relay Servers for Outgoing Emails.
- In the text box, type the IP addresses of the server that sends the outgoing messages to Email Protection.
- Clear the Restrict Email Sending to the Relay Server IP Addresses and Bounce Management (Recommended) check boxes.
- From the User Check section, select SMTP.
- Disable Alternative IP Address for User Check.
- Click Save.
- From the Email Filter Settings section, keep the default settings.
Update the Domain MX Record
When you add WatchGuard Email Protection servers to the MX record for your domain, you can route incoming email messages for your domain to WatchGuard servers. WatchGuard Email Protection servers then filter the email messages and forward them to the Microsoft Exchange server. This process takes place before the email messages reach your inbox.
To update the MX record for your domain:
- Log in to your DNS hosting provider. Delete the original MX record.
- Add the WatchGuard Email Protection MX records shown in WatchGuard Email Protection Server MX Records. We recommend that you add all the records with different priorities in each range.

- Add an A-type record for your Microsoft Exchange Server IP address.

Update Domain SPF Records and Activate SPF Check
The Sender Policy Framework (SPF) records of your domains must point to Email Protection SPF records. This authorizes Email Protection to send email messages from your domain. Recipients outside your organization can use the SPF record to perform SPF checks on email messages from your domain.
To update the SPF record and activate SPF check:
- Log in to your DNS hosting provider.
- Add this SPF record: v=spf1 include:spf.hornetsecurity.com ~all

- Wait for the DNS resolution to take effect.
- Log in to Email Protection as an administrator.
- From the Scope Selection drop-down list, select the company domain.
- From the navigation menu, select Security Settings > Email Authentication.
- To refresh the status, click Refresh DNS Settings.
The DNS status settings for the domain show in the table.- A green check mark indicates that the domain settings are correct.
- A yellow exclamation mark icon indicates that no records are set for the domain.
- A red X icon indicates that the domain settings are not correct.
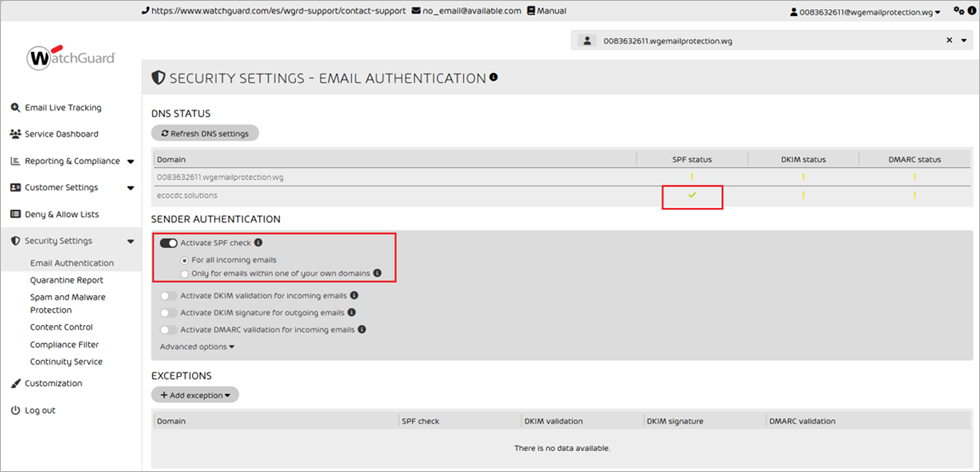
- From the Sender Authentication section, enable Activate SPF Check.
- Select For All Incoming Emails.
Create a Receive Connector for Inbound Email Traffic
To make sure that the Exchange Server does not receive unprocessed email messages by WatchGuard Email Protection services, you must create a receive connector for inbound email traffic. This connector makes sure that the Exchange Server only accepts messages coming from the WatchGuard Email Protection server IP address range. Any email messages that do not originate from WatchGuard Email Protection IP address range are rejected.
To create a receive connector for inbound email traffic:
- Log in to Microsoft Exchange admin center.
- From the navigation menu, select Mail Flow > Receive Connector.
- Disable all original FrontendTransport receive connectors.
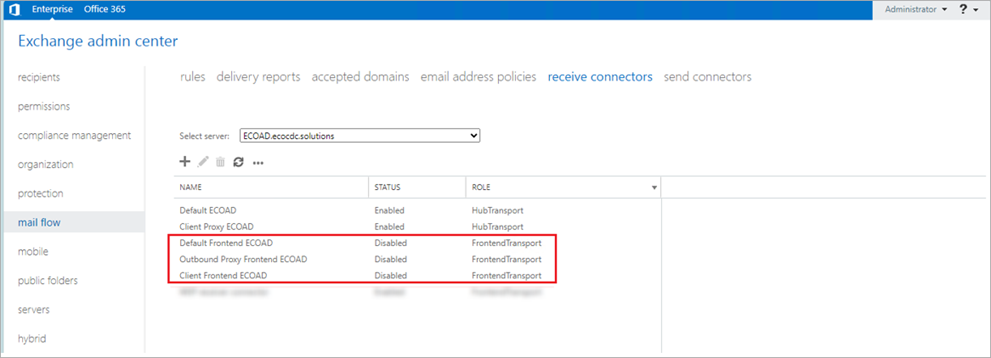
- To add a new receive connection, click
 .
.
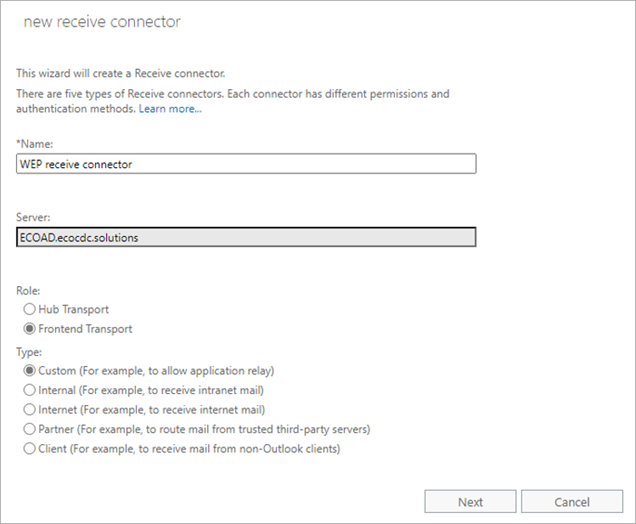
- In the Name text box, type a name.
- From the Role section, select Frontend Transport.
- From the Type section, select Custom (For example, to allow application relay).
- Click Next.
The Network Adapter Bindings dialog box opens.
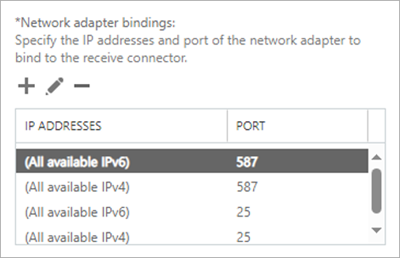
- In the Network Adapter Bindings section, click
 .
. - Add ports 25 and 587 for all available IPv4 and IPv6 addresses.
- Click Next.
The Remote Network Settings dialog box opens.
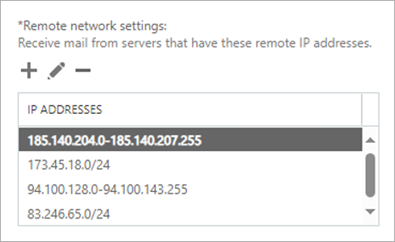
- In the Remote Network Settings section, click
 .
. - Add all IP addresses shown in IP Addresses of WatchGuard Email Protection Servers.
- Click Save.
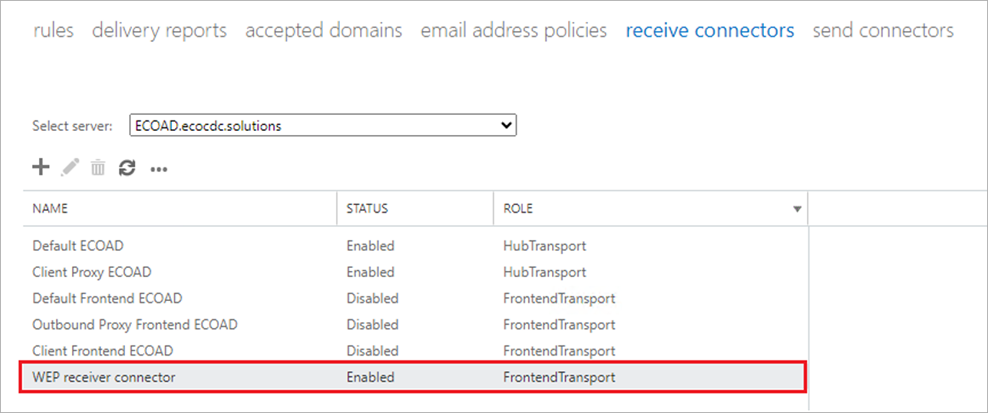
- Double-click the receive connector you added.
- Select Security.
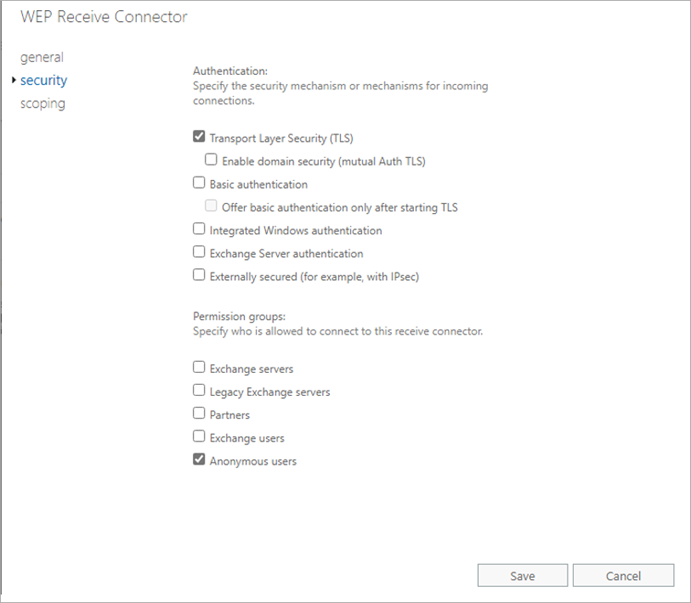
- In the Permission Groups section, enable Anonymous Users.
- Keep the other default settings. Click Save.
Create a Send Connector for Outbound Email Traffic
To prevent email messages sent by your Microsoft Exchange server from being defined as malicious by other external mail servers, you must add a send connector to route all outbound emails through the Email Protection smart host.
To create a send connector for outbound email traffic:
- Log in to Microsoft Exchange admin center.
- From the navigation menu, select Mail Flow > Send Connectors.
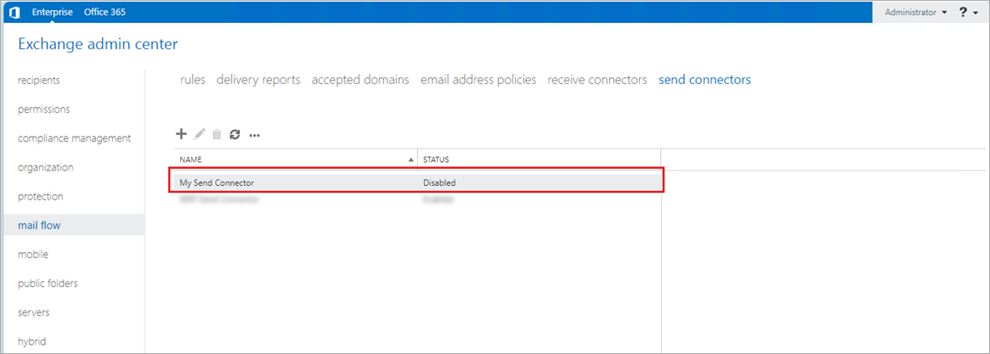
- Disable the original send connectors.
- To add a new send connector, click
 .
.
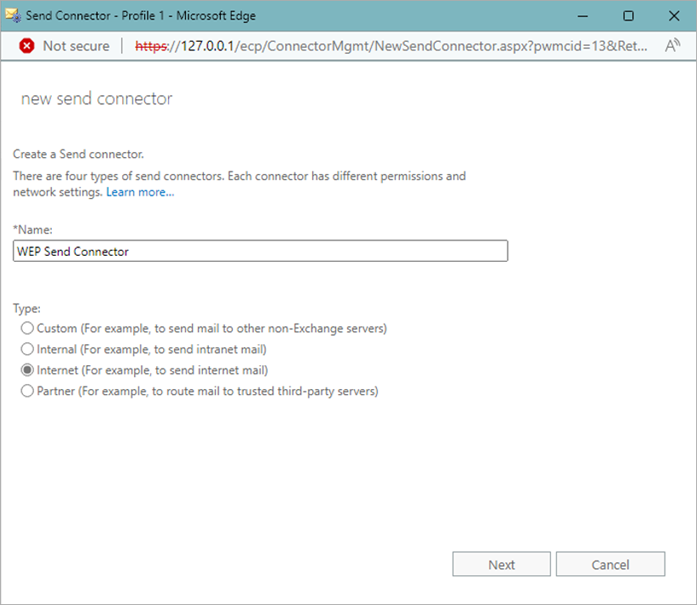
- In the Name text box, type a name.
- From the Type section, select Internet (For example, to send internet mail).
- Click Next.
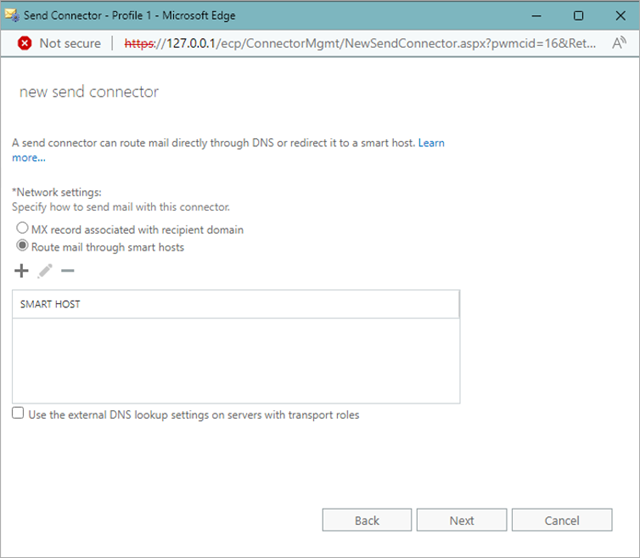
- From the Network Settings section, select Route mail through smart hosts.
- To add a new smart host, click
 .
.

- In the text box, type the domain name for the region:
- United States — relay-cluster-usa01.hornetsecurity.com
- Europe — relay-cluster-eu01.hornetsecurity.com
- Canada — relay-cluster-ca01.hornetsecurity.com
- Click Save.
- Click Next.
The New Send Connector dialog box opens.
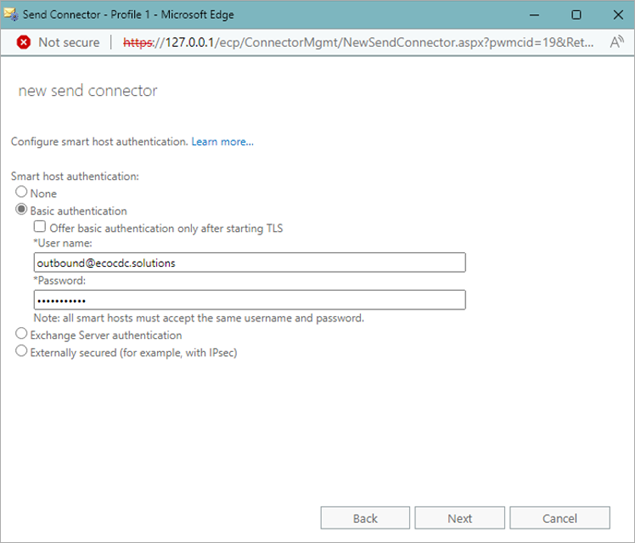
- From the Smart Host Authentication section, select Basic Authentication.
- Type the user name and password you added in Add a Mailbox to Email Protection.
- Click Next.
- To add a new address space, from the Address Space section, click
 .
.
The Add Domain dialog box opens.
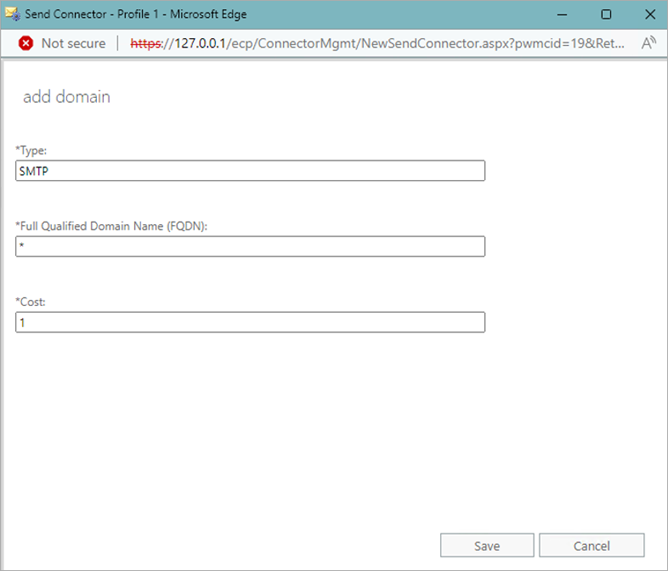
- In the Full Qualified Domain Name FQDR) text box, type *.
- Keep the other default settings. Click Save.
- Click Next.
The Select a Server dialog box opens.
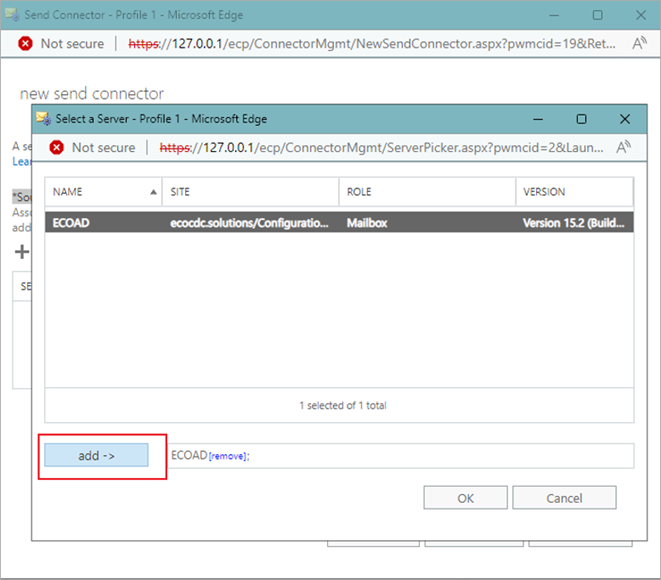
- To add a new source server, from the Source Server section, click
 .
. - Select the source server and click Add.
- Click OK. Click Finish.
Add Recipients to the Microsoft Exchange Server
To test that you can send and receive email messages, you must add recipients to your Microsoft Exchanger server.
To add recipients:
- Log in to Microsoft Exchange admin center.
- From the navigation menu, select Recipients > Mailboxes.
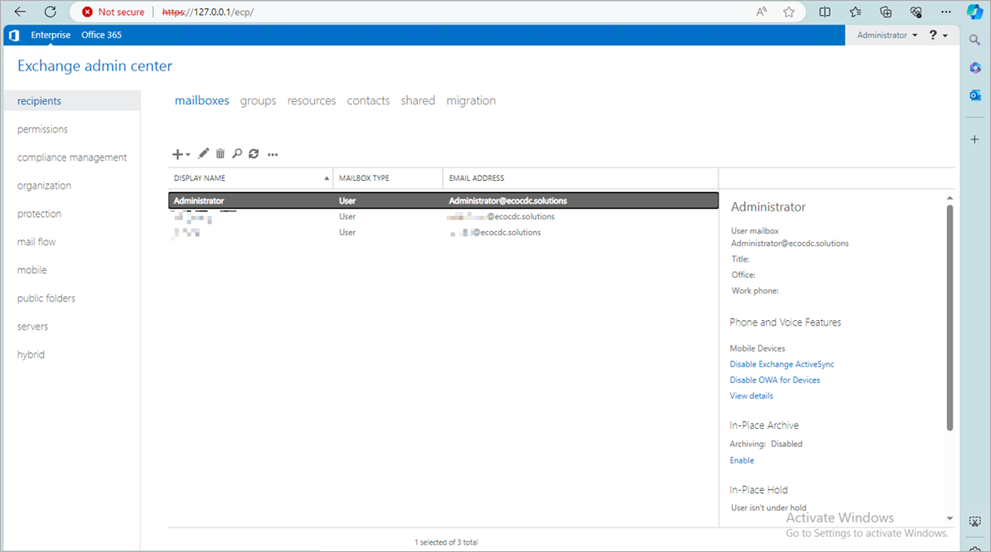
- Click
 .
. - Select User Mailbox.
The New User Mailbox dialog box opens.
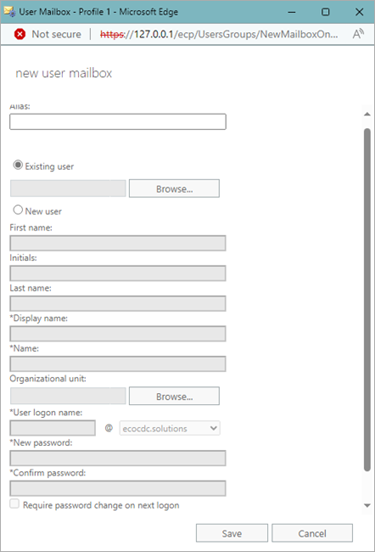
- In the text boxes, type the required user information. Click Save.
Test the Integration
To test the integration:
- Go to https://<your.domain>.
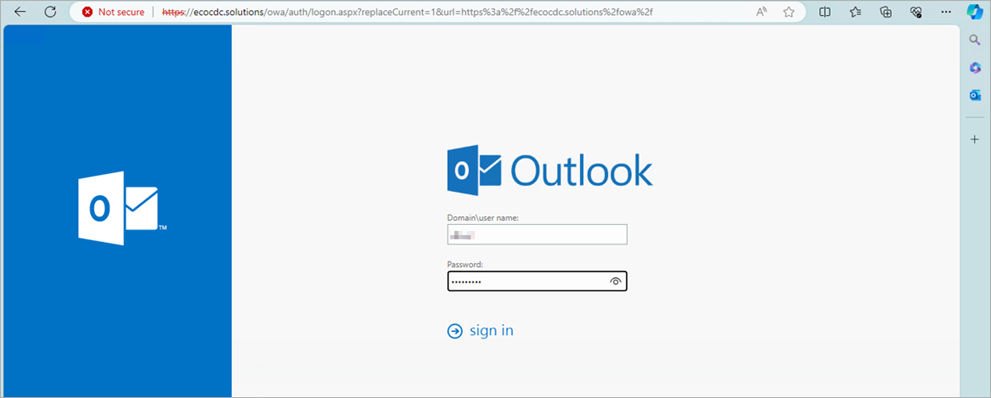
- Log in with the credentials of the recipient you added in Add Recipients to the Microsoft Exchange Server.
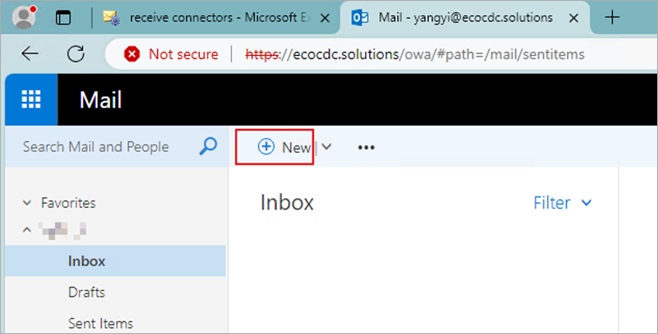
- Send an email message to an external mailbox, for example, [email protected].
- Log in to the external mailbox and verify that you received the email message.
- From the external mailbox, send an email message to your internal mailbox on the Microsoft Exchange Sever.
- In WatchGuard Email Protection, verify that email messages appear in the Email Live Tracking page.
![]()
WatchGuard Email Protection Server MX Records
Europe
The MX records for customers in Europe are:
| Domain | Class | Type | Priority | Email server |
|---|---|---|---|---|
| <domain.tld> | IN | MX | 10 | mx01.hornetsecurity.com |
| <domain.tld> | IN | MX | 20 | mx02.hornetsecurity.com |
| <domain.tld> | IN | MX | 30 | mx03.hornetsecurity.com |
| <domain.tld> | IN | MX | 40 | mx04.hornetsecurity.com |
For customers of the DNS provider 1&1, these MX records apply instead:
| Domain | Class | Type | Priority | Email server |
|---|---|---|---|---|
| <domain.tld> | IN | MX | 10 | mx23a.antispameurope.com |
| <domain.tld> | IN | MX | 20 | mx23b.antispameurope.com |
| <domain.tld> | IN | MX | 30 | mx23c.antispameurope.com |
| <domain.tld> | IN | MX | 40 | mx23d.antispameurope.com |
United States
The MX records for customers in the United States are:
| Domain | Class | Type | Priority | Email server |
|---|---|---|---|---|
| <domain.tld> | IN | MX | 10 | mx-cluster-usa01.hornetsecurity.com |
| <domain.tld> | IN | MX | 20 | mx-cluster-usa02.hornetsecurity.com |
| <domain.tld> | IN | MX | 30 | mx-cluster-usa03.hornetsecurity.com |
| <domain.tld> | IN | MX | 40 | mx-cluster-usa04.hornetsecurity.com |
Canada
The MX records for customers in Canada are:
| Domain | Class | Type | Priority | Email server |
|---|---|---|---|---|
| <domain.tld> | IN | MX | 10 | mx-cluster-ca01.hornetsecurity.com |
| <domain.tld> | IN | MX | 20 | mx-cluster-ca02.hornetsecurity.com |
| <domain.tld> | IN | MX | 30 | mx-cluster-ca03.hornetsecurity.com |
| <domain.tld> | IN | MX | 40 | mx-cluster-ca04.hornetsecurity.com |
IP Addresses of WatchGuard Email Protection Servers
WatchGuard Email Protection Servers IP Address Ranges
| 83.246.65.0/24 | 94.100.128.0/24 | 94.100.129.0/24 | 94.100.130.0/24 | 94.100.131.0/24 |
| 94.100.132.0/24 | 94.100.133.0/24 | 94.100.134.0/24 | 94.100.135.0/24 | 94.100.136.0/24 |
| 94.100.137.0/24 | 94.100.138.0/24 | 94.100.139.0/24 | 94.100.140.0/24 | 94.100.141.0/24 |
| 94.100.142.0/24 | 94.100.143.0/24 | 173.45.18.0/24 | 185.140.204.0/24 | 185.140.205.0/24 |
| 185.140.206.0/24 | 185.140.207.0/24 |
WatchGuard Email Protection Servers IP Address Ranges in Canada
| 108.163.133.224/27 | 199.27.221.64/27 | 209.172.38.64/27 | 216.46.2.48/29 | 216.46.11.224/27 |