Lansweeper is a software tool that provides comprehensive IT asset management, network discovery, and IT inventory capabilities for organizations.
This document describes how to use Lansweeper to discover and monitor your access points managed in WatchGuard Cloud.
Contents
Integration Topology
This diagram outlines the topology used for the Lansweeper and WatchGuard access point integration.

Before You Begin
Before you begin these procedures, make sure that you have:
- Registered a Lansweeper account (additional charges might apply)
- Installed Lansweeper Scanner on your server
- Enabled the Lansweeper Classic web console
- Upgraded your WatchGuard Cloud access points to firmware version v2.4.7 or higher
- Activated your access points with a WatchGuard USP Wi-Fi Management license and added the devices to WatchGuard Cloud
For more information about how to set up Lansweeper for the first time, go to Install the Lansweeper Cloud-first trial.
For more information about how to enable the Lansweeper Classic web console, go to Enable the Lansweeper Classic web console.
Configure SNMP for Access Points
Before you can use Lansweeper to discover a WatchGuard access point, you must configure SNMP settings for the device.
For more information about how to configure SNMP for your access points in WatchGuard Cloud and view the details of the SNMP MIB file, go to Configure SNMP for Access Points.
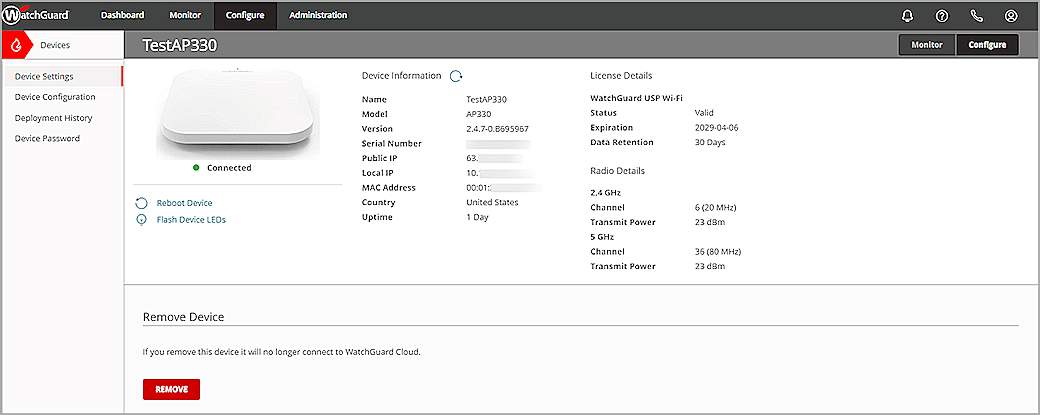
- Log in to WatchGuard Cloud.
- Select Configure > Devices.
- Select the access point.
The Device Settings page opens. - Select Device Configuration.
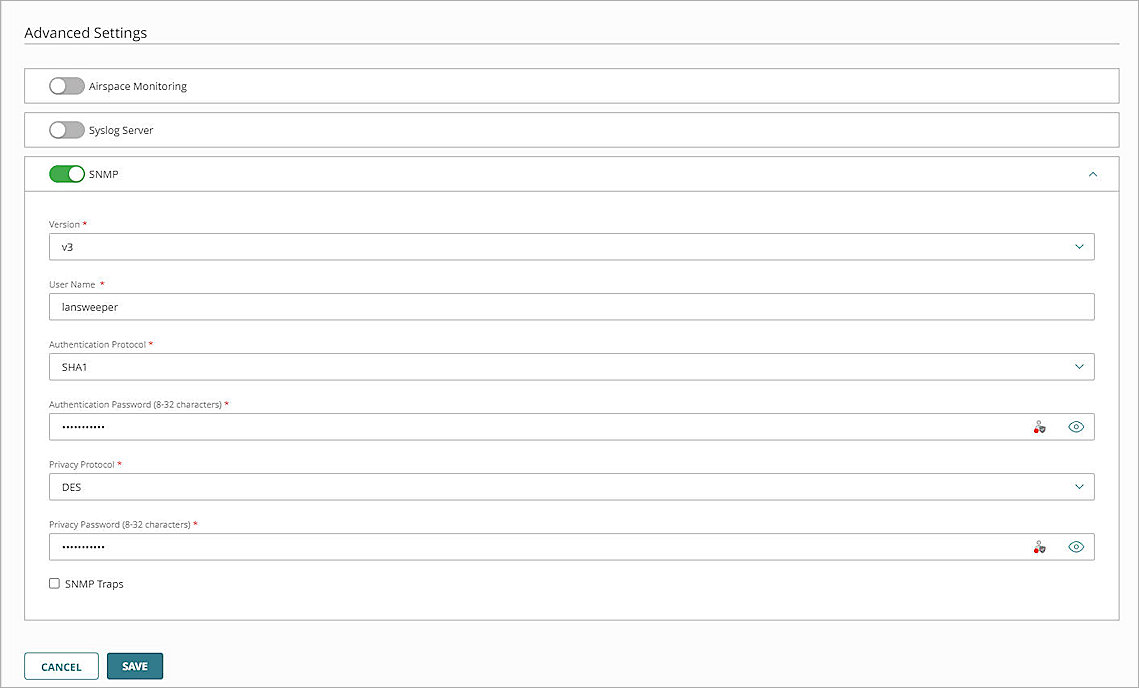
- In the Settings widget, select Advanced Settings.
- Enable SNMP.
- From the Version drop-down list, select v3.
- In the User Name text box, type a user name to authenticate with the SNMP management system. In this example, we type lansweeper.
- From the Authentication Protocol drop-down list, select a protocol. You must use the same protocol when you configure the Lansweeper scanning credentials. In this example, we select SHA1.
- In the Authentication Password (8-32 characters) text box, type an authentication password.
- From the Privacy Protocol drop-down list, select DES.
- In the Privacy Password text box, type a password to encrypt outgoing messages and decrypt incoming messages.
- Click Save.
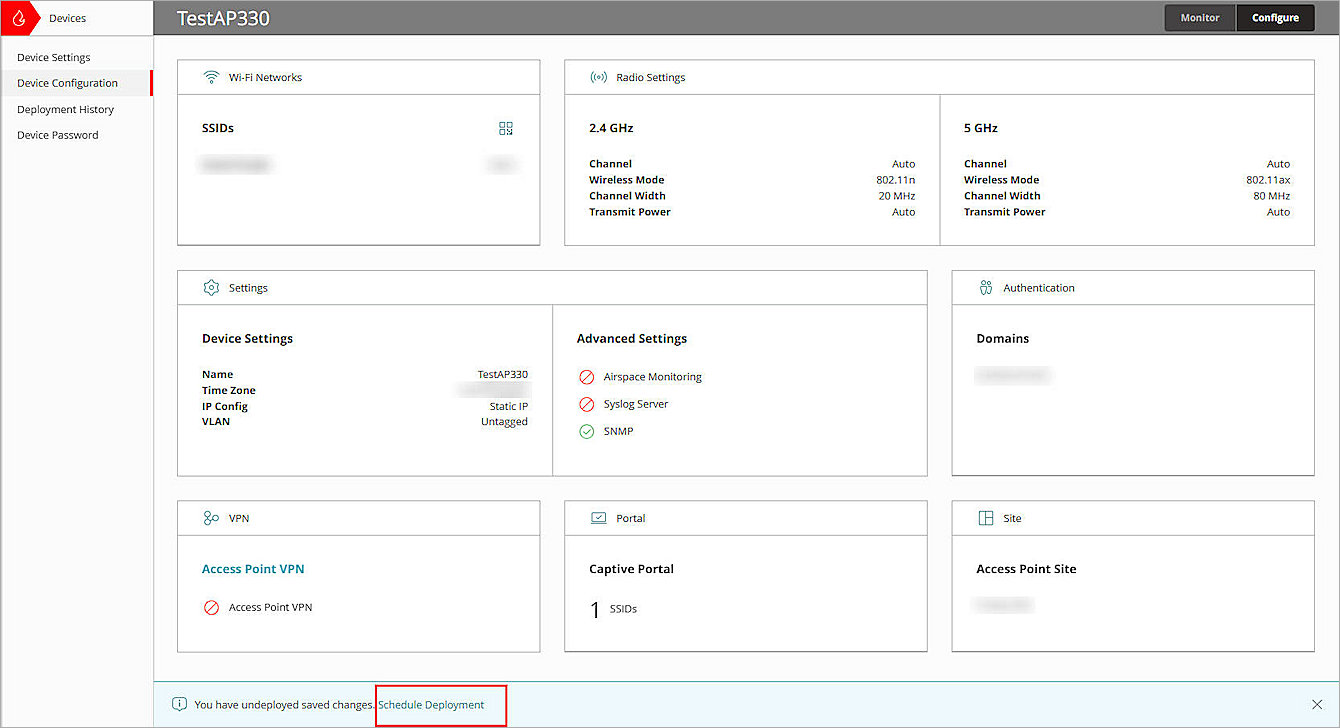
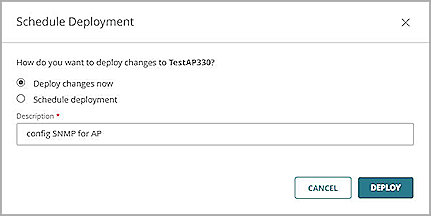
- To apply the configuration to your access points, click Schedule Deployment in the banner at the bottom of the page.
The Schedule Deployment dialog box opens. - Select Deploy changes now.
- In the Description text box, type a description. For this example, we type config SNMP for AP.
- Click Deploy.
Lansweeper Configuration
Follow the steps in these sections to configure Lansweeper for integration with WatchGuard access points.
Add Scanning Target
To add a scanning target in Lansweeper:
- Log in to your Lansweeper Classic web console.
- From the top navigation bar, select Scanning > Scanning targets.
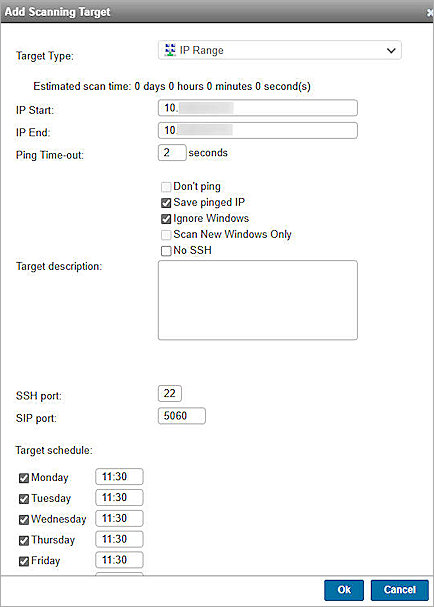
The Scanning Targets page opens. - Click Add Scanning Target.
- From the Target Type drop-down list, select IP Range.
- In the IP Start and IP End text boxes, type the starting IP address and ending IP address of your AP devices.
- Enable Ignore Windows.
- Use the default values for all other settings.
- Click Ok.

Add Scanning Credentials
To add scanning credentials in Lansweeper:
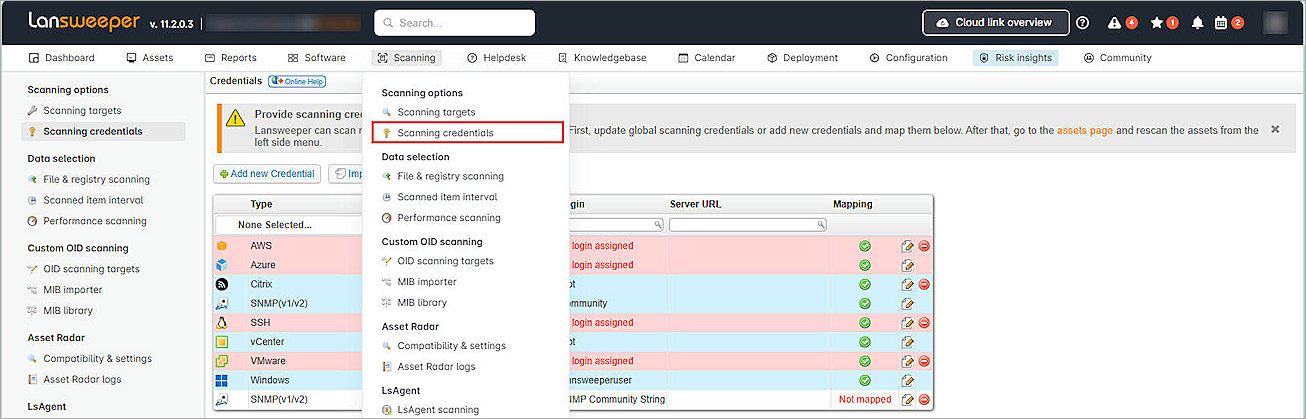
- From the top navigation bar, select Scanning > Scanning credentials.
The Credentials page opens. - Click Add new Credential.
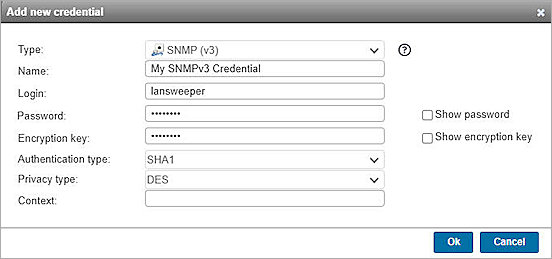
The Add new credential dialog opens. - From the Type drop-down list, select SNMP (v3).
- In the Name text box, type a name to describe this credential.
- In the Login text box, type the user name you configured in the previous section.
- In the Password text box, type the authentication password you configured in the previous section.
- In the Encryption key text box, type the password you configured in the previous section.
- From the Authentication type drop-down list, select the authentication protocol you configured in the previous section. In this example, we select SHA1.
- From the Privacy type drop-down list, select DES.
- Leave the Context text box empty.
- Click Ok.
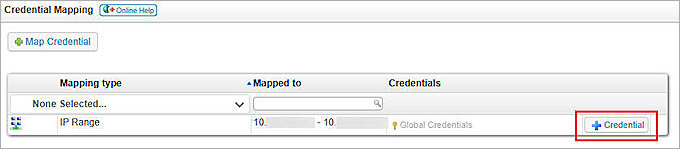
- In the Credential Mapping section, click
 Credential for the IP Range you just added.
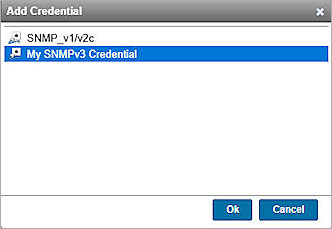
The Add Credential dialog shows. - Select the SNMPv3 credential you just added.
- Click Ok.
Add Custom OID Scanning Targets
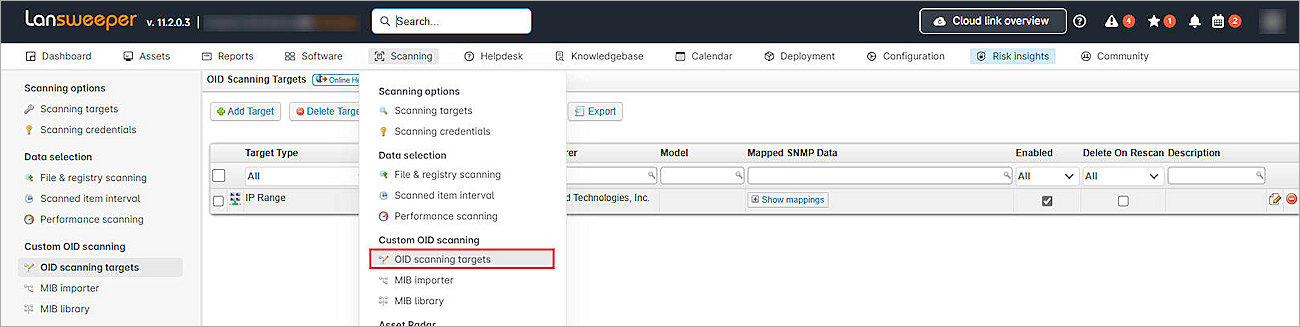
To add a custom OID scanning target in Lansweeper:
- From the top navigation bar, select Scanning > OID Scanning targets.
The OID Scanning Targets page opens. - Click Add Target.
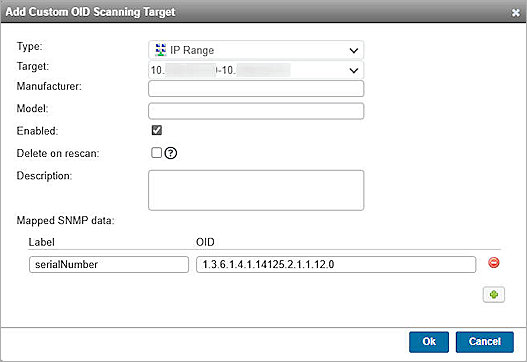
- From the Type drop-down list, select IP Range.
- From the Target drop-down list, select the IP range of your APs.
- In the Mapped SNMP data section, type a label in the Label text box, and type an OID in the OID text box. You must append a zero (0) at the end of the OID number to access the scalar value. For example, to retrieve the serial number of an AP, type serialNumber in the Label text box and type 1.3.6.1.4.1.14125.2.1.1.12.0 in the OID text box.
- (Optional) Click
 to add Mapped SNMP data.
 - Use the default values for all other settings.
- Click Ok.
For more information about the OID values in the WatchGuard MIB file, go to Configure SNMP for Access Points.
Test the Access Point and Lansweeper Integration
To test Lansweeper integration with WatchGuard access points:
- Log in to the Lansweeper Classic web console.
- From the top navigation bar, select Scanning > Scanning targets.
The Scanning Targets page opens. - Click Scan now to start a quick scan.
- When the scan is complete, from the top navigation bar, select Assets.
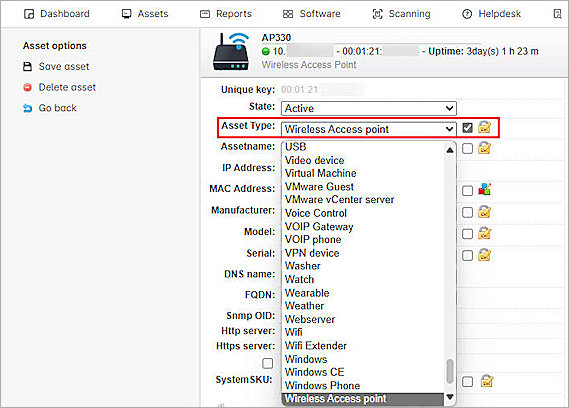
The All Assets page opens. - Click the asset name to view the details.
- Click Scanned OIDs to view the Scanned OIDs.
- (Optional) Click Edit asset in the left navigation bar to edit your asset.
- (Optional) From the Asset Type drop-down list, select Wireless Access point.
- (Optional) Click Save asset.


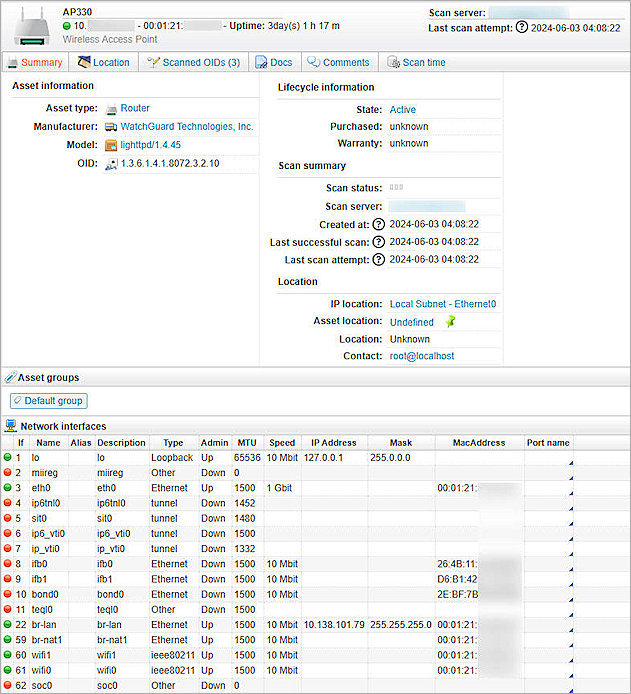

The WatchGuard access point is discovered as a Router. You can change the asset type to Wireless Access Point.