Applies To: WatchGuard Advanced EPDR, WatchGuard EPDR, WatchGuard EDR,WatchGuard EDR Core, WatchGuard EPP
In environments with very specific characteristics, it might be necessary to follow the recommendations provided by the virtualization vendor to adapt these general instructions to your needs. For a customized solution, contact WatchGuard Support.
This installation procedure creates a template to be deployed later to virtual computers on the network. The procedure to manage persistent VDI environments consists of three steps:
- Step 1 — Prepare the Computer to Generate a Template
- Step 2 — Modify the Agent Service Startup Type
- Step 3 — Manually Update the Template
After you generate and update the template, Verify the Procedures.
Caution: It is important that you follow these procedures step-by-step and when complete, you should verify that all cloned devices are displayed with a unique ID in the management UI. Devices that are cloned incorrectly can impact the reliability of the Advanced Protection and can severely compromise the security of your network. If you only see a single device in the management UI, you must repeat the process, rebuild the template, and deploy it again to the affected endpoints as soon as possible.
Prerequisites
- In persistent environments, computers must have fixed MAC addresses.
- The computer used to generate the template must have an Internet connection.
-
Endpoint Agent Tool for Windows must be run as administrator. It has a graphic interface but can also be run from the command line. If you run the tool from a .bat or .cmd file, you must use this command: start /wait "". For example, if the instruction is: EndpointAgentTool.exe /sg, you would type: start /wait "" "C:\Path\EndpointAgentTool.exe" /sg
- Install or update the operating system with the user applications.
In persistent environments, information stored on the computer hard disk persists between reboots. You must install an updated version of the operating system with all the programs users need and then create the template with the product protection updates configured. - From the management UI, create a group to host the template (Template Group) and a Virtual Machines group.
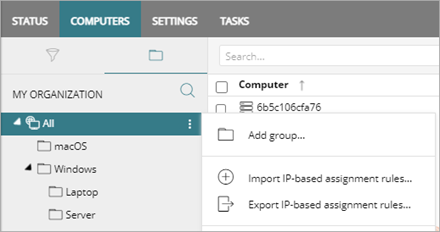
- Virtual Machines group
- On the Settings tab, select Per-Computer Settings and create a settings profile for future image updates.
- Make sure automatic updates of the protection engine is enabled.
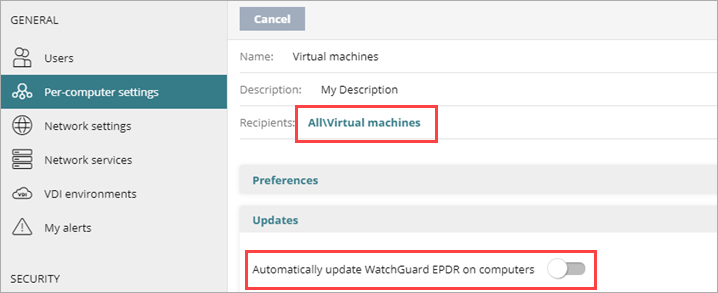
- Assign these settings to the Virtual Machines group you created earlier for the template.
- Select the Settings tab, and select Workstations and Servers to create a settings profile for future image updates.
- Make sure Automatic Knowledge Updates is enabled:
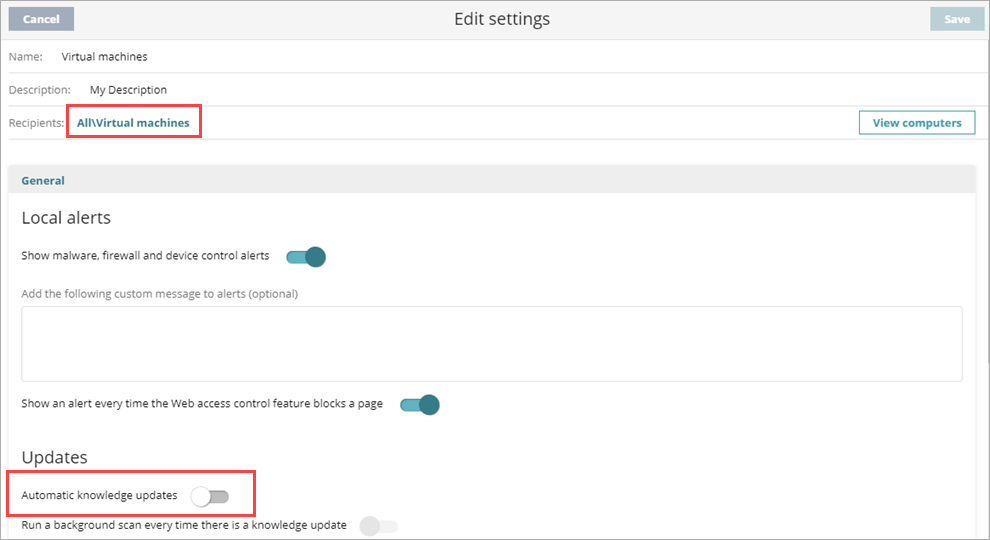
- Assign these settings to the Virtual Machines group.
- Install the agent and protection on the Virtual Machines group:
- Select Computers and then select the Virtual Machines group.
- Click Add Computers to download the installer.

- Install the agent on the template and wait for the progress window to finish. The protection is automatically installed, configured, and updated. After the installation is complete, the computer appears on the list of protected computers in the management UI with a green icon. The computer's protection and knowledge are up to date.
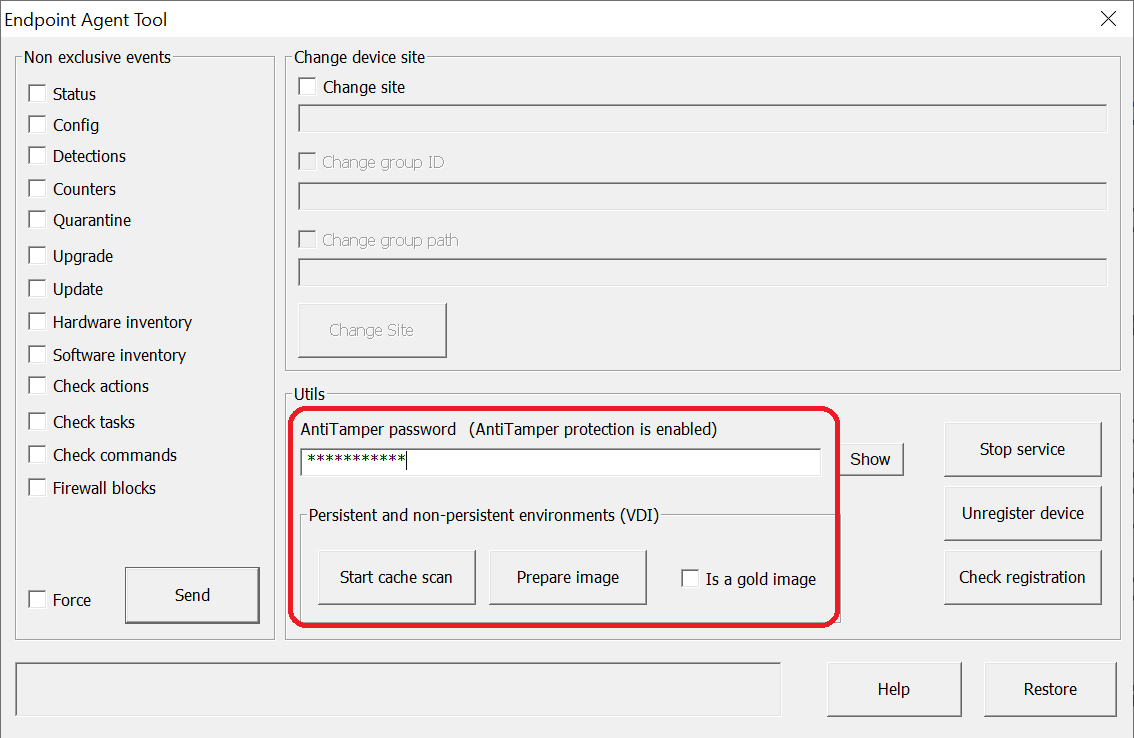
- Run the Endpoint Agent Tool (password panda) on the computer with the template.
-
(Optional) For WatchGuard EDR, click Start Cache Scan in the Endpoint Agent Tool to scan the virtual machine. For WatchGuard EPDR and Advanced EPDR, right-click the EPDR icon in the Windows task bar, and select Antivirus and Advanced Protection > Scan Now.
-
This fills the goodware cache and leaves the protection in an appropriate state for virtual images. The scan process can take some time, depending on the contents of the hard disk. You receive a notification when the operation is complete.
- In the Non Exclusive Events section, select the check boxes for Detections, Counters, and Check Commands. Click Send.
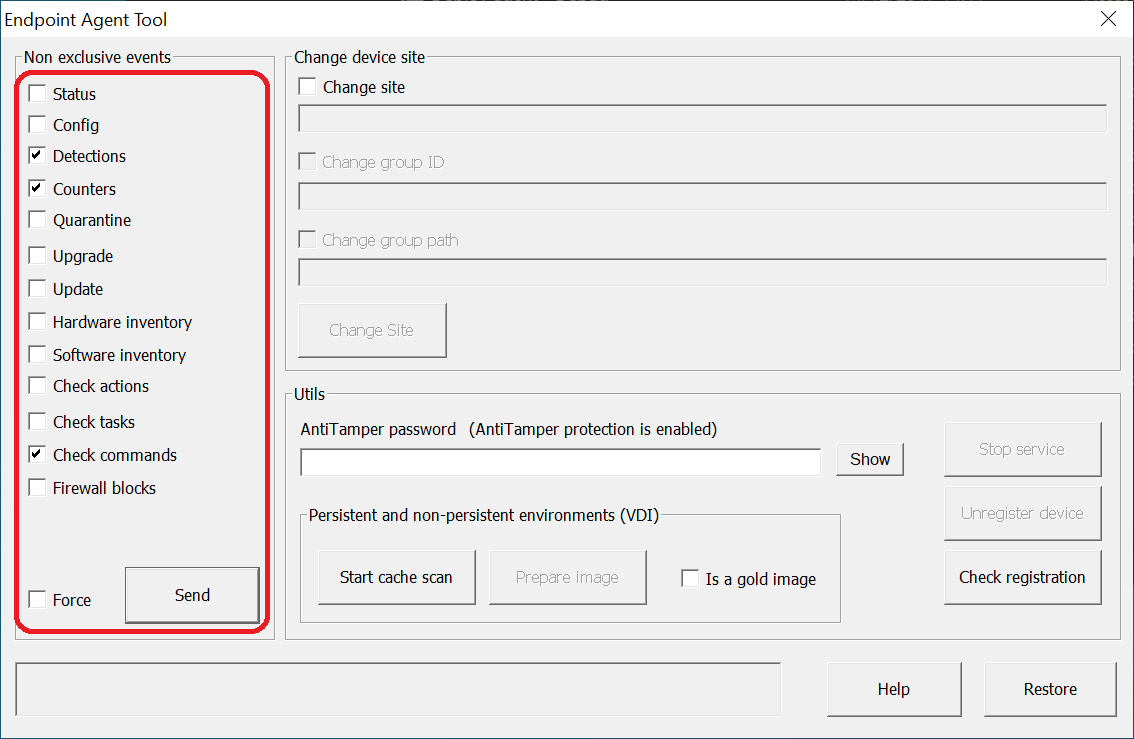
- Important: Remove the computer ID.
- Make sure the Is a Gold Image check box is not selected.
- If required, enter the AntiTamper Password .
- Click Prepare Image.
- Important: Disable the WatchGuard agent service so that the service does not start automatically when using this template on virtual instances.
Caution: This removes the device ID from the template, so that all virtual machines that run obtain their device ID when executed and connect to WatchGuard Endpoint Security for the first time. It is critical to make sure that each virtual instance is uniquely identified in the management UI.
- Access the virtual environment management tool and generate the template. For more information, contact your vendor.
When customization of the deployed virtual machine is completed, you must change the agent service startup type. This service was disabled in the previous step. You can use different methods depending on the VDI deployment system. To change the agent service startup type, you can create GPO policies for devices within a domain, or through other types of script applications such as Horizon, Windows Logon Scripts, etc.
For more information on how to work with the Group Policy Management Editor, contact Microsoft support.
Important: After you clone the virtual machine, the agent service must be the last thing enabled. The first time the agent starts, it registers the unique device ID.
Because the security settings that VDI computers receive have updates disabled, we recommend that you update the template manually at least once a month. This makes sure that VDI computers receive the latest version of the protection and signature file.
To manually update the template in a persistent VDI environment:
- Restart the virtual machine that is used as the template.
- Enable the agent service and start it.
- Complete any system maintenance, such as upgrading the WatchGuard Endpoint Software on the virtual machine.
- When the system is ready, complete Step 1 — Prepare the Computer to Generate a Template.
Verify the Procedures
Make sure that the procedures were successful. If the list only includes a single device, you must remove the device from the Computers list and re-start this procedure (that is, rebuild the template and deploy it again to the affected endpoints).
- In the management UI, select Computers.
- Verify that your cloned devices show correctly in the list.