Applies To: WatchGuard Advanced EPDR, WatchGuard EPDR, WatchGuard EDR, WatchGuard EPP
In Jamf, there are several ways to complete the same task.The instructions in this topic were successfully used to deploy WatchGuard Endpoint Security with Jamf Pro 11 in our test lab. Your environment might have different requirements or limitations. If you encounter any issues, contact your Jamf Pro Support representative for assistance.
Jamf Pro is an enterprise-level Mobile Device Management (MDM) software that helps you manage and secure Apple devices with advanced tools and integrations. You can use Jamf Pro to automate acceptance of the permissions required for the WatchGuard Endpoint Security software to work on Mac devices.
We recommend that you create the configuration profiles in Jamf Pro first so that when the WatchGuard Endpoint Security is installed on your device, it already has the required permissions.
Before You Begin
This topic assumes that you have a working push certificate already integrated in Jamf Pro (settings-global-push certificates).
Before you create the configuration profiles in Jamf Pro, we recommend that you create a small group of Mac devices where you want to deploy Endpoint Security first. After you successfully complete the deployment, you can increase the size of the group. In this topic, we create and deploy the Jamf configuration profiles to a static computer group and individual devices.
We strongly recommend that you use Mac devices that support system extensions (that is, Mac devices with macOS Catalina 10.15 or higher). Mac devices with macOS Mojave 10.14 and lower run WatchGuard Endpoint Security v2.x and lower. The steps for these devices are not included in this topic. We recommend that your Mac devices have the latest version of WatchGuard Endpoint Security installed.
The steps to automate installation of Endpoint Security for macOS with Jamf Pro include:
- Create a Jamf Pro Configuration Profile
- Enable Login Item — Allow Run in Background for WatchGuard Endpoint Security
- Allow System and Network Extensions
- Enable Full Disk Access
- Automatically Allow the Content Filter
- Deploy the WatchGuard Agent and Jamf Pro Profile
- Verify Deployment of the Agent and Profile
Create a Jamf Pro Configuration Profile
You can use Jamf Pro to create a configuration profile that automatically accepts the macOS privileges required for Endpoint Security to install and run on your Mac devices.
To create a configuration profile, from Jamf Pro:
- In the left pane, click Computers.
- In the menu that opens, click Configuration Profiles.

- Click New.
- In the General section, enter a Name for the profile (for example, macOS protection permissions policy).
- Select the Scope tab.
- Click Add.
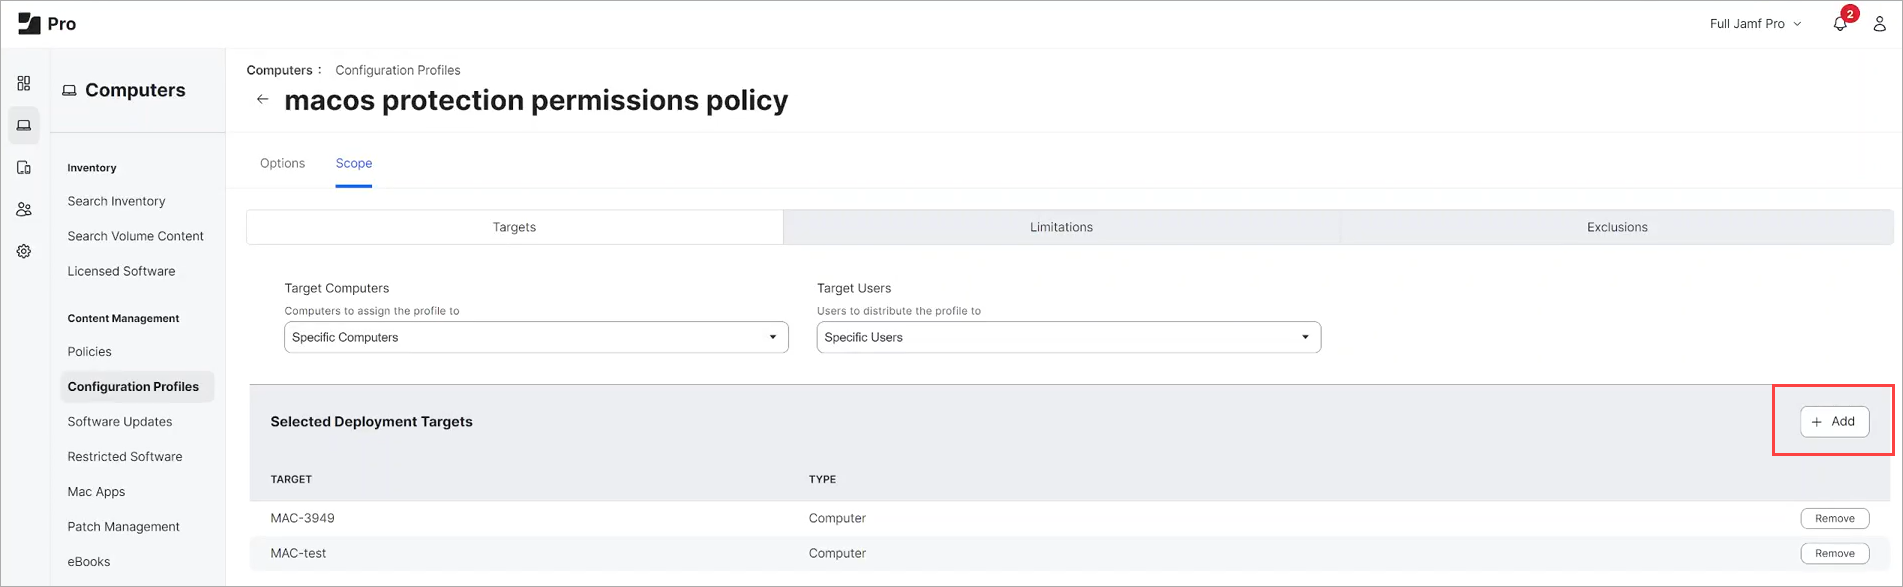
- Select the devices or a group of devices that you want to apply the profile to.
- Click Save.
Enable Login Item — Allow Run in Background for WatchGuard Endpoint Security
The Login Item – Allow Run in Background permission is required for Mac devices with macOS Ventura 13.x and macOS Sonoma 14.x to run WatchGuard Endpoint Security in the background. You can also assign the permission to Mac devices with a higher OS (for example, Catalina, Big Sur, and Monterey). The permission can be assigned to older devices but will not have any impact.
To allow WatchGuard Endpoint Security to run in the background:
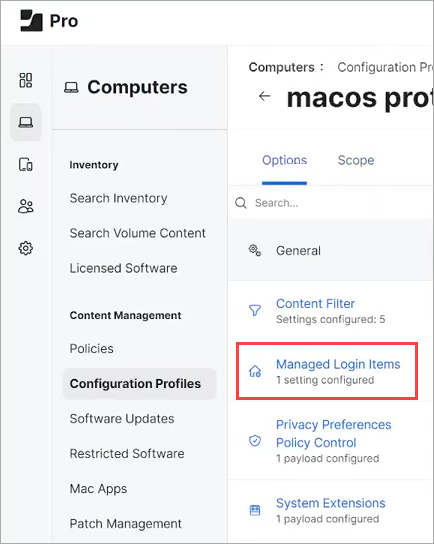
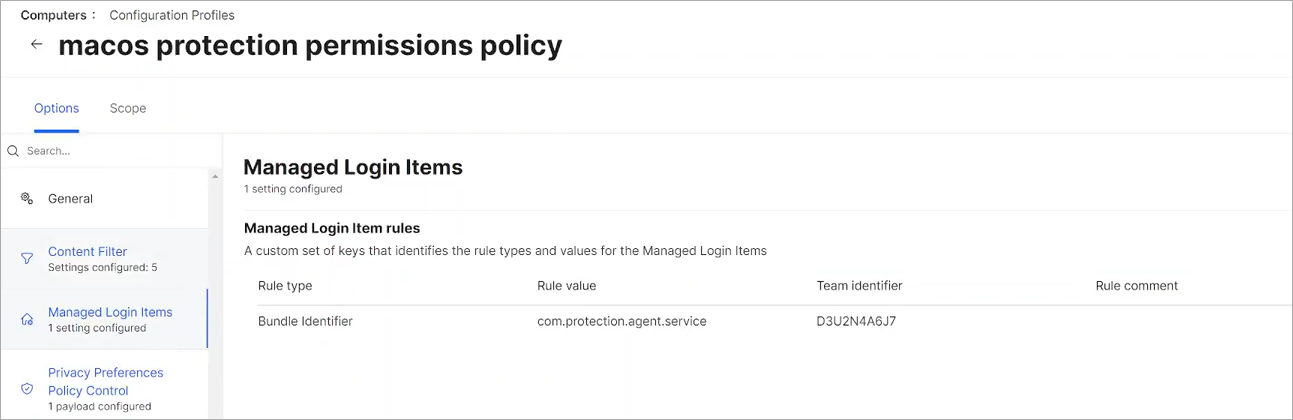
- From the Options tab, select Managed Login Items.
- From the Rule Type list, select Bundle Identifier.
- In the Rule Value text box, enter com.protection.agent.service.
- In the Team Identifier text box, enter D3U2N4A6J7.
- Click Save to save the policy.
Allow System and Network Extensions
System extensions are required to capture file events. Network extensions are required to capture and filter network packets for web protection and content filtering. In the WatchGuard Endpoint Security protection software v3.04 and higher, network extensions are also required for device isolation.
To create an option to allow system and network extensions:
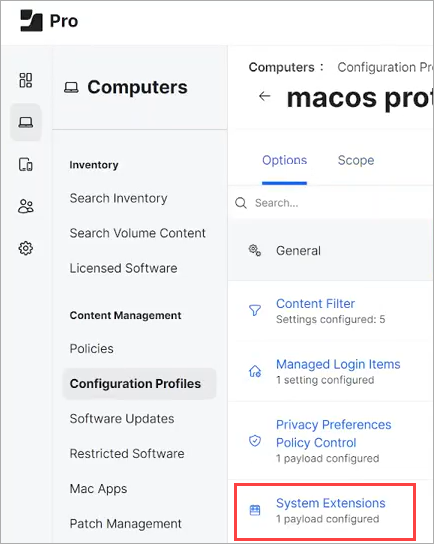
- From the Options tab, select System Extensions.
- Click Configure.
- Enter a Display Name (for example, System Extensions).
- From the System Extension Types list, select Allowed System Extensions.
- In the Team Identifier text box, enter D3U2N4A6J7.
- In the lower section of the page, click Add.
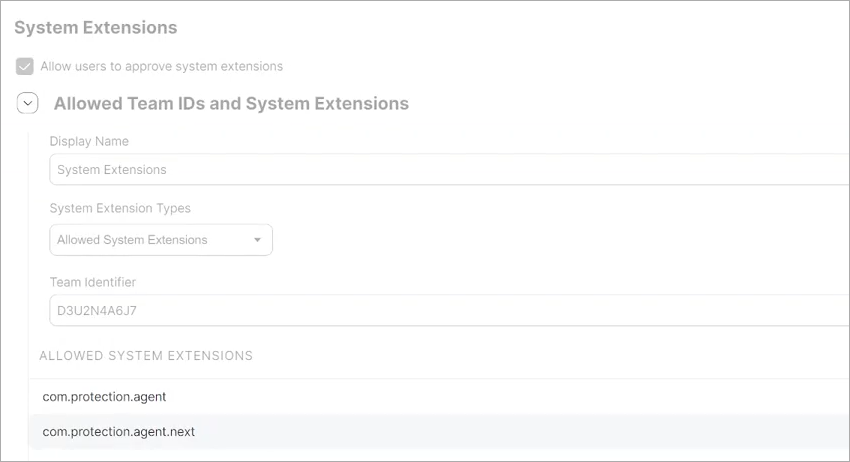
- In the Allowed System Extensions section, add these extensions:
- com.protection.agent
- com.protection.agent.next
- Click Save to save the policy.
- Click Distribute to All.
These system extension settings are distributed to all the devices defined in the scope.
Enable Full Disk Access
Full disk access on the Mac is required for the endpoint security protection service.
To create an option to enable full disk access:
- From the Options tab, select Privacy Preferences Policy Control.

- Click Configure.
- In the App Access section, in the Identifier text box, enter com.protection.agent.
- From the Identifier Type list, select Bundle ID.
- In the Code Requirement text box, enter this code:
identifier "com.protection.agent" and anchor apple generic and certificate 1[field.1.2.840.113635.100.6.2.6] /* exists / and certificate leaf[field.1.2.840.113635.100.6.1.13] / exists */ and certificate leaf[subject.OU] = D3U2N4A6J7
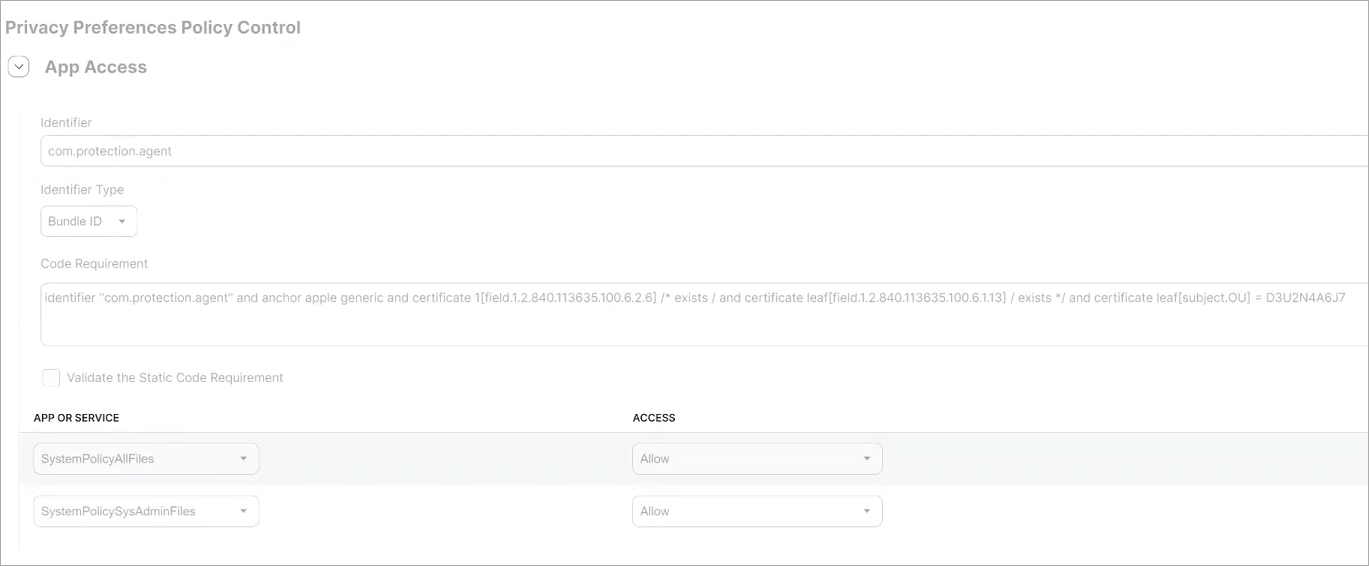
- In the lower section of the page, click Add to add a row.
- From the App or Service drop-down list, select SystemPolicyAllFiles.
- From the Access drop-down list, select Allow.
- Save the row.
- Click Save to save the policy.
- Click Distribute to All.
These system extension settings are distributed to all the devices defined in the scope.
Automatically Allow the Content Filter
You can create a policy to use the Endpoint Security content filter. The filter is part of the network extension.
To create an option to automatically allow the content filter:
- From the Options tab, select Content Filter.

- Click Configure.
- In the Filter Name text box, enter EndpointProtectionNetwork.
- In the Identifier text box, enter com.protection.agent.next.
- In the Organization text box, enter D3U2N4A6J7.
- Enable Network Filter.
- In the Network Filter Bundle Identifier text box, enter com.protection.agent.next.
- In the Network Filter Designated Requirement text box, enter thiscode:
identifier "com.protection.agent.next" and anchor apple generic and certificate 1[field.1.2.840.113635.100.6.2.6] /* exists */ and certificate leaf[field.1.2.840.113635.100.6.1.13] /* exists */ and certificate leaf[subject.OU] = D3U2N4A6J7

- Click Save.
- Click Distribute to All.
These system extension settings are distributed to all the devices defined in the scope.
Deploy the WatchGuard Agent and Jamf Pro Profile
After you create the configuration profile, you use deployment scripts to deploy the WatchGuard Agent and the profile to your Mac devices. In this section, you create a shell script to deploy the configuration profiles to the Mac.
To create deployment scripts:
- Download the deployment scripts from here.
- Extract the files.
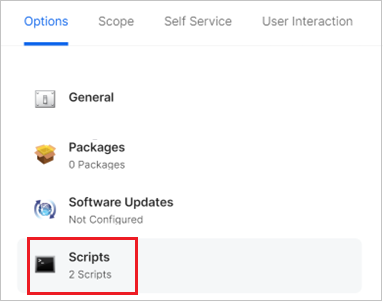
- Select Settings > Computer Management.
- Click Scripts.
- Click New.
- On the General page, enter a Display Name for the script (for example, deployendpointscript).
- On the Script page, paste the code from the script.
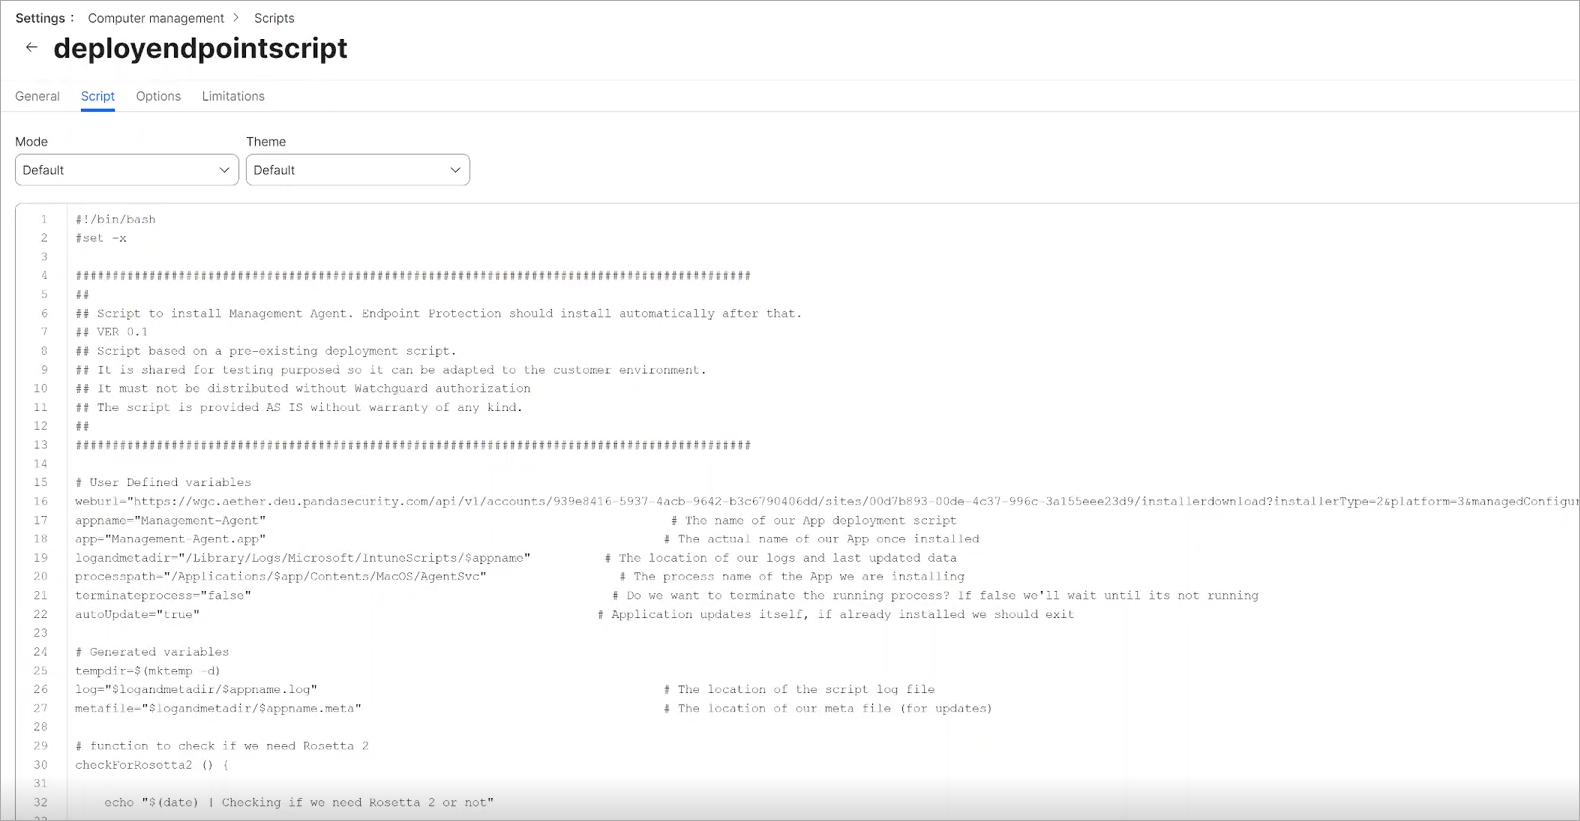
- Edit the URL in the pasted code to include the full URL from your Endpoint Security management UI. Make sure to include quotation marks (for example, "https://...").
To copy the full URL from the Endpoint Security management UI, select Computers > Add Computers > MacOS and then click Send URL by Email.

- Click Save.
- Click New.
- On the General page, enter a Display Name for the script (for example, loadNext).
- On the Script page, paste this code in the text box: /Applications/Endpoint-Protection.app/Contents/MacOS/EndpointProtectionService.app/Contents/MacOS/NextLoader.app/Contents/MacOS/psanwatchdog --loadNext
- Click Save.
When you run a script, you can select the priority and specify values for the script in a deployment policy. To run a script on computers, the script must be stored on the distribution point you plan to deploy it from and in Jamf Pro. The policy runs on computers within the defined scope the next time they check in with Jamf Pro.
To create a deployment policy, from Jamf Pro:
- In the left pane, click Computers.
- In the menu that opens, select Policies.
- Click New.
- From the Options page, select General.
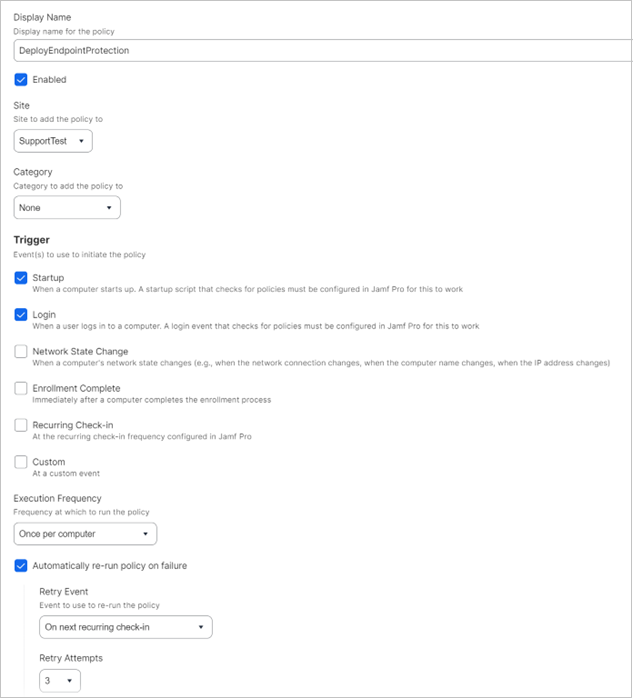
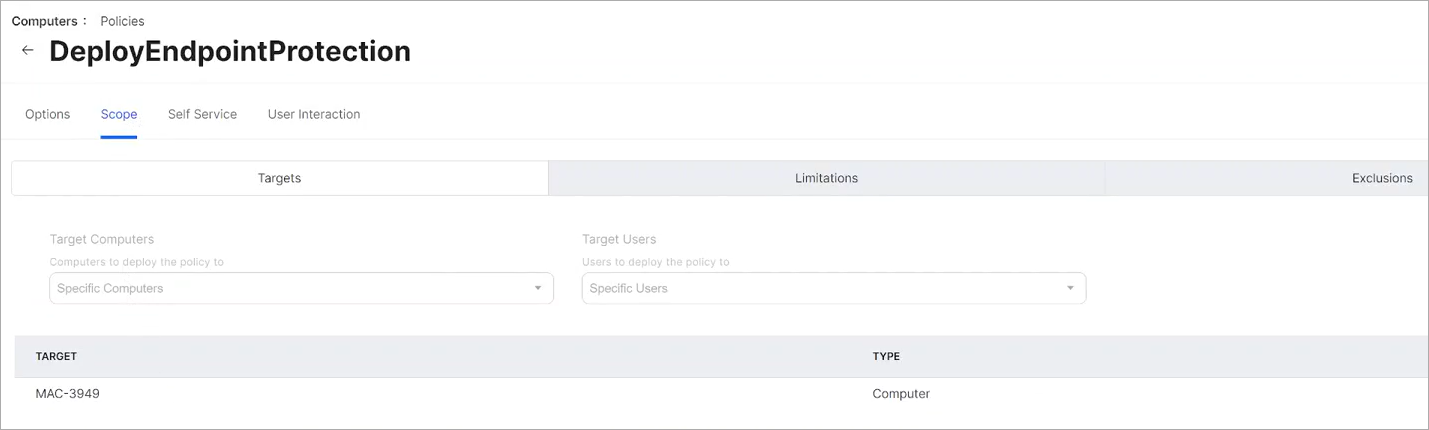
- Enter a Display Name for the policy (for example, DeployEndpointProtection).
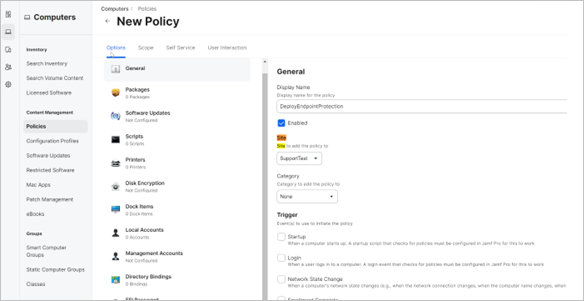
- From the Scope page, assign the policy to the computers or group of computers you want it to apply to.
- Click Save.
- From the Options page, select Scripts.
- Click Add.
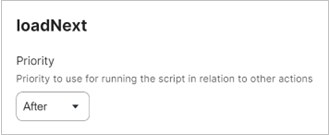
- Add the scripts you want to run (for example, DeployEndpointProtection and loadNext).
The Scripts section shows the two scripts selected. - Set the DeployEndpointProtection script priority as Before.
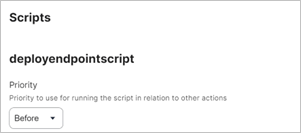
- Set the loadNext script priority as After.
- Click General.
- We recommend that you configure these options:
- Enable Automatically Re-Run Policy on Failure.
- Set Retry Attempts to 3.
This makes sure that the second script (loadNext) runs several times to confirm that the agent and protection are installed. For example, the login startup determines when to trigger deployment. This can be changed as required.
- On the Scope page, add the devices or group of devices you want to the policy to apply to.
Verify Deployment of the Agent and Profile
You can view the logs to determine whether the policy was deployed. When the policy is deployed, the first script (DeployEndpointProtection) runs. This script automatically:
- Determines if rosetta2 is required. This is a translation layer for Apple M-X devices. If it is needed and not already installed, the script installs it.
- Determines if the WatchGuard Agent is already installed in this folder:/Applications/Management-Agent.app/. If the agent is not installed, it downloads the agent from the link specified and installs it on the device.
The agent then automatically installs the Endpoint Security software on the device. The Mac device shows the message: A required system extension has been blocked. To resolve the problem, open the Security Preferences panel and allow the NextLoader application.
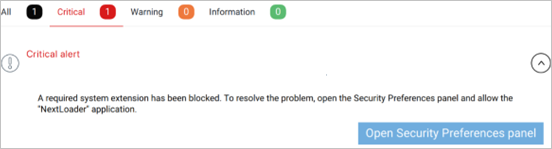
This message shows because WatchGuard Endpoint Security does not start the network extension automatically until the user clicks Open Security Preference Panel and allows the application. This message automatically closes a few minutes later, when the second script (loadNext) runs again as specified by the retry option in the deployment policy.
Install the Endpoint Security Software on Mac Computers