Applies To: WatchGuard Advanced Reporting Tool and Data Control
The delivery method dictates how the Advanced Visualization Tool sends an alert and to whom. For example, you might create a delivery method to send an email to [email protected], or to use Pushover to distribute the alert message to mobile device users.
To specify delivery conditions for alerts, from the Advanced Visualization Tool:
- From the left pane, select Administration.
- Select Alerts Configuration.
- Select Delivery Methods.

- Select the delivery type:
- Email — Send alerts by email.
- HTTP-JSON — Send alerts as JSON objects.
- ServiceDesk — Send alerts through ServiceDesk Plus.
- JIRA — Send alerts to a JIRA server.
- Pushover — Send alerts in a Pushover account.
- PagerDuty — Send alerts in a PagerDuty account.
- Click New.
The New Delivery dialog box opens. - Configure the specific method.
For more information, go to the appropriate section below. - Associate the delivery method with a sending policy.
For more information, go to Create and Assign a Sending Policy for Alerts.
Configure Email Delivery Method
You can send the alerts by email message and attach the events that triggered the alert to the message.
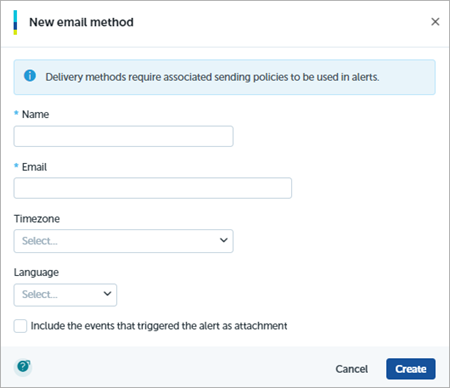
To configure an email delivery method, in the New Delivery Method dialog box:
- In the Name text box, type a name for the delivery method.
- In the Email text box, type the email account of the recipient.
- From the Timezone drop-down list, select the time and date when you want to send the email.
- From the Language drop-down list, select the language that the alert is received in.
- To attach events to the email, select the Attach the events that triggered the alert to the email check box.
- In the Maximum number of events to send text box, type the maximum number of events to include in the email message.
- Click Apply.
The new method is saved as Pending Validation. A validation email is sent to the email address, which must be confirmed before you can use this delivery method. - Associate the delivery method with a sending policy.
For more information, go to Create and Assign a Sending Policy for Alerts.
Configure HTTP-JSON Delivery Method
You can send the alerts to your server by real-time alerts over HTTP or HTTPS with a POST method that uses JSON objects. To improve security, in addition to the HTTPS encryption protocol, you can enable authentication.
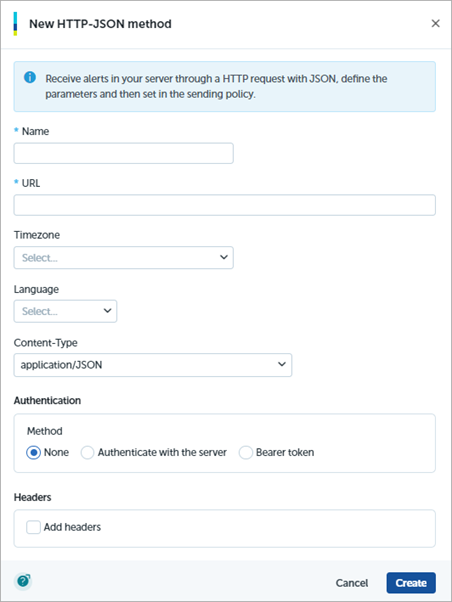
To configure an HTTP-JSON delivery method, in the New Delivery Method dialog box:
- In the Name text box, type a name for the delivery method.
- From the Timezone drop-down list, select the time and date when you want to send the email.
- In the URL text box, type the URL of the server to send alerts to.
- From the Language drop-down list, select the language that the alert is received in.
- To require authentication, select the Authenticate with the Server check box. Specify the User name and a New Password.
- Click Apply.
The new method is saved in Pending Validation status. A message with a code is sent to validate the server. -
Associate the delivery method with a sending policy.
For more information, go to Create and Assign a Sending Policy for Alerts.
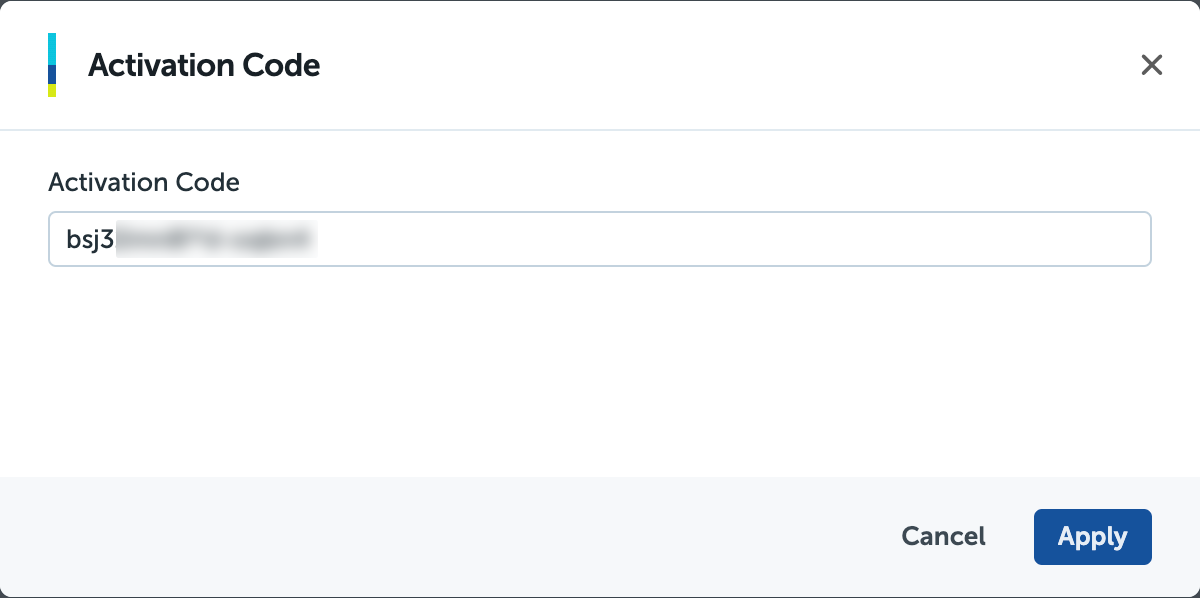
Activate the Delivery Method
To send alerts with this delivery method, you must activate it. An HTTP text message with a verification code is sent to the URL specified in the delivery method. This activation code must be validated on the server-side before the delivery method can be used.
To activate the delivery method, in the Advanced Visualization Tool:
- From the left pane, select Administration > Alert Configuration.
- Select Delivery Methods.
- In the Status column for the delivery method, select Pending Activation.
- Paste the verification code you received in the dialog box that opens.
- Click Apply.
Configure ServiceDesk Plus Delivery Method
This type of delivery method helps to automate the ticketing process in ServiceDesk Plus. Alerts must be sent with one of the two ServiceDesk Plus methods: REST or SERVLET.

To configure a ServiceDesk Plus delivery method, in the New Delivery Method dialog box:
- In the Name text box, type a name for the delivery method.
- From the Timezone drop-down list, select the time and date when you want to send the alert.
- In the URL text box, type the URL of the server to send the alerts to.
- REST: http://[SERVER]:[PORT]/sdpapi/request/
- SERVLET: http://[SERVER]:[PORT]/servlets/RequestServlet
- From the Language drop-down list, select the language that the alert is received in.
- In the Technician API Key text box, type the API key for the technician.
For information on how to create a technician API key, go to the ServiceDesk Plus documentation. - Click Apply.
The new method is saved in Pending Validation status. A message with a code is sent to the ServiceDesk Plus URL. This activation code must be validated on the server side before you can use the delivery method. - Associate the delivery method with a sending policy.
For more information, go to Create and Assign a Sending Policy for Alerts.
Configure Jira Delivery Method
You can send alerts in real-time to Jira servers. This delivery method creates a new issue of a specific type in a Jira project (for example, a task, bug, or story).
The issue type in Jira must not have Required/Mandatory fields other than Summary (where the name of the alert populates), otherwise, you cannot create the delivery method.
Create a delivery method for each combination of project key and issue type needed to accommodate the alerts that will trigger Jira issues. For example, you might have one delivery method that creates a Bug in the SEC project key and another that creates a Task in the NET project key.
If your Jira server is inside a private network, you will not receive alerts on your server.

To configure a Jira delivery method, in the New Delivery Method dialog box:
- In the Name text box, type a name for the delivery method.
- In the Issue Type text box, type the Jira issue type for alerts that use this delivery method (for example, Task, Bug, Story).
- In the URL text box, type the URL of the Jira Cloud site to send alerts to, in this format:
https://<your_JIRA_domain>.atlassian.net/rest/api/<Jira_API_version>/issue/ - In the Project Key text box, type the project key under which to create the alert.
The project key is the prefix used to number issues in a specific project. - In the User text box, type the JIRA server username.
The username should be the email address associated with the Atlassian account. - From the Timezone drop-down list, select the time and date when you want to send the alert.
- In the Password text box, type the JIRA server password for communication with the server.
The Password should be the API token. For more information, go to the Atlassian Support site. - From the Language drop-down list, select the language that the alert is received in.
- Click Apply.
The new delivery method is saved in Pending Validation status. To activate the delivery method, you must validate it with an activation code.
Activate the Delivery Method
The Jira validation code appears on the Jira server as a new Jira issue. It appears as the type configured for the delivery method.
To activate the delivery method:
- Copy the validation code on the Jira server.
- In the Advanced Visualization Tool, from the left pane, select Administration > Alert Configuration.
- Select Delivery Methods.
- In the Status column for the delivery method, select Pending Activation
- Paste the validation code you received in the dialog box that opens.
- Click Apply.
- Associate the delivery method with a sending policy.
For more information, go to Create and Assign a Sending Policy for Alerts.
Configure Pushover Delivery Method
You can send alert messages to Pushover servers that broadcast the messages to mobile devices and browsers that run the Pushover client.
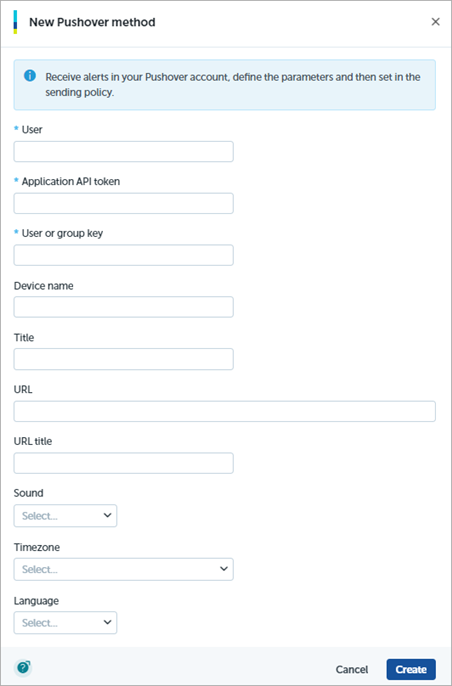
To configure a Pushover delivery method, in the New Delivery Method dialog box:
- In the User text box, type a unique name that identifies this Pushover delivery method.
- In the URL text box, type a supplementary URL that you want to include with the notification.
- In the Application API Token text box, type the API key of your application.
To obtain the API key, you need to register your application. For more information, go to the Pushover API documentation. - In the URL Title text box, type text that will link to the supplementary URL. For example, "Forward to tech support".
- In the User or Group Key text box, type the key that identifies the Pushover user or group.
- From the Sound drop-down list, select a Pushover notification sound to play when the message is delivered to a device.
- In the Device Name text box, type the name of the user device to which you want to send the notification.
If a device name is not specified for a user, notifications are sent to all of the user's active devices. - From the Timezone drop-down list, select the time zone that is used to calculate when alerts are sent.
This applies to the schedule you define in any sending policy that uses this delivery method. - In the Title text box, type a short title for the alert message.
If you do not specify a title, the name of your application is used as the notification title. - From the Language drop-down list, select the language that the alert is received in.
- Click Apply.
The new method is saved in Pending Validation status.
Activate the Delivery Method
The Pushover validation code is sent to the Pushover account. This activation code must be validated on the server side before you can use the delivery method.
To activate the delivery method:
- Copy the validation code from the Pushover account.
- In the Advanced Visualization Tool, from the left pane, select Administration > Alert Configuration.
- Select Delivery Methods.
- Select Pending Activation in the Status column for the delivery method.
- Paste the validation code you received in the dialog box that opens.
- Click Apply.
- Associate the delivery method with a sending policy.
For more information, go to Create and Assign a Sending Policy for Alerts.
Configure PagerDuty Delivery Method
You can send alert messages to servers that run PagerDuty. Before you configure this delivery method, you must set up the Advanced Visualization Tool as a service in PagerDuty and have the associated integration key ready. You need this key to set up the delivery method. For information on how to create a service in PagerDuty and obtain the API key, go to the PagerDuty documentation.
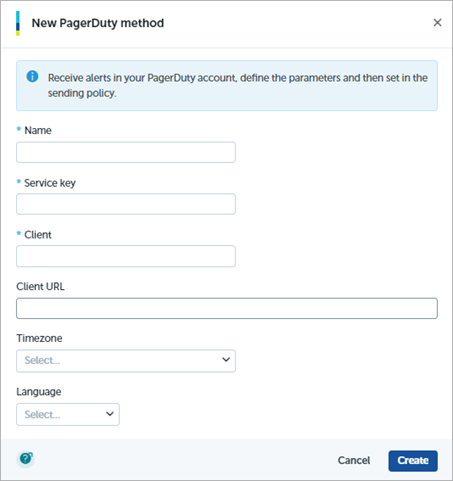
To configure a PagerDuty delivery method, in the New Delivery Method dialog box:
- In the Name text box, type a unique name that identifies this delivery method.
- If you specify a Client below, in the Client URL text box, type the URL of the resource you specify as the client.
PagerDuty notifications include this URL. - In the Service Key text box, type the service or integration API Key for the service that you set up in PagerDuty.
- From the Timezone drop-down list, select the time zone that is used to calculate when to send alerts.
This applies to the schedule you define in any sending policy that uses this delivery method. - In the Client text box, type the name of the resource whose information triggers this event.
- From the Language drop-down list, select the language that the alert is received in.
- Click Apply.
The new method is saved in Pending Validation status.
Activate the Delivery Method
The PagerDuty validation code is sent to the account, where it is saved as an incident. This code must be validated on the server side before you can use the delivery method.
To activate the delivery method:
- Copy the validation code from the PagerDuty incident.
- In the Advanced Visualization Tool, from the left pane, select Administration > Alert Configuration.
- Select Delivery Methods.
- In the Status column for the delivery method, select Pending Activation.
- Paste the validation code you received in the dialog box that opens.
- Click Apply.
- Associate the delivery method with a sending policy.
For more information, go to Create and Assign a Sending Policy for Alerts.
Manage Delivery Methods
After you configure a delivery method, you can edit or delete it on the Delivery Methods tab.
To edit or delete a delivery method:
- In the Advanced Visualization Tool, from the left pane, select Administration > Alert Configuration.
- Select Delivery Methods.
- Select the delivery method you want to edit or delete.
- Click
 .
. - To edit the delivery method:.
- Select Edit.
The New Delivery Method dialog box opens. - Edit the method. Click Apply.
- Select Edit.
- To delete the delivery method:
- Select Delete.
- Click Delete to confirm the deletion.