In areas with limited or no existing network infrastructure, you can use your wireless Firebox to provide secure network access. You must physically connect your network devices to the Firebox. Then you configure your external interface as a wireless client to connect to a wireless access point that connects to a larger network.
When the external interface is configured with a wireless connection, the wireless Firebox can no longer be used as a wireless access point. To provide wireless access for users, you can connect an wireless AP device to the Firebox wireless device.
Configure the Primary External Interface as a Wireless Interface
To configure the primary external interface as a wireless interface, you must enable the device as a wireless client.
Configuring the External interface as a wireless client is not supported when the Firebox is configured in Bridge mode.
- Select Network > Wireless.
The Wireless Configuration page appears.
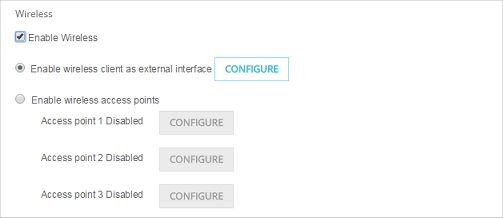
- Select Enable wireless client as external interface.
When this option is enabled, the external interface acts as a wireless client. The radio settings in the configuration cannot be modified and are only used when the Firebox is configured as a wireless access point.
- Click Configure.
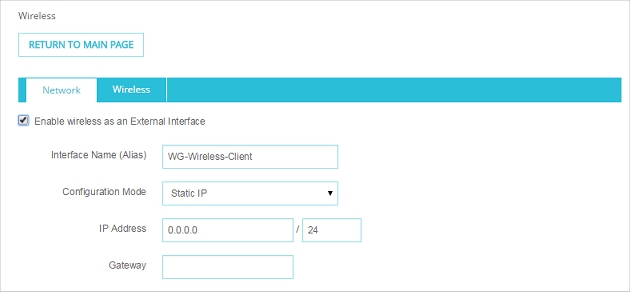
The external interface settings appear. - The Interface Name (Alias) text box indicates the name used by the interface. The default name WG-Wireless-Client cannot be changed in Fireware Web UI.
- In the Configuration Mode drop-down list, select an option:
Static IP
To use a static IP address, select this option. Type the IP Address, Subnet Mask, and Default Gateway you use to connect to the wireless network.
DHCP
To configure the external interface as a DHCP client, select this option. Configure the DHCP client settings.

For more information about how to configure the external interface to use a static IP address or DHCP, go to Configure an External Interface.
- Select the Wireless tab.
The wireless client configuration settings appear.

- Select the Frequency Band to use (2.4 GHz or 5 GHz).
- In the Network name (SSID) text box, type the name of the external wireless network this device connects to.
- In the Security drop-down list, select the encryption and authentication method to use for the wireless connection. We recommend that you use WPA2 or higher.
For more information about wireless authentication methods, go to About Wireless Security Settings.
- In the Encryption algorithm drop-down list, select the type of encryption to use for the wireless connection. Add the passphrase or keys required for the type of encryption you select.
- Click Save.
- Select Network > Wireless.
The Wireless Configuration dialog box appears.
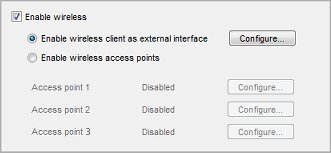
- Select the Enable wireless check box.
- Select Enable wireless client as external interface.
- Click Configure.
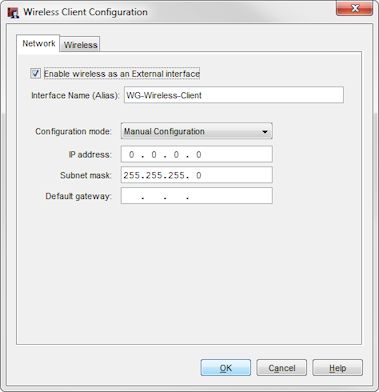
The external interface settings appear. - In the Interface Name (Alias) text box, type a name for this interface.
The default name is WG-Wireless-Client. - In the Configuration Mode drop-down list, select an option:
Manual Configuration
To use a static IP address, select this option. Type the IP Address, Subnet Mask, and Default Gateway you use to connect to the wireless network.
DHCP Client
To configure the external interface as a DHCP client, select this option. Configure the DHCP client settings.
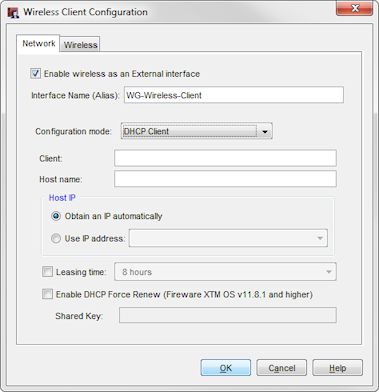
For more information about how to configure the external interface to use a static IP address or DHCP, go to Configure an External Interface.
- Select the Wireless tab.
The wireless client configuration settings appear.

- Select the Frequency Band to use (2.4 GHz or 5 GHz).
- In the Network name (SSID) text box, type the name of the external wireless network this device connects to.
- In the Security drop-down list, select the encryption and authentication method to use for the wireless connection. We recommend that you use WPA2 or higher.
For more information about wireless authentication methods, go to About Wireless Security Settings.
- In the Encryption algorithm drop-down list, select the type of encryption to use for the wireless connection. Add the passphrase or keys required for the type of encryption you select.
- Click OK.
Configure a BOVPN tunnel for additional security
To create a wireless bridge and provide additional security, you can add a BOVPN tunnel between your Firebox and the external gateway. You must set the mode to Aggressive Mode in the Phase 1 settings of your BOVPN configuration on both devices.
The ability to use a wireless interface in the BOVPN configuration is currently only available in Policy Manager. Aggressive mode is not applied if IKEv2 is selected in your BOVPN settings.
For information about how to set up a BOVPN tunnel, go to About Manual IPSec Branch Office VPNs.