About Policy Views
The policies included in your current Firebox configuration appear on the Firewall Policies and Mobile VPN IPSec Policies pages.

By default, Fireware Web UI sorts policies from the most specific to the most general. The order the policies appear in the list determines how traffic flows through the policies.
For more information about how to add policies, go to Add Policies to Your Configuration.
Policy Manager Policy Views
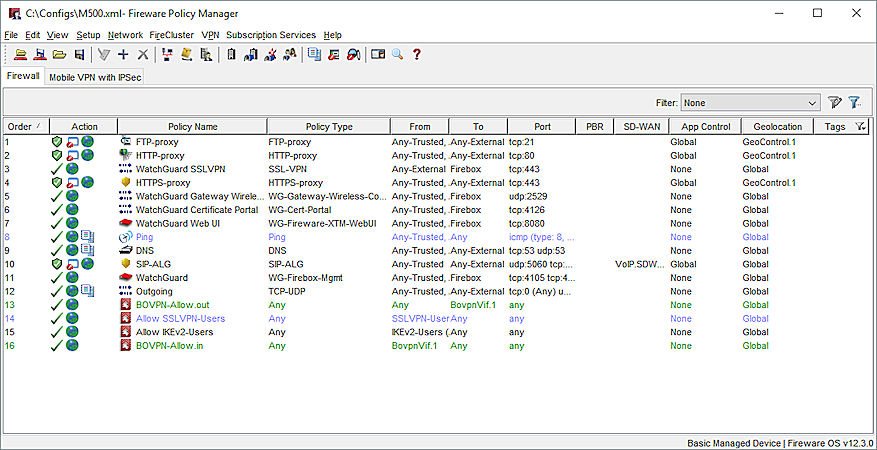
Policy Manager has two views: Large Icons and Details.In the default Details view, each policy is a row of information divided among several columns. You can see configuration information, such as source and destination addresses, assigned ports, policy-based routing, and application control settings, as well as whether notification, scheduling, and QoS/Traffic Management are configured. The Large Icons view shows each policy as an icon.

Details View
![]()
Large Icons View
To change to the Large Icons view:
Select View > Large Icons.
This information appears for each policy:
Order
The order in which the policies are sorted, and how traffic flows through the policies. Policies are automatically sorted from the most specific to the most general. To manually select the order in which the policies are applied, you can switch to Manual-Order Mode.
To switch to Manual-Order Mode and change the policy order, from Fireware Web UI:
- Click Disable policy Auto-Order mode.
A confirmation message appears.- Click Yes to enable Manual-Order Mode.
- To change the order of policies:
- Select one or more policies in the list and click Move Up or Move Down.
- Select a policy and drag it to a new location in the Policy List.
- Click Save Policy Order.
To switch to Manual-Order Mode and change the policy order, from Policy Manager:
- Select View > Auto-order mode and remove the check mark from the Auto-order Mode option.
- Select a policy and drag it to a new location in the Policy List.
For more information on policy order, go to About Policy Precedence.
Action
The action taken by the policy for traffic that matches the policy definition. The symbols in this column also indicate whether the policy is a packet filter policy or a proxy policy, and the settings that are configured for the policy:
-
 — Packet filter policy; traffic is allowed
 -
 — Packet filter policy; traffic is denied
 -
 — Disabled packet filter policy
 -
 — Proxy policy; traffic is allowed
 -
 — Proxy policy; traffic is denied
 -
 — Disabled proxy policy
 -
 — Application Control is configured
 -
 — Geolocation is configured
 -
 —Traffic Management/ QoS is configured
 -
 — Scheduling is configured
 -
 — Logging is enabled
 -
 — Notification is enabled
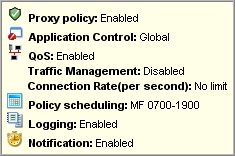
To see the details about the icons that appear in the Action column for a policy, you can hover over the icons and the list of enabled actions and definitions appears.

Policy Name
The name of the policy.
For more information, go to Add Policies to Your Configuration.
Type
The protocol that the policy manages. Packet filters include the protocol name only. Proxies include the protocol name and -proxy. ALGs include the protocol name and -ALG.
From
The source addresses for this policy.
Src Port
The source port of the connection enabled for this policy.
To
The destination addresses for this policy.
Dst Port
Protocols and ports used by the policy.
PBR
The interface numbers that are used in the policy-based routing settings for the policy.
SD-WAN
The SD-WAN action that is used in the SD-WAN routing settings for the policy.
App Control
The Application Control action enabled for the policy.
For more information, go to Enable Application Control in a Policy.
Geolocation
The Geolocation action enabled for the policy.
For more information, go to Enable Geolocation in a Policy.
Tags
The policy tag that is applied to the policy. To filter the policies in the policy list by the applied policy tags, click ![]() and apply a policy filter.
and apply a policy filter.
For more information, go to About Policy Tags and Filters.
Change Colors Used for Policy Manager Text