Applies To: Cloud-managed Fireboxes
The Firebox uses dynamic NAT to change the source IP address of an outgoing connection to the public IP address of the Firebox. The default Firebox network configuration includes dynamic NAT rules for outbound traffic from all private IP addresses specified in RFC1918 to all external networks:
- 192.168.0.0/16
- 172.16.0.0/12
- 10.0.0.0/8
Source IP Addresses and Dynamic NAT
Dynamic NAT rules change the source IP address for traffic to the primary IP address of the network the traffic leaves. In a dynamic NAT rule, you can specify a different source IP address. If you set a source IP address in a dynamic NAT rule, the IP address must be on the same subnet as the primary or secondary IP address of the network the traffic leaves. For more information, see About Dynamic NAT Source IP Addresses.
Dynamic NAT and Policy Settings
By default, all firewall policies use the dynamic NAT rules. In policy advanced settings, you can set a custom source IP address for dynamic NAT. For information about how to configure dynamic NAT settings in a policy, see Configure Dynamic NAT in a Firewall Policy.
Configure Dynamic NAT Rules
To edit the dynamic NAT rules, from WatchGuard Cloud:
- Select Configure > Devices.
- Select the cloud-managed Firebox.
- Click Device Configuration.
- In the Networking section, click the Dynamic NAT tile.
The Dynamic NAT configuration page opens.

- To add a Dynamic NAT rule, click Add Dynamic NAT.
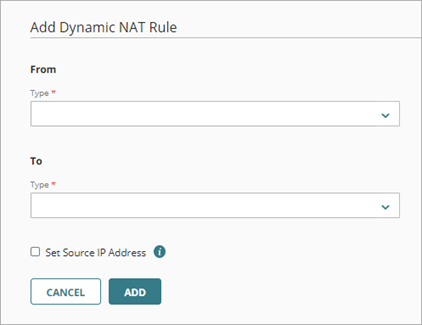
The Add Dynamic NAT Rule dialog page opens.

- In the From section, from the Type drop-down list, select the type of address to use to specify the source of the outgoing packets:
- My Aliases — An alias you configured, including template aliases
- Built-in Aliases — A predefined system alias
- Firebox Networks — The name of a Firebox network, such as Internal or External
- Host IPv4 — The IPv4 address of a host
- Network IPv4 — The IPv4 address of a network
- Host Range IPv4 — A range of IPv4 addresses

A custom alias can be inherited from a template. When an alias is inherited from a template, it displays a TEMPLATE label beside the alias name.
- In the From section, type the host IP address, network IP address, or host IP address range, or select an alias or Firebox network.
- In the To section, from the Type drop-down list, select the type of address to use to specify the destination of the outgoing packets: My Aliases, Built-in Aliases, Firebox Networks, Host IPv4, Network IPv4, or Host Range IPv4.
- In the To section, type the host IP address, network IP address, or host IP address range, or select an alias or Firebox network.
- To set the source IP address:
- Select the Set Source IP Address check box.
- In the Source IP Address text box, type the IP address you want to set as the source IP address for traffic that matches this rule.

If you enable Set Source IP Address, the dynamic NAT rule must allow traffic through only one network. The source IP address you specify must be on the same subnet as the primary or secondary network IP address of the outgoing network. For more information, see About Dynamic NAT Source IP Addresses.
- Click Add.
- To save configuration changes to the cloud, click Save.
Edit a Dynamic NAT Rule
To edit a Dynamic NAT rule:
- On the Firebox Device Configuration page, click the Dynamic NAT tile.
- Click the network IP address for the rule.
- Click Update.
- Edit the rule, as described in the previous section
- To save configuration changes to the cloud, click Save.
Remove a Dynamic NAT Rule
To remove a Dynamic NAT rule:
- On the Firebox Device Configuration page, click the Dynamic NAT tile.
- In the row for the rule you want to delete, click
 .
. - To confirm the deletion, click Delete.
- To save configuration changes to the cloud, click Save.