To configure the Access Portal, you must:
- Enable the Access Portal
- Add an Application Group
- Add a Web Application
- Add an RDP Host
- Add an SSH Host
- Configure the User Connection Settings — user access, authentication servers, configuration port, and timeouts
- (Optional) Configure reverse proxy actions
- (Optional) Configure SAML Single Sign-On
You can add custom icons for web applications, Remote Desktop Protocol (RDP) hosts, and Secure Shell (SSH) hosts. We recommend that image files for icons have a maximum size of 64 x 64 pixels.
The Access Portal is not supported on Firebox T Series. The Access Portal is supported on FireboxV, FireboxCloud, and all other Fireboxes.
Enable the Access Portal
To enable the Access Portal, from Fireware Web UI or Policy Manager:
- Select Subscription Services > Access Portal.
- Select Enable Access Portal.
Add an Application Group
- Select Subscription Services > Access Portal.
- Select Add > Application Group.
The Add Application Group dialog box appears. - In the Name text box, type a name for the application group.

- Click OK.
- To add an application to the application group, select the application.

- To move the application into an application group, click Move Up or Move Down to move the application into an application group.

- Select Add.
The Web Application or Application Group dialog box appears. - From the Type drop-down list, select Application Group.
- In the Name text box, type a name for the application group.
- Select applications to move into this application group.

Add a Web Application
You can add external web applications to the Access Portal. For internal web applications, configure reverse proxy actions. For more information about reverse proxy actions, go to Reverse Proxy for the Access Portal.
You cannot configure the exact same URL for a web application and a reverse proxy action.
- Select Add > Web Application.
- In the Name text box, type a name for the web application.
- In the Description text box, type a description of the web application.
- To select a custom icon for the application, select Custom Icon > Choose File.
- To remove a custom image that you added, select Reset Image.
- In the URL text box, type the URL for the web application. This URL must be publicly resolvable.

- Click Add.
The Web Application or Application Group dialog box appears. - In the Name text box, type a name for the web application.
- In the Description text box, type a description of the web application.
- To select a custom icon for the application, select Custom Icon > Upload Custom Icon.
- In the URL text box, type the URL for the web application. This URL must be publicly resolvable.

Add an RDP Host
The Access Portal supports the Any, NLA, TLS, and RDP security types for connections to RDP hosts. We recommend the default setting Any which works for most connections. When Any is selected, the Firebox negotiates the security protocol with the remote host.
If you change the security type to a setting other than Any, make sure the RDP host has the same security type configured.
For more information about Windows RDP settings, go to Security Settings for Windows RDP Hosts.
For information about macOS and iOS certificates, go to Certificate Requirements for macOS and iOS Devices.
For information about how to manage the RDP connection, go to Manage the RDP Connection.
- Click Add.
The Web Application or Application Group page appears. - From the Type drop-down list, select Host Desktop Access (RDP).
- In the Name text box, type a name for the RDP connection.
- In the Description text box, type a description of the RDP connection.
- To select a custom icon for the application, select Custom Icon > Choose File.
- To remove a custom image that you added, select Reset Image.
- In the Host text box, type the IP address or domain name of the host to connect to.
- To use a port other than 3389, type the number in the Port text box.
- From the Security drop-down list, select Any, NLA, RDP, or TLS as the security protocol for the connection. Tip!
- If you select RDP or TLS:
- To require users to specify a user name and password on the RDP login page, select Require users to specify credentials.
- To specify and save a user name and password for the RDP connection, select Use these credentials.
- If the RDP host has a self-signed certificate, and you trust the connection and the RDP host, select Trust certificate.
For RDP connections to a computer with Windows 10 Enterprise, you must select Trust certificate.

- To require the Firebox to verify the certificate, clear the Trust Certificate check box. You must import the CA chain of the RDP server into the Firebox. For information about how to import CA certificates, go to Import and Install a Third-Party Web Server Certificate.
- Click the Session tab.

- (Optional) Specify the name for the RDP host to use to identify the RDP client.
- (Optional) To automatically launch a program when Windows starts, type the file path in the Initial Program text box. The operating system you connect to must support the Initial Program feature for this to work.
- To connect to the console session, select Console Session. You must log in with an account that is a member of the Administrators group.Tip!
Windows Server 2003
The Console Session option connects you to the physical console session (session 0) on the Windows server. This option is the same as the /console switch in Windows. You can only connect to one console session at a time.
For more information about console connections in Windows Server 2003, go to How to Connect to and Shadow the Console Session with Windows Server 2003 Terminal Services.
Windows Server 2008 and higher
The Console Session option connects you to the physical console session on the server. This option is the same as the /admin switch in Windows which replaced the deprecated /console switch. A maximum of two console sessions are allowed at the same time unless you have a Terminal Service license that allows additional concurrent console sessions.
- If Terminal Server is installed on your Windows server, but you do not have a valid Client Access license, you must select Console Session to remotely administer the server.
- If Terminal Server is not installed, you do not need to select this option to remotely administer the server.
For more information about console connections in Windows Server 2008 and higher, go to Changes to remote administration in Windows Server 2008.
- To change the keyboard language, select an option from the Keyboard Language drop-down list.
- Click the Display tab.

- To change the color depth settings, select an option from the Color Depth drop-down list.
- To change the Resize Method, from the drop-down list, select Automatic or Disabled. If you keep the default setting of Automatic, the session automatically resizes the RDP window smoothly.
Automatic resizing is only supported for Windows versions that support RDP 8.1. You must select Disabled if your operating system is a version prior to Windows 8.1 or Windows Server 2012 R2 without an RDP 8.1 update.
In Fireware v12.3.x or lower, to change the Resize Method, from the drop-down list, select Reconnect or Disabled. If you keep the default setting of Reconnect, the session automatically disconnects if the client display size changes and reconnects with the new display size.
- Click Add.
The Web Application or Application Group page appears. - From the Type drop-down list, select Host Desktop Access (RDP).
- In the Name text box, type a name for the RDP connection.
- In the Description text box, type a description of the RDP connection.
- To select a custom icon for the application, select Custom Icon > Upload Custom Icon.
- In the Host text box, type the IP address or domain name for the host to connect to.
- To use a port other than 3389, type the number in the Port text box.

- Click the User Authentication tab.

- From the Security drop-down list, select Any, RDP, TLS, or NLA as the security protocol for the connection. Tip!
- To require users to specify a user name and password on the RDP login page, select Require users to specify credentials.
- To specify and save a user name and password for the RDP connection, select Use these credentials.
- If the RDP host has a self-signed certificate, and you trust the connection and the RDP host, you can select Trust Certificate.
- Select View > Certificates > Import Certificate and select General Use.
- Click the Session tab.

- (Optional) In the Client Name text box, specify the name for the RDP host to use to identify the RDP client.
- (Optional) To automatically launch a program when Windows starts, type the file path in the Initial Program text box. The operating system you connect to must support the Initial Program feature for this to work.
- To connect to the console session, select Console Session. You must log in with an account that is a member of the Administrators group.Tip!
Windows Server 2003
The Console Session option connects you to the physical console session (session 0) on the Windows server. This option is the same as the /console switch in Windows. You can only connect to one console session at a time.
For more information about console connections in Windows Server 2003, go to How to Connect to and Shadow the Console Session with Windows Server 2003 Terminal Services.
Windows Server 2008 and higher
The Console Session option connects you to the physical console session on the server. This option is the same as the /admin switch in Windows that replaced the deprecated /console switch. A maximum of two console sessions are allowed at the same time unless you have a Terminal Service license that allows additional concurrent console sessions.
- If Terminal Server is installed on your Windows server, but you do not have a valid Client Access license, you must select Console Session to remotely administer the server.
- If Terminal Server is not installed, you do not need to select this option to remotely administer the server.
For more information about console connections in Windows Server 2008 and higher, go to Changes to remote administration in Windows Server 2008.
- To change the keyboard language, select an option from the Keyboard Language drop-down list.
- Click the Display tab.

- To change the color depth settings, select an option from the Color Depth drop-down list.
- To change the Resize Method, from the drop-down list, select Automatic, Reconnect, or Disabled. If you keep the default setting of Automatic, the session automatically resizes the RDP window smoothly.
Automatic resizing is only supported for Windows versions that support RDP 8.1. You must select Disabled if your operating system is a version prior to Windows 8.1 or Windows Server 2012 R2 without an RDP 8.1 update.
In Fireware v12.3.x or lower, to change the Resize Method, from the drop-down list, select Reconnect or Disabled. If you keep the default setting of Reconnect, the session automatically disconnects if the client display size changes and reconnects with the new display size.
Security Settings for Windows RDP Hosts
The guidelines in this section describe which Access Portal RDP security types are compatible with Remote Desktop and Security Layer settings on the Windows RDP host.
These guidelines assume the Windows operating system on the RDP host uses default Security Layer settings. The default Security Layer settings in Windows vary by operating system, and can only be changed through registry edits in some Windows operating systems. We do not support changes to Windows settings that require registry edits.
For all Windows operating systems:
- We recommend that you select Trust Certificate in the Access Portal RDP settings.
- If you do not select Trust Certificate, you must import the CA chain for the RDP host into the Firebox. For general certificate import instructions, go to Manage Device Certificates (Web UI) or Manage Device Certificates (WSM). When you import the CA chain, you must select the General certificate function.
- If the option Allow connections only from computers running Remote Desktop with Network Level Authentication is selected in the Remote Settings in Windows, that host only allows connections that use NLA. In the Access Portal RDP settings, you must select the NLA security type.
- You must select the Any, NLA, or TLS security types.
- If you select TLS, you must change the Remote Settings in Windows so Allow connections only from computers running Remote Desktop with Network Level Authentication is not selected.
- We do not support the RDP security type because it requires a registry edit to change the security layer value. In Windows 10 and Windows Server 2016 or higher, the default security layer value is TLS.
- You can select the Any, NLA, TLS, or RDP security types.
- If you select the RDP security type, you must change the security layer value. When the Terminal Server role is installed, you can change the security layer value in the Windows GUI.
To change the security layer value, from Windows Server 2016, Windows Server 2019, and Windows Server 2022:
- Open Server Manager.
- Select Roles > Remote Desktop Services > RD Session Host Configuration > RDP-Tcp Properties.
- Select the General tab.
- From the Security layer drop-down list, select Negotiate.
You can select the Any, NLA, TLS, or RDP security types.
Certificate Requirements for macOS and iOS Devices
To connect to an RDP host from a macOS or iOS device with Safari, you must import a certificate on the macOS or iOS device. For information about certificate requirements and the import process, go to Install a Certificate on a macOS or iOS Device for RDP or SSH.
Add an SSH Host
You can add an SSH host to the Access Portal from Fireware Web UI or Policy Manager.
In Fireware v12.11 and higher, when you use Access Portal SSH resources with SSH servers based on OpenSSH 7.6 and higher with older SSH-1 algorithms, you must use DSA keys. RSA is not supported.
To connect to an SSH host from a macOS or iOS device with Safari, you must import a certificate on the macOS or iOS device. For information about certificate requirements and the import process, go to Install a Certificate on a macOS or iOS Device for RDP or SSH.
- Click Add and select Host Shell Access (SSH).
The Add SSH Application page appears. - In the Name text box, type a name for the SSH connection.
- In the Description text box, type a description of the SSH connection.
- To select a custom icon for the application, select Custom Icon > Choose File.
- To remove a custom image that you added, select Reset Image.
- In the Host text box, type the IP address or domain name for the host you connect to.
- To use a port other than 22, type the number in the Port text box.
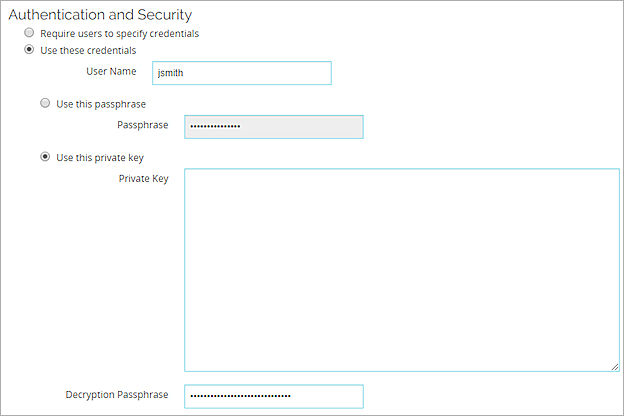
- To require users to specify a user name and password on the RDP login page, select Require users to specify credentials.

- To specify and save user credentials for the RDP connection, select Use these credentials.
- In the User Name text box, type a user name.
- To specify a passphrase, select Use this passphrase.

- To specify a private key, select Use this private key.
- If you specified a private key, in the Decryption Passphrase text box, type a decryption passphrase for the private key.
- To change the display settings, select the Display tab.
- From the Color Scheme drop-down list, select Black and white, Gray and black, Green and black, or White and black.
- To change the font size, type a number in the Font Size text box.
- Click Add.

- From the Type drop-down list, select Host Shell Access (SSH).
- In the Name text box, type a name for the SSH connection.
- In the Description text box, type a description of the SSH connection.
- To select a custom icon for the application, select Custom Icon > Upload Custom Icon.
- In the Host text box, type the IP address or domain name for the host to connect to.
- To use a port other than 22, type the number in the Port text box.
- Click the User Authentication tab.
- To require users to specify a user name and password on the RDP login page, select Require users to specify credentials.

- To specify and save user credentials for the RDP connection, select Use these credentials.
- In the User Name text box, type a user name.
- To specify a passphrase, select Use this passphrase.
- To specify a private key, select Use this private key.
- If you specified a private key, in the Decryption Passphrase text box, type a decryption passphrase for the private key.
- To change the display settings, click the Display tab.
- From the Color Scheme drop-down list, select Black and white, Gray and black, Green and black, or White and black.
- To change the font size, type a number in the Font Size text box.

Install a Certificate on a macOS or iOS Device for RDP or SSH
To connect to an RDP or SSH host from a macOS or iOS device with the Safari web browser, you must configure one of these certificates on the Firebox:
- Trusted third-party web server certificate signed by a trusted CA
- Custom web server certificate that specifies the domain name or IP address of the Access Portal
If you install a trusted third-party web server certificate on your Firebox, you do not have to install the certificate on your macOS or iOS device.
If you install a custom web server certificate on the Firebox, you must install the certificate on the macOS or iOS device. The RDP or SSH connection does not work if you only accept the certificate in the Safari web browser.
- On the Firebox, install a custom web server certificate.
- Send the certificate file to the iOS device.
- To install the certificate, open the file on the iOS device.
- Select Settings > General > About > Certificate Trust Settings to make sure the certificate was installed.
- Enable the certificate as a trusted root certificate.
To install the certificate on a macOS device, go to Keychain for Mac: Add certificates to a keychain on the Apple website.
Configure the User Connection Settings
On the User Connection Settings tab, you can specify:
- Users and groups that can connect to applications or application groups.
- Authentication servers
- Access Portal port (configuration port)
- Timeout values
In Fireware v12.4 or higher, users only need to type their user name to log in with the default authentication server. To log in with a different authentication server, users must type the domain name and the user name in this format: <domain name>\<user name>.
You cannot use the AuthPoint authentication server with the Access Portal. In Fireware v12.9.4 or higher, if the AuthPoint authentication server is the default authentication server for Mobile VPN with SSL, the Access Portal uses the next authentication server in the list as the default authentication server for Access Portal authentication.
- On the Access Portal page, click the User Connection Settings tab.
- To give all users and groups permission to connect to all applications, keep the default option selected, All applications are available to all users and groups authenticated with Access Portal.
To specify which users and groups can access which applications:
- Select Specify the applications available to each user and group.
- Click Add.
The Add User or Group page appears. - From the Authentication Server drop-down list, select the authentication server where the user or group exists. Tip!
- In the Type drop-down list, specify User or Group.
- To specify a user or group that already exists on the authentication server, type the user name or group name in the Name text box.
- To add a new user or group, type the user name or group name and click New User or New Group.
If you specified the Firebox-DB authentication server, a Firebox User or Firebox Group dialog box appears.
If you specified a third-party authentication server, the Add User or Group dialog box appears. - To configure the new user or group, follow the instructions in the Use Users and Groups in Policies topic.
- In the Access Portal settings, on the Add User or Group page, select one or more application groups or applications.

- Click OK.

- In the Access Portal settings, click the User Connection Settings tab.
- To give all users and groups permission to connect to all applications, keep the default option selected, All applications are available to all users and groups authenticated with the Access Portal.
To specify which users and groups can access which applications:
- Select Specify the applications available to each user and group.
- Click Add.
The Add User or Group dialog box appears. - To add a user or group, click Add and follow the instructions in the Use Users and Groups in Policies topic.
- In the Access Portal settings, on the Add a User or Group page, select a user or group name from the Name drop-down list.
- Select one or more application groups or applications.

- Click OK.

- In the Access Portal settings, click the User Connection Settings tab.
- In the Authentication Servers section, select a server from the drop-down list.
- Click Add.
- Repeat these steps to add more authentication servers.
- Click Move Up or Move Down to reorder the list. The first authentication server in the list is the default server for users.

In Fireware v12.4 or higher, users only need to type their user name to log in with the default authentication server. To log in with a different authentication server, users must type the domain name and the user name in this format: <domain name>\<user name>.
- Select Subscription Services > Access Portal.
- Click the User Connection Settings tab.
- In the Authentication Servers section, select a server from the drop-down list.
- Click Add.
- Repeat these steps to add more authentication servers.
- Click Up or Down to reorder the list. The first authentication server in the list is the default server for users.

In Fireware v12.4 or higher, users only need to type their user name to log in with the default authentication server. To log in with a different authentication server, users must type the domain name and the user name in this format: <domain name>\<user name>.
- Select Subscription Services > Access Portal.
- Click the User Connection Settings tab.
- In the Access Portal Port text box, type a port number.
If Mobile VPN with SSL is enabled, and you change the Access Portal Port, the Configuration Channel in the Mobile VPN with SSL configuration is changed to the same port.

If you cannot edit the Access Portal port, another SSL/TLS Firebox feature is enabled that shares this port setting. For more information, go to SSL/TLS Settings Precedence and Inheritance.
- Select Subscription Services > Access Portal.
- Click the User Connection Settings tab.
- In the Access Portal Port text box, type a port number.
If Mobile VPN with SSL is enabled, and you change the Access Portal Port, the Configuration Channel in the Mobile VPN with SSL configuration is changed to the same port.

If you cannot edit the Access Portal port, another SSL/TLS Firebox feature is enabled that shares this port setting. For more information, go to SSL/TLS Settings Precedence and Inheritance.
Timeout settings specify when the Firebox disconnects users from the Access Portal. The Session Timeout setting indicates the maximum amount of time a user can remain connected to the Access Portal. The Idle Timeout setting indicates the maximum amount of time a user can be idle while connected to the Access Portal.
To configure the SAML single sign-on settings, go to Configure SAML Single Sign-On.
Manage the RDP Connection
After you establish a connection with an RDP host, from the Access Portal RDP host session, you can:
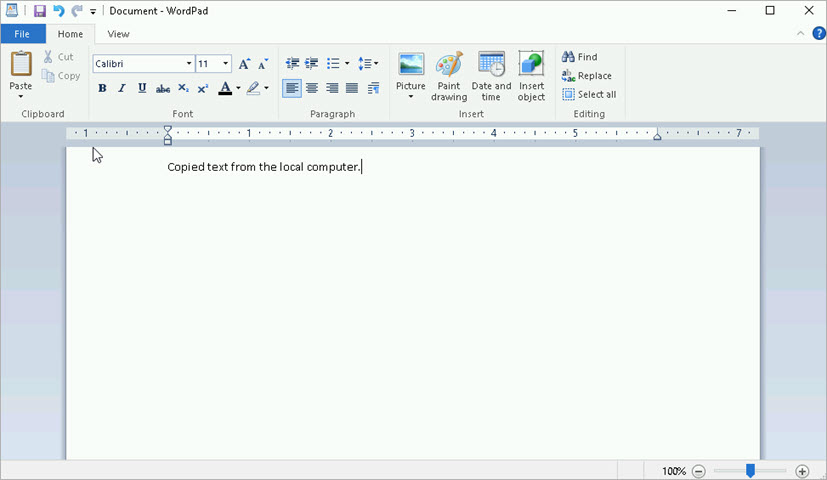
To copy text from your local computer to an RDP host:
- From your local computer, copy the text that you want to move to the RDP host.
- From the Access Portal, connect to the RDP host.
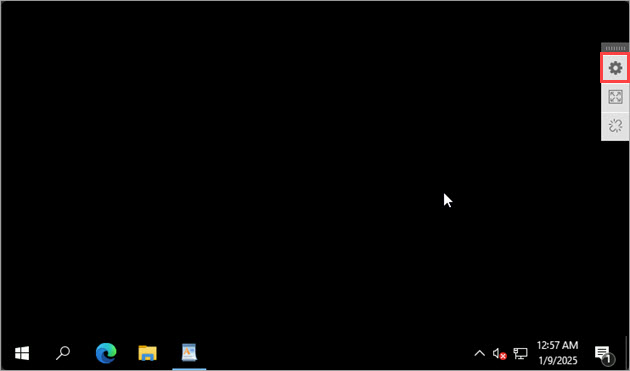
The RDP host opens. - From the RDP host, in the top-right corner, click the settings icon.
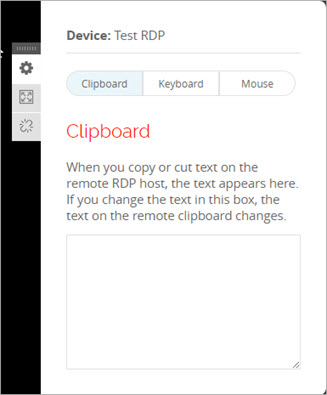
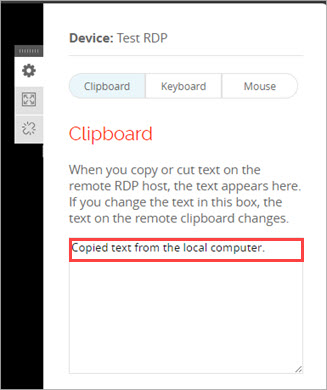
The Clipboard opens. - To paste the text that you copied to the clipboard in step 1, press Ctrl+V, or right-click and select Paste.
The text appears in the clipboard. - To paste the text from the clipboard to a location on the RDP host, navigate to that location and press Ctrl+V, or right-click and select Paste.
All text in the clipboard is pasted to the RDP host.
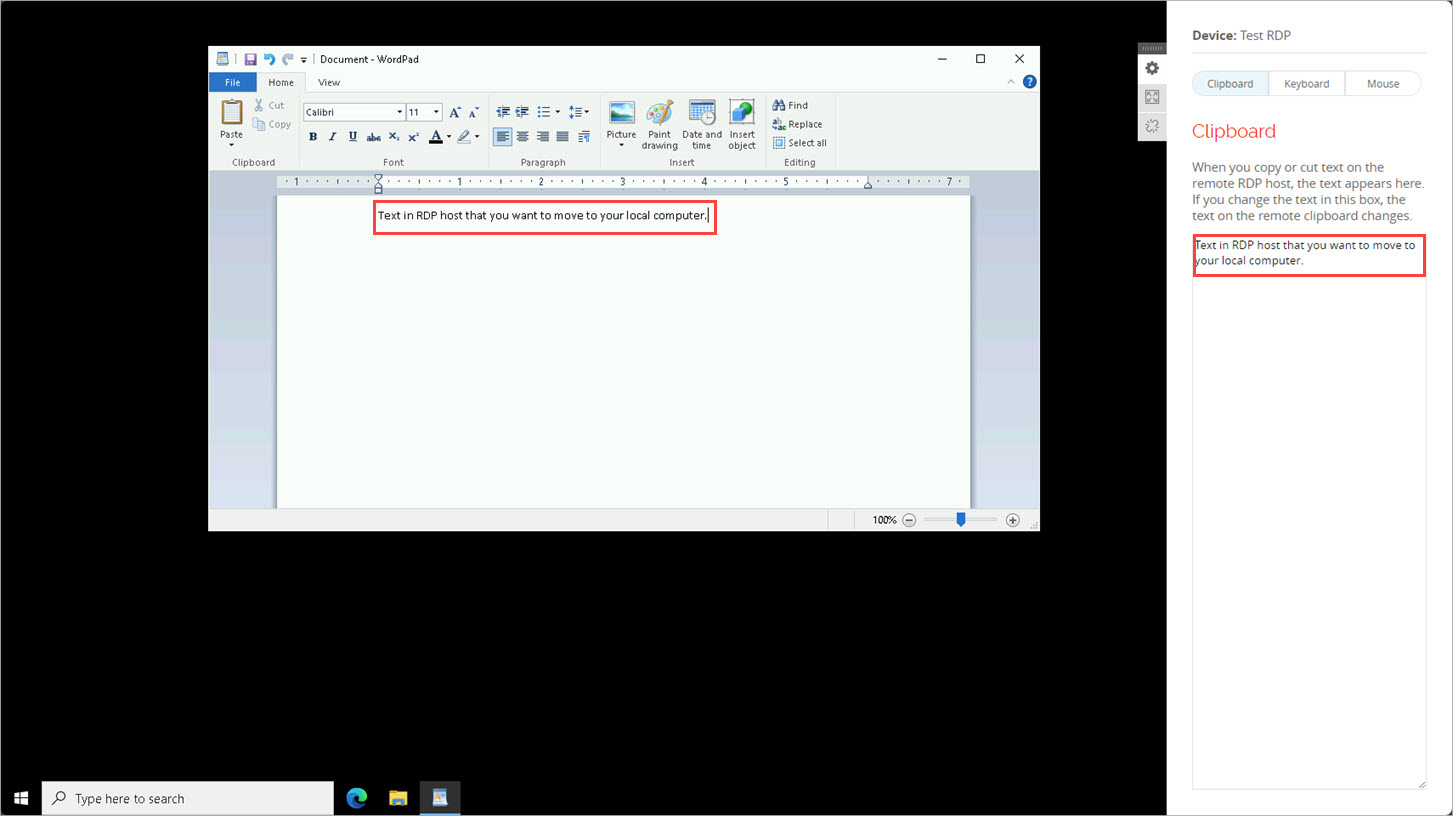
To copy text from an RDP host to your local computer:
- From the RDP host, copy the text that you want to move to your local computer.
The copied text appears in the clipboard. - Copy the text from the clipboard.
- Paste the text that you copied from the clipboard to your local computer.
To set the RDP host session to full screen:
- From the Access Portal RDP host, in the top-right corner, click
 .
.
To disconnect the RDP host session:
- From the Access Portal RDP host, in the top-right corner, click
 .
.
To change the keyboard input settings in an Access Portal RDP host session:
- From the RDP host, in the top-right corner, click
 .
. - Select Keyboard.
The keyboard input options open.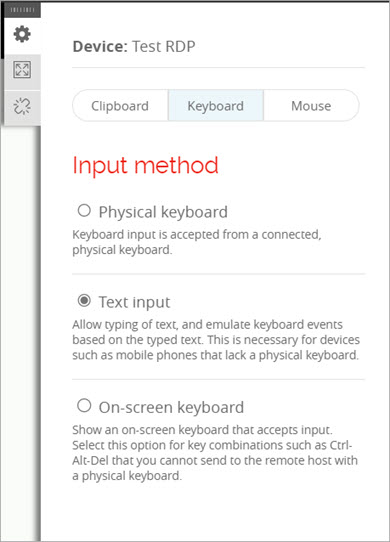
- Select one of these options as the keyboard input type:
- Physical Keyboard — Use your physical keyboard as an input method.
- Text Input — Emulate keyboard events based on the typed text. Select this option when you cannot press the Ctrl, Alt, Esc, and Tab buttons on your physical keyboard. If you select this option, a text bar appears at the bottom of the page.
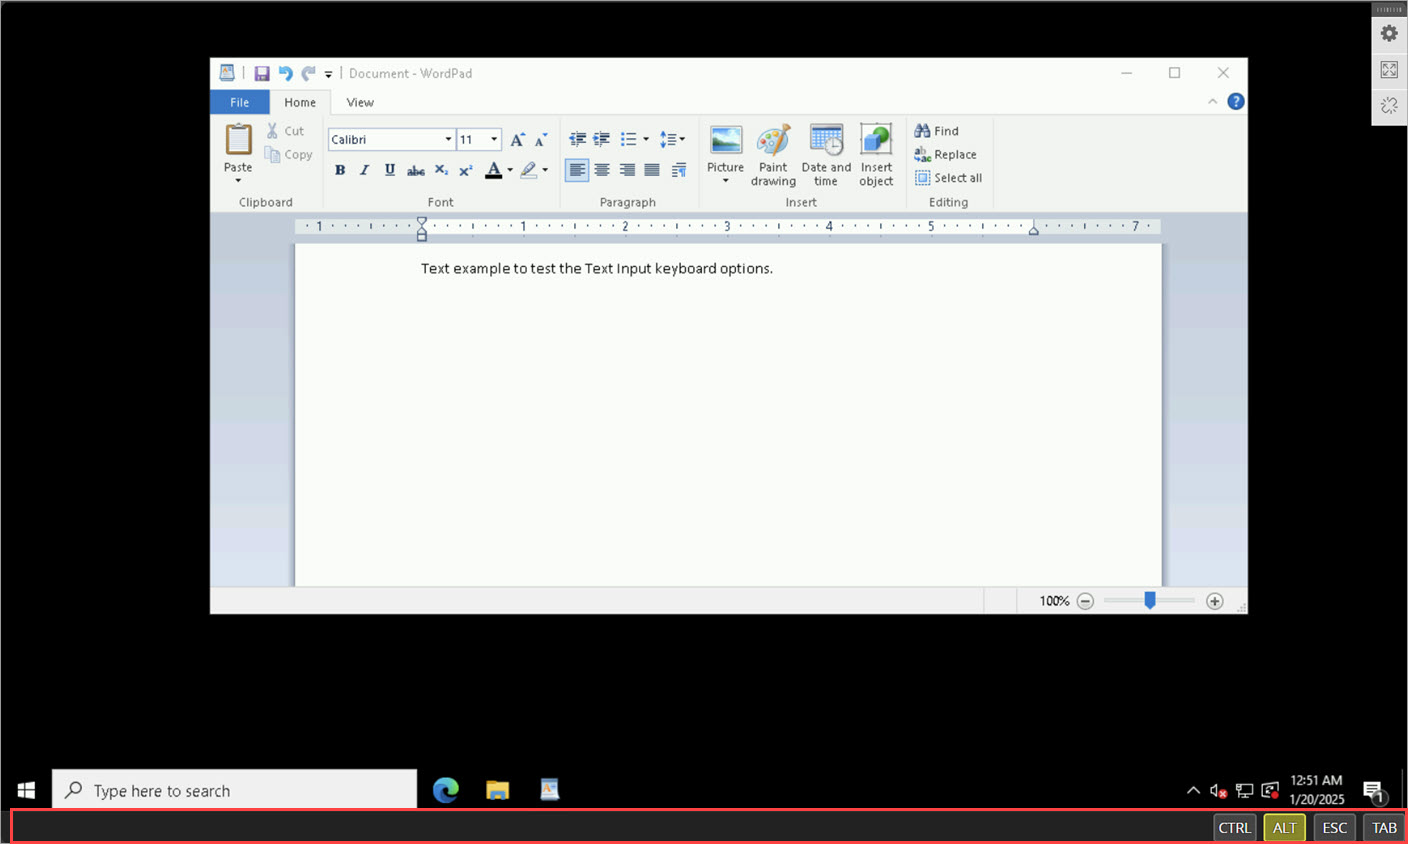
To use the text input keyboard option, from the right corner of the text bar:
- Select Ctrl, Alt, Esc, or Tab, then type the command that you want to run.
For example, to select all text in your text editor, from the bottom of the screen, select Ctrl, then, from your physical keyboard, type A.
All the text in your text editor is copied.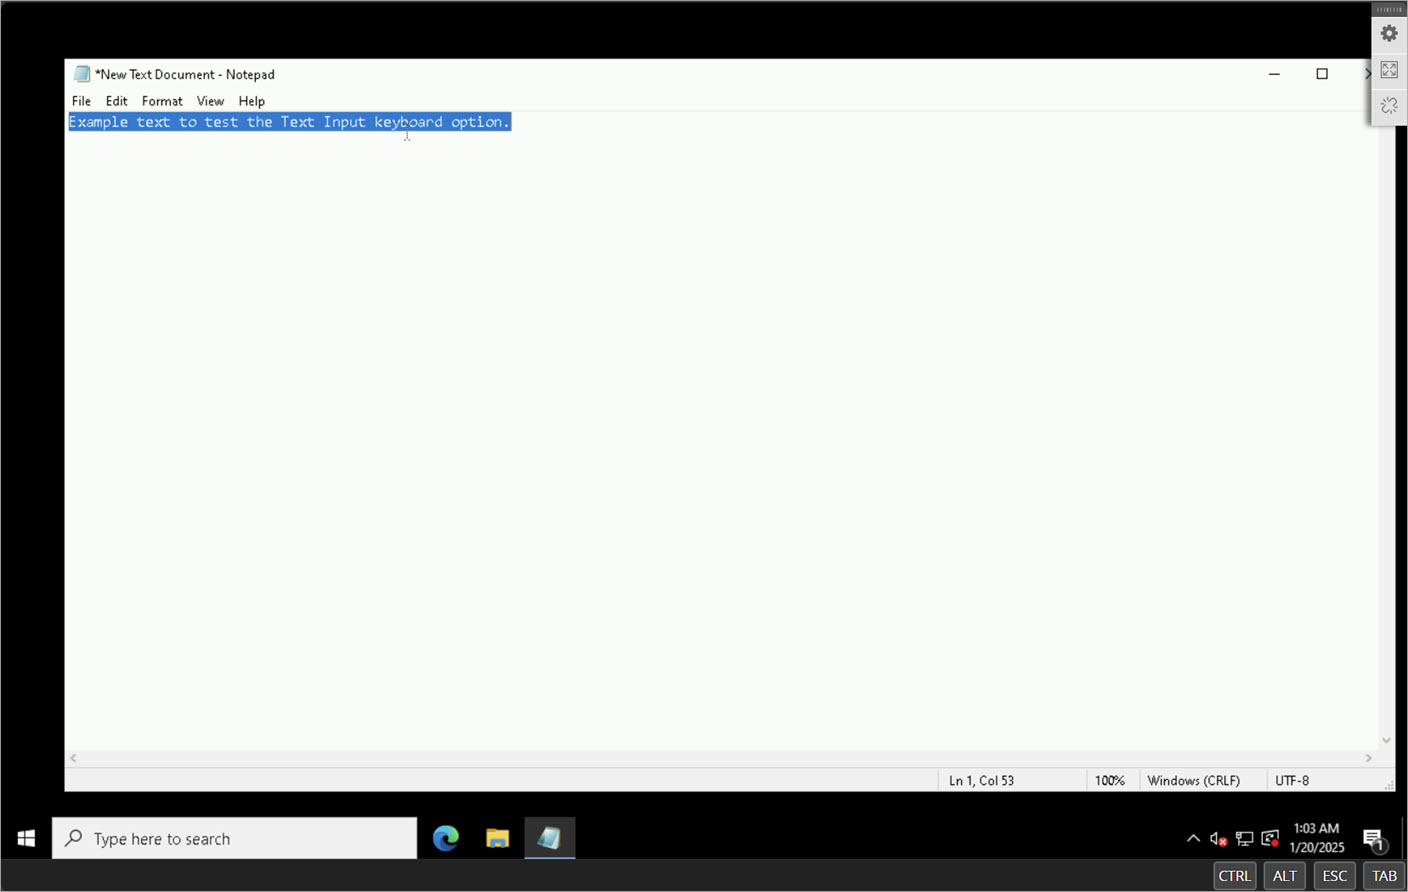
- On-Screen Keyboard — To use an on-screen keyboard.
To change the mouse input settings in an Access Portal RDP host session:
- From the RDP host, in the top-right corner, click
 .
. - Select Mouse.
The mouse input options open.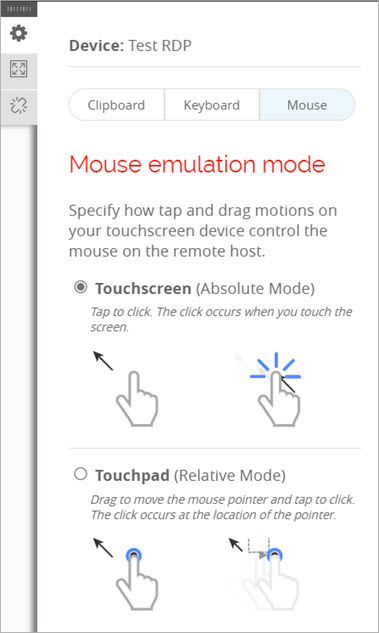
- Select Touchscreen or Touchpad.
Customize the Access Portal Design