Tasks for Windows devices are created as automation policies in N-central. These automation policies are available for Windows devices:
- WatchGuard Endpoint Security – Install the agent in Windows (automatic deployment or manual installation)
- WatchGuard Endpoint Security – Scan Windows device
- WatchGuard Endpoint Security – Isolate Windows device
- WatchGuard Endpoint Security – Un-isolate Windows device
- WatchGuard Endpoint Security – Uninstall agent in Windows
Automatic Deployment
You can configure N-central to automatically deploy the WatchGuard agent to Windows devices for one or more clients.
To configure automatic deployment to Windows devices, from N-central:
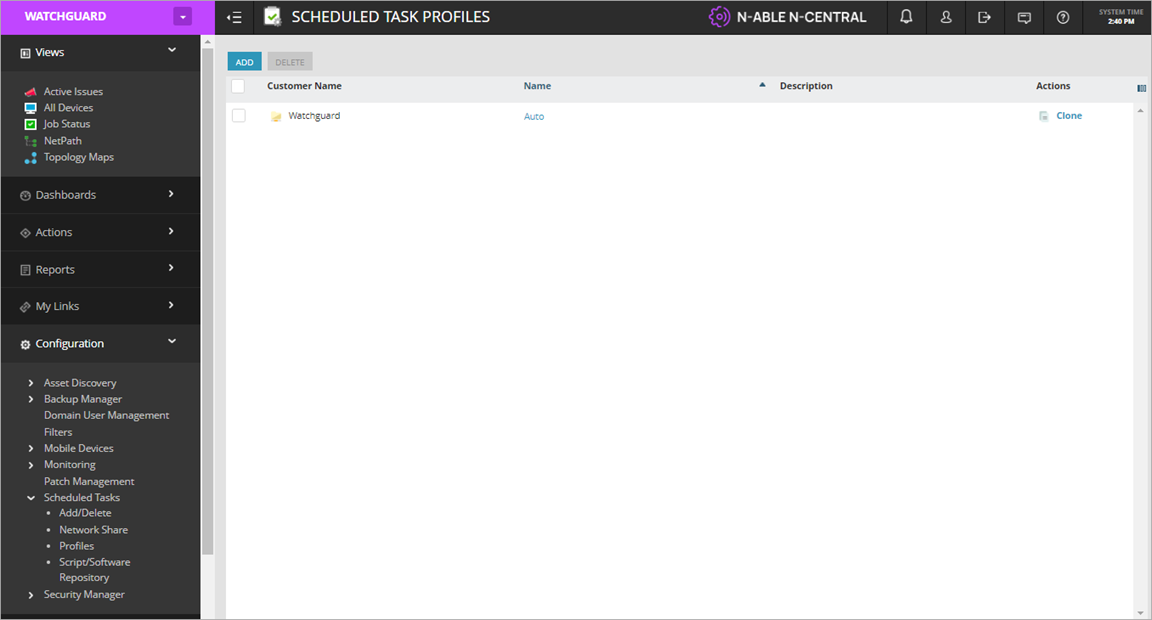
- Select Configuration > Scheduled Tasks > Profiles.
The Scheduled Tasks Profiles page opens.

- Click Add.
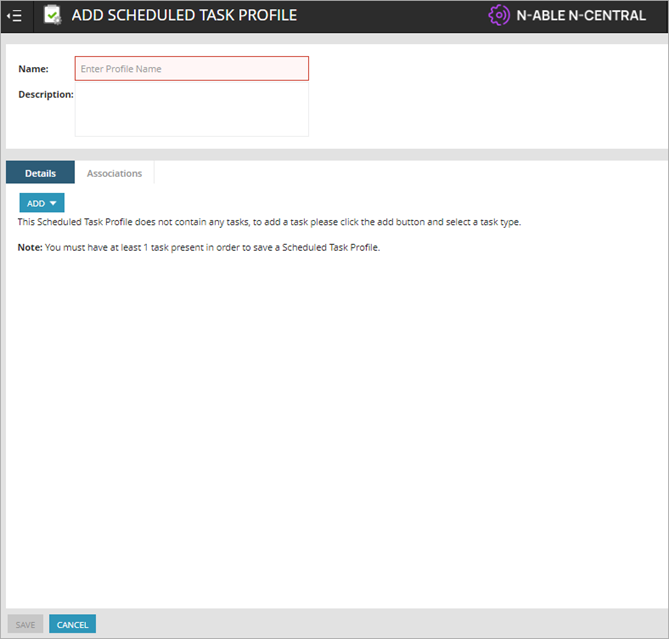
The Add Scheduled Task Profile page opens.

- Enter a name for the scheduled task profile.
- From the Add drop-down list, select Automation Policy.
The Automation Policy Task page opens.

- Enter a task name.
- From the Repository Item drop-down list, select WatchGuard Endpoint Security - Install agent in Windows.
The Input Parameters section opens.

- For the WatchGuard Endpoint Security Integration - API Key input parameter, select the Select a Property option, and select WatchGuard Endpoint Security Integration - API Key from the drop-down list.
- For the WatchGuard Endpoint Security Integration Client Account ID input parameter, select the Select a Property option, and select WatchGuard Endpoint Security Integration - Client Account ID from the drop-down list.
- For the WatchGuard Endpoint Security Integration - Deployment Setting ID input parameter, select the Select a Property option, and select WatchGuard Endpoint Security Integration - Deployment Setting ID from the drop-down list.
- For the WatchGuard Endpoint Security Integration - Installer URL input parameter, select the Select a Property option, and select WatchGuard Endpoint Security Integration - Installer URL from the drop-down list.
- For the WatchGuard Endpoint Security Integration - Service Provider Account ID input parameter, select the Select a Property option, and select WatchGuard Endpoint Security Integration - Service Provider Account ID from the drop-down list.
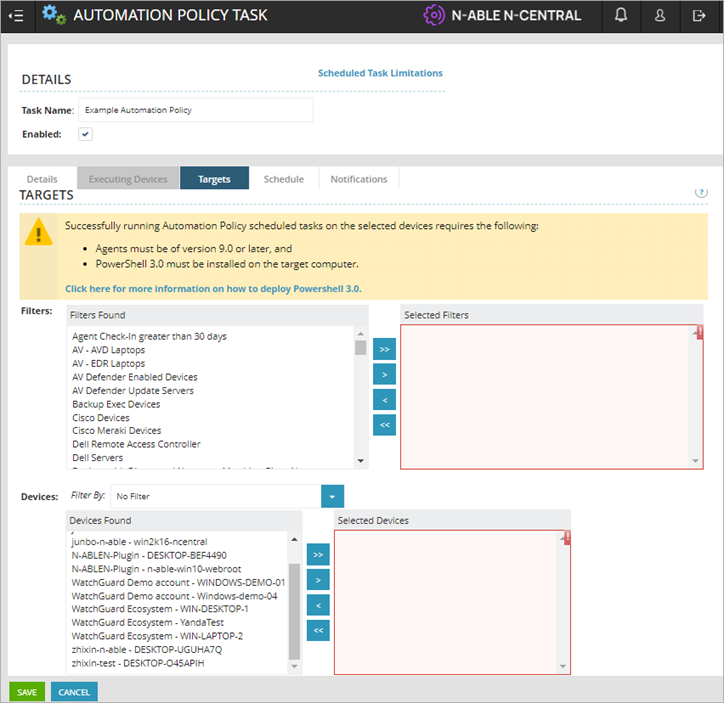
- Select the Targets tab.

- In the Filters section, select the customer accounts you want from the Filters Found column and move them to the Selected Filters column.
- In the Devices section, select the customer devices you want from the Devices Found column and move them to the Selected Devices column.
- Select the Schedule tab.

- Configure the date and time you want this task to run.
- Select the Notifications tab.

- Select when you want a notification to occur (on a success or failure). Select the recipients you want from the Recipients Found column and move them to the Selected Recipients column.
- Click Save.
The scheduled task installs the WatchGuard agent on current Windows devices for the client at the scheduled time. When new Windows devices are added, they are automatically discovered and imported to N-central.
Manual Installation
You can manually run a task to install WatchGuard Endpoint Security on Windows devices. The plug-in installation creates the scripts used to install WatchGuard Endpoint Security.
To manually install WatchGuard Endpoint Security on one or more Windows devices, from N-central:
- Select Actions > Run an Automation Policy.
The Automation Policy Task page opens.

- Enter a task name.
- From the Repository Item drop-down list, select WatchGuard Endpoint Security - Install agent in Windows.
The Input Parameters section opens.

- For the WatchGuard Endpoint Security Integration - API Key input parameter, select the Select a Property option, and select WatchGuard Endpoint Security Integration - API Key from the drop-down list.
- For the WatchGuard Endpoint Security Integration Client Account ID input parameter, select the Select a Property option, and select WatchGuard Endpoint Security Integration - Client Account ID from the drop-down list.
- For the WatchGuard Endpoint Security Integration - Deployment Setting ID input parameter, select the Select a Property option, and select WatchGuard Endpoint Security Integration - Deployment Setting ID from the drop-down list.
- For the WatchGuard Endpoint Security Integration - Installer URL input parameter, select the Select a Property option, and select WatchGuard Endpoint Security Integration - Installer URL from the drop-down list.
- For the WatchGuard Endpoint Security Integration - Service Provider Account ID input parameter, select the Select a Property option, and select WatchGuard Endpoint Security Integration - Service Provider Account ID from the drop-down list.
- Select the Targets tab.

- In the Filters section, select the customer accounts you want from the Filters Found column and move them to the Selected Filters column.
- In the Devices section, select the customer devices you want from the Devices Found column and move them to the Selected Devices column.
- Click Save.
The task installs the WatchGuard agent on the selected devices immediately.
Scan Windows Devices
The plug-in installation creates scripts for Windows device scan tasks.
To configure a Windows device scan, from N-central:
- Select Actions > Run an Automation Policy.
- Enter a task name.
- From the Repository Item drop-down list, select WatchGuard Endpoint Security - Scan Windows device.

- For the WatchGuard Endpoint Security Integration - API Key input parameter, select the Select a Property option, and select WatchGuard Endpoint Security Integration - API Key from the drop-down list.
- For the WatchGuard Endpoint Security Integration Client Account ID input parameter, select the Select a Property option, and select WatchGuard Endpoint Security Integration - Client Account ID from the drop-down list.
- For the WatchGuard Endpoint Security Integration - Service Provider Account ID input parameter, select the Select a Property option, and select WatchGuard Endpoint Security Integration - Service Provider Account ID from the drop-down list.
- Select the Targets tab.

- In the Filters section, select the customer accounts you want from the Filters Found column and move them to the Selected Filters column.
- In the Devices section, select the customer devices you want from the Devices Found column and move them to the Selected Devices column.
- Click Save.
The task saves and WatchGuard Endpoint Security scans the selected device or devices the next time they connect to the server.
Isolate and Un-isolate Devices
You can isolate an at-risk computer to block communication to and from the computer. When you isolate a computer, WatchGuard Endpoint Security blocks all communications, except for those it requires. The plug-in installation creates scripts for Windows device isolation and un-isolation tasks.
To isolate or un-isolate selected Windows devices, from N-central:
- Select Actions > Run an Automation Policy.
- Enter a task name.
- From the Repository Item drop-down list, select WatchGuard Endpoint Security - Isolate Windows device or WatchGuard Endpoint Security - Unisolate Windows device.

- For the WatchGuard Endpoint Security Integration - API Key input parameter, select the Select a Property option, and select WatchGuard Endpoint Security Integration - API Key from the drop-down list.
- For the WatchGuard Endpoint Security Integration Client Account ID input parameter, select the Select a Property option, and select WatchGuard Endpoint Security Integration - Client Account ID from the drop-down list.
- For the WatchGuard Endpoint Security Integration - Service Provider Account ID input parameter, select the Select a Property option, and select WatchGuard Endpoint Security Integration - Service Provider Account ID from the drop-down list.
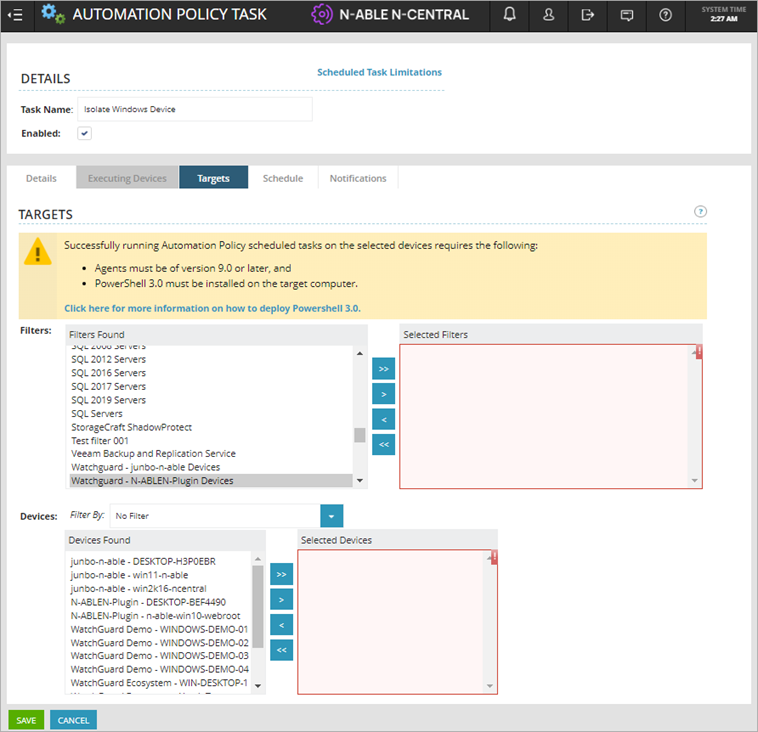
- Select the Targets tab.

- In the Filters section, select the customer accounts you want from the Filters Found column and move them to the Selected Filters column.
- In the Devices section, select the customer devices you want from the Devices Found column and move them to the Selected Devices column.
- Click Save.
The selected devices receive a command from WatchGuard Endpoint Security to isolate or un-isolate.
Uninstall WatchGuard Endpoint Security
The Uninstall WatchGuard Endpoint Security task uninstalls the WatchGuard agent from the devices you select.
To uninstall WatchGuard Endpoint Security, from N-central:
- Select Actions > Run an Automation Policy.
- Enter a task name.
- From the Repository Item drop-down list, select WatchGuard Endpoint Security - Uninstall agent in Windows.

- For the WatchGuard Endpoint Security Integration - API Key input parameter, select the Select a Property option, and select WatchGuard Endpoint Security Integration - API Key from the drop-down list.
- For the WatchGuard Endpoint Security Integration Client Account ID input parameter, select the Select a Property option, and select WatchGuard Endpoint Security Integration - Client Account ID from the drop-down list.
- For the WatchGuard Endpoint Security Integration - Service Provider Account ID input parameter, select the Select a Property option, and select WatchGuard Endpoint Security Integration - Service Provider Account ID from the drop-down list.
- Select the Targets tab.

- In the Filters section, select the customer accounts you want from the Filters Found column and move them to the Selected Filters column.
- In the Devices section, select the customer devices you want from the Devices Found column and move them to the Selected Devices column.
- Click Save.
The tasks runs immediately and uninstalls the WatchGuard agent from the selected devices.
About the WatchGuard Endpoint Security Plug-in for N-able N-central
Configure the WatchGuard Endpoint Security Plug-in for N-able