Applies To: ThreatSync+ NDR
A subnet is a smaller network created by the division of a larger network into equal parts. On the Manage Subnets page, you configure subnets and ranges of IP addresses to label your internal networks and important systems to help ThreatSync+ NDR identify rogue devices.
Internal systems that are not part of a subnet or IP range are identified as members of an Untrusted Private group.

On the Manage Subnets page, you also specify how much of the network you want ThreatSync+ NDR to monitor traffic for.
Specify Traffic Monitoring Behavior
You can specify subnets and IP address ranges to label internal networks and important systems and to limit how much traffic you want ThreatSync+ NDR to monitor. You can exclude a subnet or IP address range from network traffic monitoring.
WatchGuard recommends that you monitor all traffic.

To specify traffic monitoring behavior, there are three options to control how much of your network ThreatSync+ NDR monitors:
- Monitor All Traffic — Monitors all traffic without restrictions. This includes all subnets and exceptions listed. This option is enabled by default.
- Monitor Only My Critical Systems — Monitors a core set of systems only, based on the subnets and IP addresses you include in the list. To configure this option, go to Monitor Only My Critical Systems.
- Exclude Address Ranges from Monitoring — Monitors all traffic except for the subnets and IP address ranges you exclude in the list. Excluded subnets and IP address ranges are not monitored, regardless of the direction of traffic. To configure this option, go to Exclude Address Ranges From Monitoring.
Create a Subnet in ThreatSync+ NDR
Create a subnet and ranges of IP addresses to label internal networks and important systems.
To create a subnet, from WatchGuard Cloud:
- Select Configure > ThreatSync+ > Subnets and Organizations.
- Click New Subnet.
- In the Create a Subnet section, enter the CIDR subnet range (for example, 192.168.34.0/24) or the start and end of an IP address range (for example, 192.168.34.1 and 192.168.34.88).
An end IP Address is required when you do not enter a CIDR subnet range.

- In the Organization text box, enter a name for the address range.
The organization name shows in other summary and detail pages. - From the Device Type drop-down list, select a default device type and icon to used in the user interface for this range (for example, a computer, server, or gateway).
- In the Organization Tags text box, enter a label to further describe the system in the address range.
Organization tags are useful to group assets. - If the addresses in this range are allocated by your DHCP servers, select the Managed by DHCP check box.
This helps improve network analytics. - Click Save.
The new subnet or IP address range shows in the list. You can filter the list and export the list to CSV file. To edit an existing IP address range or subnet, click next to the row you want to edit. Click
  to delete the IP address range or subnet.

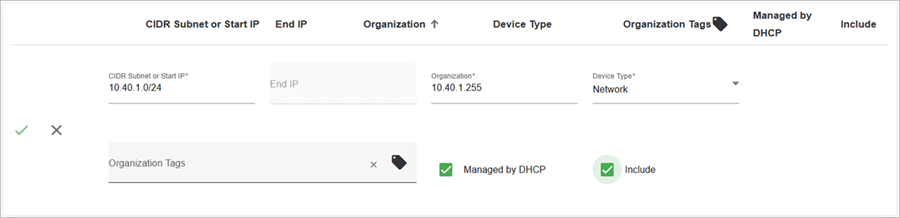
Monitor Only My Critical Systems
To monitor only selected systems:
- Select Configure > ThreatSync+ > Subnets and Organizations.
- Select Monitor only my critical systems. Click Save.
- Next to the IP address range or subnet you want to include, click .
- Select Include.
- Click
 .
.
The selected subnet or IP address range is included in network monitoring.
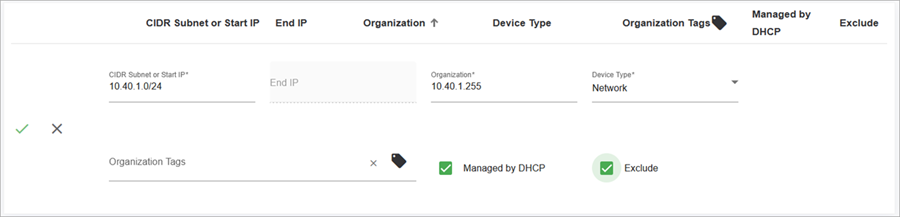
Exclude Address Ranges From Monitoring
To exclude address ranges from monitoring:
- Select Configure > ThreatSync+ > Subnets and Organizations.
- Select Exclude address ranges from monitoring. Click Save.
- Next to the IP address range or subnet you want to exclude, click .
- Select Exclude.
- Click .
The selected subnet or IP address range is excluded from network monitoring.