You can downgrade the Fireware OS version for FireCluster members. Because some steps cause downtime, we recommend that you plan this work accordingly.
In this example:
- Firebox A is the original cluster master.
- Firebox B is the original backup master.
You cannot downgrade a Firebox to a version of Fireware lower than Fireware v12.1.3 Update 8, v12.5.9 Update 2, or v12.7.2 Update 2, based on your device model.
Step 1 — Save the Configuration File
On Firebox A (cluster master), save the Firebox configuration file.
- Select File > Save > As Version.
The Save As Version dialog box appears.

- Type the Fireware OS version for the configuration file.
The version you specify must be in the range of versions in the configured OS Compatibility settings.
For information about compatibility settings, go to Configure Fireware OS Compatibility. - Click OK.
If any feature in the configuration is not compatible with the version you specify, an error message appears with information about what you must change before you can save the configuration as the specified version.
Step 2 — Force a FireCluster Failover
Force Firebox A (cluster master) to fail over to the backup master (Firebox B).
This step is optional because either member can function as the cluster master or backup master. However, we recommend this step so that Firebox A becomes the cluster master again after you complete all steps on this page. It can help you to avoid confusion if the Fireboxes retain their original cluster roles.
While the FireCluster fails over, brief downtime occurs for some services.
To force a FireCluster failover, from Firebox System Manager:
- Select Tools > Cluster > Failover master.
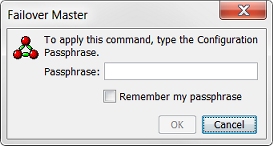
The Failover Master dialog box appears.

- Type the configuration passphrase.
- Click OK.
The cluster master fails over to the backup master, and the backup master becomes the master.
Step 3 — Make Firebox A Leave the Cluster
After you complete step 2, Firebox A (original cluster master) is now the backup master. Next, you must make Firebox A leave the cluster.
To make Firebox A leave the cluster, from WatchGuard System Manager:
- Specify the FireCluster Management IP address to connect to Firebox A (current backup master).
- Start Firebox System Manager for Firebox A.
- Select Tools > Cluster > Leave.
- Type the administrative passphrase. Click OK.
A message appears. - Click OK.
The backup master leaves the cluster and reboots.
For more information, go to Make a Member Leave a Cluster.
Step 4 — Disconnect Cables from Firebox A
Disconnect cables from Firebox A in this order:
- Power cable, if you must move the Firebox to complete the downgrade
- Network cables connected to the external and internal interfaces
- Cluster interface cable, which connects the cluster members
- Backup cluster interface cable, if you have one
Step 5 — Factory Reset Firebox A
Reset Firebox A (current backup master) to factory default settings.
Factory reset instructions vary by Firebox model. For instructions, go to Reset a Firebox.
Step 6 — Upgrade Firebox A
On Firebox A (current backup master), upgrade Fireware OS to the version that you require. For more information, go to Upgrade Fireware or WatchGuard System Manager.
Step 7 — Upload the Configuration File to Firebox A
On Firebox A (current backup master), upload the configuration file that you saved in Step 1.
Step 8 — Disconnect Cables from Firebox B
While you complete steps 8 and 9, network downtime occurs because you must disconnect cables from Firebox B and reconnect cables to Firebox A.
Disconnect cables from Firebox B (current cluster master) in this order:
- Power cable, if you must move the Firebox to complete the downgrade
- Network cables connected to the external and internal interfaces
The cluster interface cable should already be disconnected as part of step 4.
Both Fireboxes are now disconnected.
Step 9 — Reconnect Cables for Firebox A
To reconnect Firebox A:
- Reconnect the network cables for the external and internal interfaces. Do not reconnect the cluster interface cable. Firebox A is now the cluster master.
- Confirm that your network functions as expected when connected to Firebox A.
- If you network does not function as expected:
- Disconnect Firebox A.
- Reconnect Firebox B.
- Troubleshoot Firebox A. For more information, go to FireCluster Diagnostics.
- Perform steps 8 (disconnect Firebox B) and 9 (reconnect Firebox A) again when you are ready.
Do not perform a factory reset on Firebox B until your network functions as expected when connected to Firebox A.
Step 10 — Factory Reset Firebox B
If your network functions as expected when connected to Firebox A, reset Firebox B to factory default settings.
Factory reset instructions vary by Firebox model. For instructions, go to Reset a Firebox.
Step 11 — Upgrade Firebox B
On Firebox B, upgrade Fireware OS to the version that you require. For more information, go to Upgrade Fireware or WatchGuard System Manager.
Step 12 — Reconnect Cables for Firebox B
- Reconnect the network cables for the external and internal interfaces.
- Reconnect the cluster interface cable.
Firebox B is not yet a member of the cluster.
Step 13 — Discover Firebox B
On the Firebox A, which is now the cluster master, discover Firebox B.
To discover Firebox B, from WatchGuard System Manager:
- Connect to Firebox A (cluster master).
- Start Firebox System Manager.
- Select Tools > Cluster > Discover member.
The Discover member dialog box appears.

- Type the configuration passphrase for the cluster.
A message appears to tell you the discovery process has started. - Click OK.
The cluster master tries to discover new devices connected to the cluster.
If Firebox A (cluster master) successfully discovers Firebox B, Firebox A pushes its configuration to Firebox B. Firebox B becomes the backup master.