Configure DHCPv6 Client Prefix Delegation
To configure a Firebox as a DHCPv6 client for prefix delegation, you can configure an external interface to request a delegated prefix from a DHCPv6 server. After you enable this for an external interface, you can use the delegated prefix to configure IPv6 addresses on the trusted, optional, and custom interfaces.
Enable DHCPv6 Client Prefix Delegation
To enable DHCPv6 prefix delegation in the IPv6 settings for an external interface:
- Edit the settings for an external interface.
- Select the IPv6 tab.
- Select Enable DHCPv6 Client Prefix Delegation.
- Select the Rapid Commit check box if you want to use a rapid two-message exchange to get an IPv6 prefix.
For more information about other IPv6 settings on an external interface, go to Configure IPv6 for an External Interface.
Determine the Client DUID
The DHCP server your device connects to can delegate a prefix from a pool of prefixes, or it can reserve a specific prefix for your device. To reserve a prefix for your device, the DHCP server must know the DHCP unique identifier (DUID) of the external interface. The DHCP client uses a DUID based on the link-layer address. This DUID type, known as DUID-LL, is described in RFC 3315. For a Firebox, the DHCP client DUID is 00:03:00:01 plus the MAC address of the interface.
- Select Dashboard > Interfaces.
- Select the Detail tab.
- Find the table row for the external interface.
The MAC Address column shows the MAC address for the interface.
- Connect to the device
- Click the plus icon (+) adjacent to the device to expand the tree view of the device status.
- Expand the tree for the external interface.
The MAC address appears in the list below the interface.
- Select the Front Panel tab.
- Expand the Interfaces tree.
- Expand the tree for the external interface.
The MAC address appears in the list below the interface.
After you know the interface MAC address, combine 00:03:00:01 with the MAC address to determine the client DUID. For example, if the MAC address of the external interface is 00:90:7f:97:ad:95, the DUID for that interface is 00:03:00:01:00:90:7f:97:ad:95. Your DHCP service provider might ask you to provide the DUID so they can reserve a specific prefix for your device.
See the Delegated Prefix
After you enable client prefix delegation, the prefix assigned to your device appears in the Front Panel tab of Firebox System Manager.
To see the delegated prefix, from Firebox System Manager:
- Select the Front Panel tab
- Expand the Interfaces for your device.
- Expand the external interface.
- Expand the IPv6 Addresses.
It is important to know what prefix has been assigned to your device before you use the delegated prefix to configure IPv6 addresses on your network.
Use a Delegated Prefix
When prefix delegation is enabled, you can select the Use delegated prefix check box when you configure these IPv6 addresses for trusted, optional, and custom interfaces:
- Static IPv6 address for an interface
- IPv6 prefix advertisement
- DHCPv6 server address pool
- DHCPv6 server reserved addresses
When you select the Use delegated prefix check box, the delegated prefix name appears as the first part of the IP address.
The delegated prefix name begins with the external interface device name. For example, if you enable DHCPv6 client prefix delegation on interface 0, the delegated prefix name is eth0_prefix.
When you configure an IP address to use a delegated prefix, you select the prefix name, and then specify a subnet and a routing prefix length. To generate a valid IP address with a delegated prefix, the configured prefix length must be longer than the delegated prefix length.
IP Address Generation with a Delegated Prefix
Before you use a delegated prefix, it is important to understand how the delegated prefix is used as part of your IP address. These two examples show how Fireware uses the delegated prefix to generate a complete IPv6 address for a static interface IP address.
- The configured static IP address is: eth0_prefix::2201:1:1:1:1/64
- The delegated prefix for eth0_prefix is 2001:db8:2::/48
- The full IPv6 address is generated like this:
2001:db8:2:: delegated prefix: 2001:db8:2::/48
+ ::2201:1:1:1:1 configured subnet
+ /64 configured prefix length
-------------------------
2001:db8:2:2201:1:1:1:1/64 generated IP address
If you specify a subnet that overlaps with the delegated prefix, the delegated prefix overwrites part of the subnet you specified.
- A static IP address uses the delegated prefix eth0_prefix, with a subnet IP address of ::2201:1:1:1/64.
- The delegated prefix for eth0_prefix is 2001:db8:2:1000::/56
- The full IPv6 address is generated like this:
2001:db8:2:1000:: delegated prefix: 2001:db8:2::/56
+ ::2201:1:1:1:1 configured subnet
+ /64 configured prefix length
-------------------------
2001:db8:2:1001:1:1:1:1/64 generated IP address
Avoid Duplicate IP Addresses
When you use a delegated prefix, make sure that you specify subnets and prefix lengths that result in unique IPv6 addresses within your configuration when the delegated prefix is applied. Be careful to avoid these invalid address configurations:
- Interfaces with the same IPv6 address or an IPv6 address on the same subnet
- Router advertisements with the same prefix
- DHCPv6 servers that use the same IP address pool
Use a Delegated Prefix in a Static IPv6 Address
After you enable prefix delegation for an external interface, you can use the delegated prefix when you enable IPv6 and configure a static IPv6 address for a trusted, optional, or custom interface.
- Select Network > Configuration.
The Network Configuration dialog box appears. - Select a trusted, optional, or custom interface. Click Configure.
The Interface Settings page appears. - Select the IPv6 tab.
- Select the Enable IPv6 check box.
- Click Add.
The Add Static IPv6 Addresses dialog box appears.
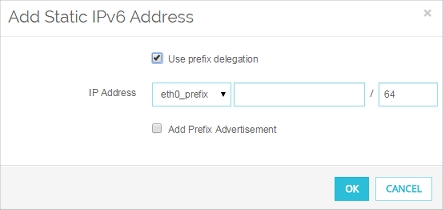
- Select the Use prefix delegation check box.
The delegated prefix name appears in the first part of the IP Address text box. - Type the subnet to use with this prefix, and the prefix length.
- Click OK.
- Select Network > Configuration.
The Network Configuration dialog box appears. - Select a trusted, optional, or custom interface. ClickConfigure.
The Interface Settings dialog box appears. - Select the IPv6 tab.
- Select the Enable IPv6 check box.
- Click Add.
The Add Static IPv6 Addresses dialog box appears.
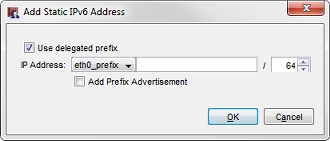
- Select the Use delegated prefix check box.
The delegated prefix name appears in the first part of the IP Address text box. - Type the subnet to use with this prefix, and the prefix length.
- Click OK.
Use a Delegated Prefix in a Prefix Advertisement
You can use a delegated prefix when you add a prefix advertisement. If you use a delegated prefix for a static IPv6 address, and you select the Add Prefix Advertisement check box for that static IPv6 address, a prefix advertisement is added that also uses the delegated prefix.
- In the Router Advertisement section, select the Send Advertisement check box.
- Click Add.
- Select the Use delegated prefix check box.
The delegated prefix name appears as the first part of the Prefix
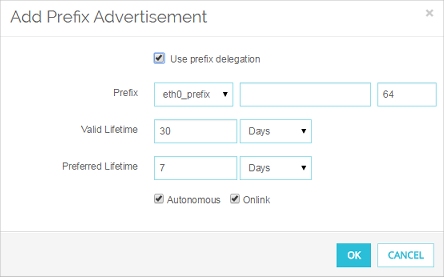
- In the Prefix text box, type a prefix to append to the delegated prefix.
The prefix must be an IPv6 prefix in the format x:x::. - Type or select the prefix length.
- Configure the other prefix advertisement settings, or use the default settings.
For more information, go to Configure IPv6 for a Trusted or Optional Interface.
- In the Router Advertisement section, select the Send Advertisement check box.
- Click Add.
- Select the Use delegated prefix check box.
The delegated prefix name appears as the first part of the Prefix

The Add Prefix Advertisement dialog box in Policy Manager
- In the Prefix text box, type a prefix to append to the delegated prefix.
The prefix must be an IPv6 prefix in the format x:x::. - Type or select the prefix length.
- Configure the other prefix advertisement settings, or use the default settings.
For more information, go to Configure IPv6 for a Trusted or Optional Interface.
Use a Delegated Prefix in the DHCPv6 Server Configuration
You can use a delegated prefix when you configure addresses for the DHCPv6 server for a trusted, optional, or custom interface. In the DHCPv6 server configuration you can use the delegated prefix for addresses to the IP address pool and reserved IP addresses. The Use delegated prefix check box appears in the IPv6 configuration settings for a trusted, optional, or external interface only after you enable DHCPv6 client prefix delegation on an external interface.
- Edit a trusted, optional, or custom interface.
- Select the IPv6 tab
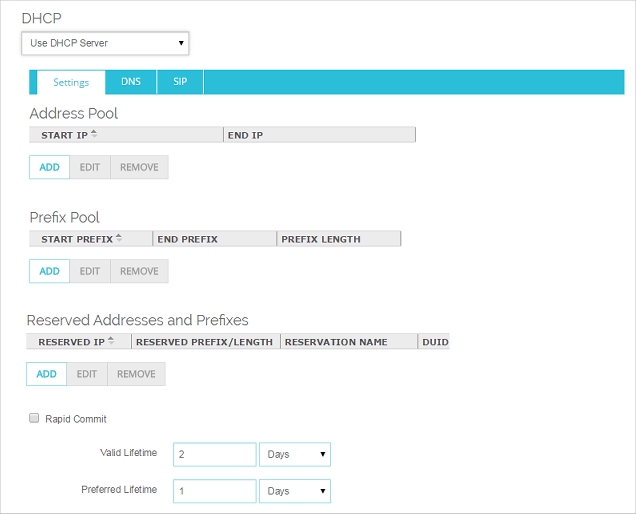
- From the DHCP drop-down list, select Use DHCP Server.
- Edit the trusted, optional, or custom interface.
- Select the IPv6 tab
- From the DHCP drop-down list, select Use DHCP Server.
- Click Configure.
The DHCP server settings appear.
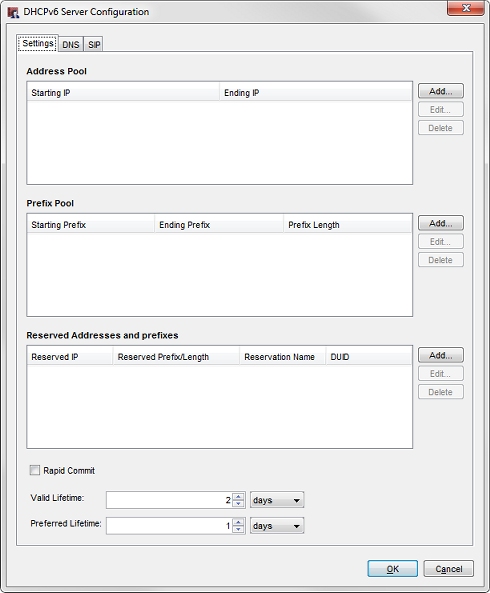
You can use the delegated prefix when you add entries to the DHCPv6 address pool.
- In the Address Pool section of the DHCP configuration, click Add.
The Add Address Range dialog box appears. - Select the Use delegated prefix check box.
The delegated prefix name appears in the first part of the Starting IP and Ending IP text boxes.
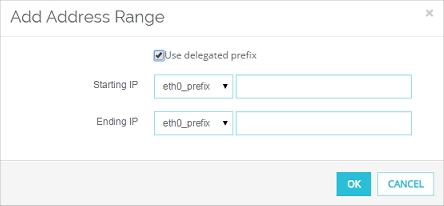
- In the Starting IP text box, type the subnet to use for the starting IP address for this address range.
- In the Ending IP text box, type the subnet to use for the ending IP address for this address range.
- Click OK to add the address range.
- In the Address Pool section of the DHCP configuration, click Add.
The Add Address Range dialog box appears. - Select the Use delegated prefix check box.
The delegated prefix name appears in the first part of the Starting IP and Ending IP text boxes.

The Add Address Range dialog box with a delegated prefix in Policy Manager
- In the Starting IP text box, type the subnet to use for the starting IP address for this address range.
- In the Ending IP text box, type the subnet to use for the ending IP address for this address range.
- Click OK to add the address range.
You can use the delegated prefix when you configure reserved IPv6 addresses.
- In the Reserved Addresses and Prefixes section of the DHCP configuration, click Add.
- Select the Use delegated prefix check box.
The delegated prefix name appears in the first part of the Reserved IP text box.

- In the Reserved IP text box, type the subnet to use for the reserved IP address.
- Configure the other settings for this reserved IP address.
For more information about the other settings, see Configure an IPv6 DHCP Server. - Click OK.
- In the Reserved Addresses and Prefixes section of the DHCP configuration, click Add.
- Select the Use delegated prefix check box.
The delegated prefix name appears in the first part of the Reserved IP text box.
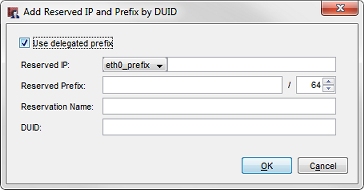
The Add Reserved IP and Prefix by DUID dialog box in Policy Manager.
- In the Reserved IP text box, type the subnet to use for the reserved IP address.
- Configure the other settings for this reserved IP address.
For more information about the other settings, go to Configure an IPv6 DHCP Server. - Click OK.