With Bridge mode, you can install your Firebox between an existing network and its gateway to filter or manage network traffic. When you enable this feature, your Firebox processes and forwards all network traffic to other gateway devices. When the traffic arrives at a gateway from the Firebox, it appears to have been sent from the original device.
System and Management IP Addresses
You can specify a static IPv4 address or DHCP. In Fireware v12.8 or higher, you can specify an IPv6 system IP address in addition to the IPv4 system IP address.
If you specify DHCP, your Firebox gets a system IP address from the DHCP server configured on your gateway device. The computers on your network can also get DHCP addresses from the gateway device. The Firebox uses the IP address assigned by DHCP to receive security services signature updates and to route traffic to internal DNS, NTP, or WebBlocker servers.
If you specify DHCP, you must also specify a management IP address in a private IP address range. If the DHCP server fails to assign a system IP address to your Firebox, or if you do not know the system IP address, you can connect to the Firebox with the management IP address.
DNSWatch
In Fireware v12.4 or higher, you can enable DNSWatch in Bridge Mode. The Firebox IP address must be able to connect to the DNSWatch Server. The Firebox system IP address is the source IP address in DNS request packets sent to the DNSWatch DNS server.
When you log in to DNSWatch, a Firebox in Bridge Mode appears as follows:
- Interface — Global Bridge
- Network — System IP address of the Firebox
In the DNSWatch settings on the Firebox, you can select the same DNSWatch enforcement options as you can for a Firebox in Mixed Routing Mode.
If you enable DNSWatch enforcement, the Firebox cannot resolve host names on the local domain unless you create DNS forwarding rules for local domains. For more information about forwarding rules, go to About DNS Forwarding.
For more information about DNSWatch, go to About WatchGuard DNSWatch.
Spanning Tree
You can enable Spanning Tree Protocol in Bridge mode. Spanning Tree Protocol is designed to prevent loops on networks with redundant links between switches. Administrators who manage networks that must be highly available can configure redundant links and enable Spanning Tree Protocol to help ensure uptime.
For more information about Spanning Tree Protocol, go to About Spanning Tree Protocol.
To enable Spanning Tree Protocol, go to the Enable Spanning Tree Protocol section.
Disabled Functions
In Bridge Mode, your Firebox cannot complete some functions that require the device to operate as a gateway because the Firebox does not handle Layer 2 or Layer 3 information.
These functions include:
- Multi-WAN
- VLANs (Virtual Local Area Networks)
- Network bridges
- PPPoE
- Link aggregation
- Static routes
- FireCluster
- Secondary networks
- DHCP server or DHCP relay
- Modem failover
- 1-to-1 NAT, dynamic NAT, or static NAT (SNAT)
- Dynamic routing (OSPF, BGP, or RIP)
- Any type of VPN for which the Firebox is an endpoint or gateway
- Some proxy functions, including HTTP Web Cache Server
- Authentication automatic redirect
- Configuring the External interface as a wireless client for Fireboxes with built-in wireless capabilities
- Management of an AP by the Gateway Wireless Controller
- Mobile Security
- Network Discovery
If you have previously configured these features or services, they are disabled when you switch to bridge mode. To use these features or services again, you must use a different network mode. If you return to drop-in or mixed routing mode, you might have to configure some features again.
Other Information
When you enable Bridge Mode, the Firebox automatically adds a Related Hosts entry for the default gateway configured on interface 0. If the default gateway IP address resides on a different interface, you must change the Related Hosts entry to the correct interface.
To learn more about Related Hosts, go to Configure Related Hosts.
When in Bridge Mode with DNSWatch enforcement enabled, the Firebox is not able to resolve local DNS servers. If you enable DNSWatch, you must create DNS forwarding rules for local domains. See About DNS Forwarding for more information about setting up the forwarding rules.
When you enable bridge mode, any interfaces with a previously configured network bridge or VLAN are disabled. To use those interfaces, you must first change to either drop-in or mixed routing mode, and configure the interface as External, Optional, or Trusted, then return to bridge mode.
To use a network bridge on a FireboxV virtual machine on ESXi, you must enable promiscuous mode on the attached virtual switch (vSwitch) in VMware. You cannot use a network bridge on a FireboxV virtual machine on Hyper-V, because Hyper-V virtual switches do not support promiscuous mode.
Enable Bridge Mode (Static IP)
- Select Network > Interfaces.
The Network Interfaces page appears. - From the Configure Interfaces In drop-down list, select Bridge Mode.
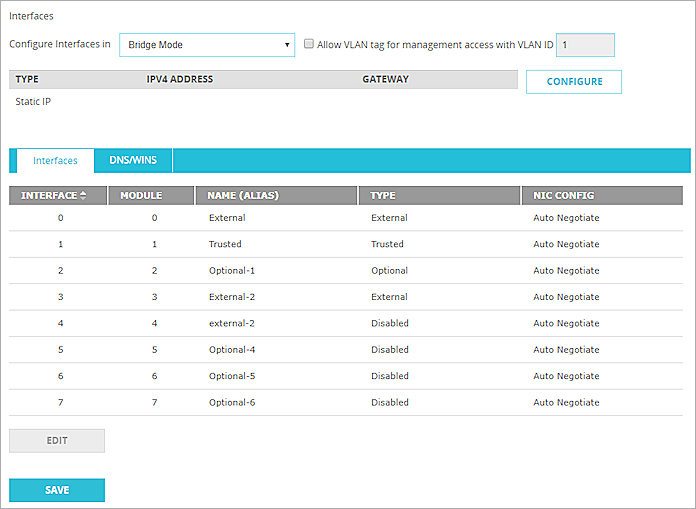
- If you are prompted to disable interfaces, click Yes to disable the interfaces, or No to return to your previous configuration.
- Click Configure.
The Bridge Mode Properties page opens. - From the Configuration Mode drop-down list, select Static IP.
- In the IP Address text box, type the IPv4 address of your Firebox in slash notation.
For more information on slash notation, go to About Slash Notation. - In the Gateway text box, type the Gateway IP address that receives all network traffic from the device.

- (Fireware v12.8 or higher) To specify an IPv6 system address:
- Click the IPv6 tab.
- Select Enable IPv6.
- In the System IPv6 Address section, configure these settings:
- Static IPv6 Address — Enter an IPv6 address and netmask.
- (Optional) IP Address Autoconfiguration — If you select this option, the Firebox automatically assigns an IPv6 link-local address to this interface. When you enable IP address autoconfiguration, the external interface is automatically enabled to receive IPv6 router advertisements, and you do not have to specify a default gateway.
- (Optional) Enable DHCPv6 Client — Select this option to enable a DHCPv6 client on this interface to request an IP address from a DHCPv6 server. To get IPv6 addresses, the DHCPv6 client can use a rapid two-message exchange (solicit, reply) or a four-message exchange (solicit, advertise, request, reply). By default, the DHCPv6 client uses the four-message exchange. To use the two-message exchange, enable the Rapid Commit option on the interface and on the DHCPv6 server.
- Default Gateway — Enter the IPv6 default gateway address. You do not have to specify a default gateway if you select IP Address Autoconfiguration.
- Hop Limit — Enter or select the number of network segments a packet can travel over before it is discarded by a router. The default value is 64.
- DAD Transmits — Enter or select the number of DAD (Duplication Address Detection) transmits. The default value is 1.

- Click Back.

- Click Save.
- Select Network > Configuration.
The Network Configuration window appears. - From the Configure Interfaces In drop-down list, select Bridge Mode.
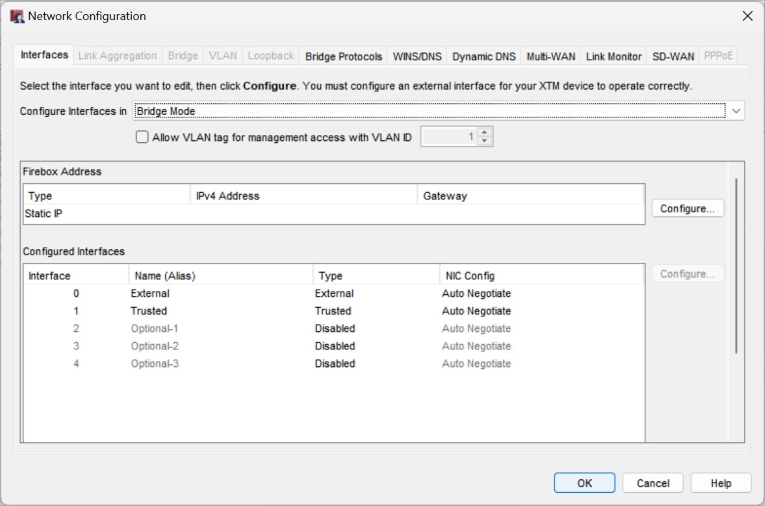
- If you are prompted to disable interfaces, click Yes to disable the interfaces, or No to return to your previous configuration.
- Click Configure
The Bridge Mode Properties window appears. - Select Use Static IP.

- In the IP Address text box, type the IPv4 address of your Firebox in slash notation.
For more information on slash notation, go to About Slash Notation. - In the Default Gateway text box, type the IPv4 gateway address that receives all network traffic from the device.
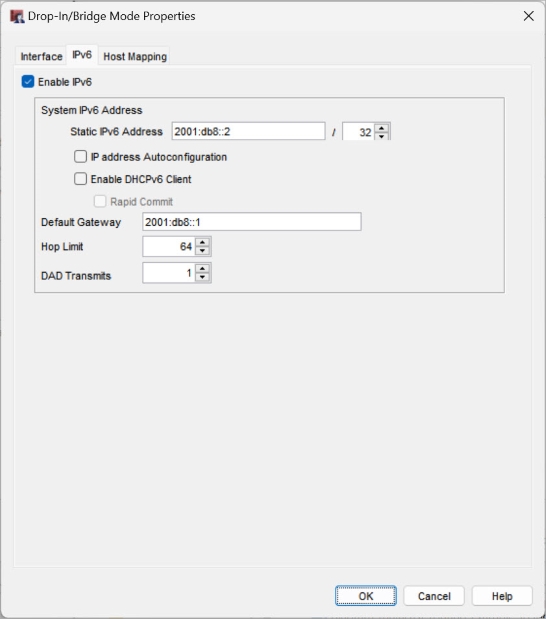
- (Fireware v12.8 or higher) To specify an IPv6 system address:
- Click the IPv6 tab.
- Select Enable IPv6.
- In the System IPv6 Address section, configure these settings:
- Static IPv6 Address — Enter an IPv6 address and netmask.
- (Optional) IP Address Autoconfiguration — If you select this option, the Firebox automatically assigns an IPv6 link-local address to this interface. When you enable IP address autoconfiguration, the external interface is automatically enabled to receive IPv6 router advertisements, and you do not have to specify a default gateway.
- (Optional) Enable DHCPv6 Client — Select this option to enable a DHCPv6 client on this interface to request an IP address from a DHCPv6 server. To get IPv6 addresses, the DHCPv6 client can use a rapid two-message exchange (solicit, reply) or a four-message exchange (solicit, advertise, request, reply). By default, the DHCPv6 client uses the four-message exchange. To use the two-message exchange, enable the Rapid Commit option on the interface and on the DHCPv6 server.
- Default Gateway — Enter the IPv6 default gateway address. You do not have to specify a default gateway if you select IP Address Autoconfiguration.
- Hop Limit — Enter or select the number of network segments a packet can travel over before it is discarded by a router. The default value is 64.
- DAD Transmits — Enter or select the number of DAD (Duplication Address Detection) transmits. The default value is 1.
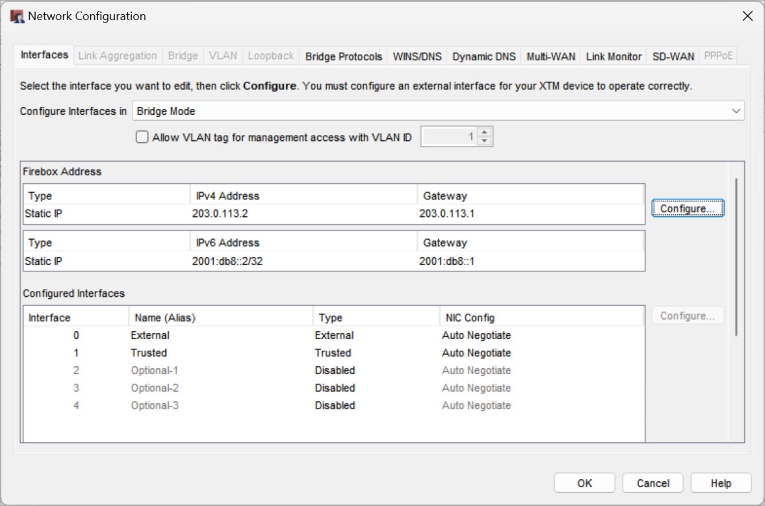
- Click OK.
Enable Bridge Mode (DHCP)
WARNING: Before you save the configuration changes described in this section, make sure to record the management IP address so you can connect to the Firebox later.
- Select Network > Interfaces.
The Interfaces page appears. - From the Configure Interfaces In drop-down list, select Bridge Mode.
- If you are prompted to disable interfaces, click Yes to disable the interfaces, or No to return to your previous configuration.
- Click Configure
The Bridge Mode Properties window appears. - From the Configuration Mode drop-down list, select DHCP.
- In the Management Address section, in the IP Address text box, type an IPv4 address in a private IP address range. Tip!

- (Fireware v12.8 or higher) To specify an IPv6 system address:
- Click the IPv6 tab.
- Select Enable IPv6.
- In the System IPv6 Address section, configure these settings:
- Static IPv6 Address — Enter an IPv6 address and netmask.
- (Optional) IP Address Autoconfiguration — If you select this option, the Firebox automatically assigns an IPv6 link-local address to this interface. When you enable IP address autoconfiguration, the external interface is automatically enabled to receive IPv6 router advertisements, and you do not have to specify a default gateway.
- Enable DHCPv6 Client — Select this option to enable a DHCPv6 client on this interface to request an IP address from a DHCPv6 server. To get IPv6 addresses, the DHCPv6 client can use a rapid two-message exchange (solicit, reply) or a four-message exchange (solicit, advertise, request, reply). By default, the DHCPv6 client uses the four-message exchange. To use the two-message exchange, enable the Rapid Commit option on the interface and on the DHCPv6 server.
- Default Gateway — Enter the IPv6 default gateway address. You do not have to specify a default gateway if you select IP Address Autoconfiguration.
- Hop Limit — Enter or select the number of network segments a packet can travel over before it is discarded by a router. The default value is 64.
- DAD Transmits — Enter or select the number of DAD (Duplication Address Detection) transmits. The default value is 1.
- Click Back.

- Click Save. A dialog box appears that says you must log in to your Firebox with the new management IP address after you continue.

- Click Yes to continue.
- To log in to your Firebox, type the system IP address assigned by DHCP or the management IP address that you specified.
- Select Network > Configuration.
The Network Configuration window appears. - From the Configure Interfaces In drop-down list, select Bridge Mode.
- If you are prompted to disable interfaces, click Yes to disable the interfaces, or No to return to your previous configuration.
- Click Configure.
The Bridge Mode Properties window appears. - Select Use DHCP client.
- For Host IP, leave the default option selected, which is Obtain an IP address automatically.
- In the Management Address section, in the IP Address text box, type an IP address in a private range. Tip!
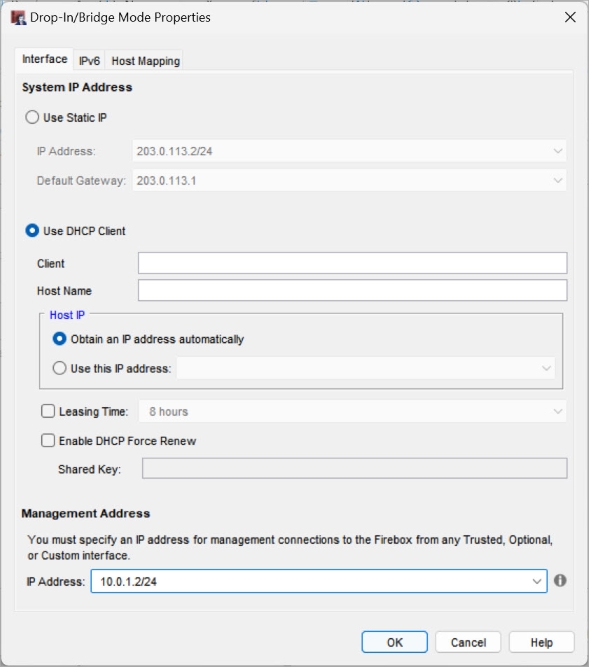
- (Fireware v12.8 or higher) To specify an IPv6 system address:
- Click the IPv6 tab.
- Select Enable IPv6.
- In the System IPv6 Address section, configure these settings:
- Static IPv6 Address — Enter an IPv6 address and netmask.
- (Optional) IP Address Autoconfiguration — If you select this option, the Firebox automatically assigns an IPv6 link-local address to this interface. When you enable IP address autoconfiguration, the external interface is automatically enabled to receive IPv6 router advertisements, and you do not have to specify a default gateway.
- Enable DHCPv6 Client — Select this option to enable a DHCPv6 client on this interface to request an IP address from a DHCPv6 server. To get IPv6 addresses, the DHCPv6 client can use a rapid two-message exchange (solicit, reply) or a four-message exchange (solicit, advertise, request, reply). By default, the DHCPv6 client uses the four-message exchange. To use the two-message exchange, enable the Rapid Commit option on the interface and on the DHCPv6 server.
- Default Gateway — Enter the IPv6 default gateway address. You do not have to specify a default gateway if you select IP Address Autoconfiguration.
- Hop Limit — Enter or select the number of network segments a packet can travel over before it is discarded by a router. The default value is 64.
- DAD Transmits — Enter or select the number of DAD (Duplication Address Detection) transmits. The default value is 1.
- Click OK.

- To log in to your Firebox after you save the configuration, type the system IP address assigned by DHCP or the management IP address that you specified.
When you enable Bridge Mode, the Firebox automatically adds a Related Hosts entry for the default gateway configured on interface 0. Automatic Host Mapping should work for most networks. If the default gateway IP address resides on a different interface, you must change the Related Hosts entry to the correct interface.
Enable Spanning Tree Protocol
You can enable Spanning Tree Protocol. To change the default Spanning Tree Protocol settings, you must use the Fireware command line interface (CLI). For more information about the default Spanning Tree Protocol settings, go to Configure Spanning Tree Protocol Settings in the CLI.
To enable Spanning Tree Protocol from the Web UI:
- Select Network > Interfaces.
The Network Configuration page appears. - Select Bridge Protocols.
- Select Enable Spanning Tree Protocol.

- Click OK.
To enable Spanning Tree Protocol from Policy Manager:
- Select Network > Configuration.
The Network Configuration window appears. - Select Bridge Protocols.
- Select Enable Spanning Tree Protocol.

- Click OK.
Allow Management Access from a VLAN
When you configure a Firebox in Bridge mode, you cannot configure VLANs on the Firebox. However, the Firebox can pass VLAN tagged traffic between 802.1Q bridges or switches. You can optionally configure the Firebox to be managed from a VLAN that has a specified VLAN tag.
To enable management from a VLAN for a device in bridge mode, from Fireware Web UI:
- Select Network > Interfaces.
The Network Interfaces page appears. - Select the Allow VLAN tag for management access check box.
- Type or select the VLAN ID you want to allow to connect to the device for management access.
To enable management from a VLAN for a device in bridge mode, from Policy Manager:
- Click
 .
.
Or, select Network > Configuration.
The Network Configuration window appears. - Select the Allow VLAN tag for management access check box.
- Type or select the VLAN ID you want to allow to connect to the device for management access.