Applies To: Cloud-managed Fireboxes
In WatchGuard Cloud, you can enable QoS marking on a policy. QoS (Quality of Service) markings create a different type of service for different types of outbound network traffic. When you mark traffic, you change up to six bits on the header of a network packet. Devices on the network can make use of the marking and provide appropriate handling of a packet as it travels from one point to another. This helps to prevent data loss for important business applications, and makes sure mission-critical applications take priority over other network traffic.
WatchGuard Cloud supports these types of QoS marking:
- IP Precedence (also known as Type of Service) — First three bits define precedence. The higher the bit value the higher the priority.
- Differentiated Service Code Point (DSCP) — Uses the Differentiated Services Field in the header for packet classification purposes.
There are no log messages for QoS marking. If you want to verify a QoS marking, you can analyze the traffic packets on your network for the hexadecimal value of a QoS marking. For more information, go to Run Network Diagnostic Tasks in WatchGuard Cloud.
Before You Begin
- Make sure your LAN equipment supports QoS marking and handling. Also, your ISP might have to support QoS marking.
- The use of QoS procedures on a network requires extensive planning. You must identify the theoretical bandwidth available on the network and then determine which network applications are high priority, particularly sensitive to latency and jitter, or both.
Configure QoS Marking for a Policy
You can enable QoS marking on an individual policy. When you define QoS marking for a policy, all traffic that uses that policy has the QoS marking.
To enable QoS marking on a policy:
- From Account Manager, select the account you want to add traffic shaping rules to.
- Select Configure > Devices.
- Select the cloud-managed Firebox that you want to create a traffic shaping rule for.
- Click Device Configuration.
The Device Configuration page opens. - Click the Traffic Shaping tile.
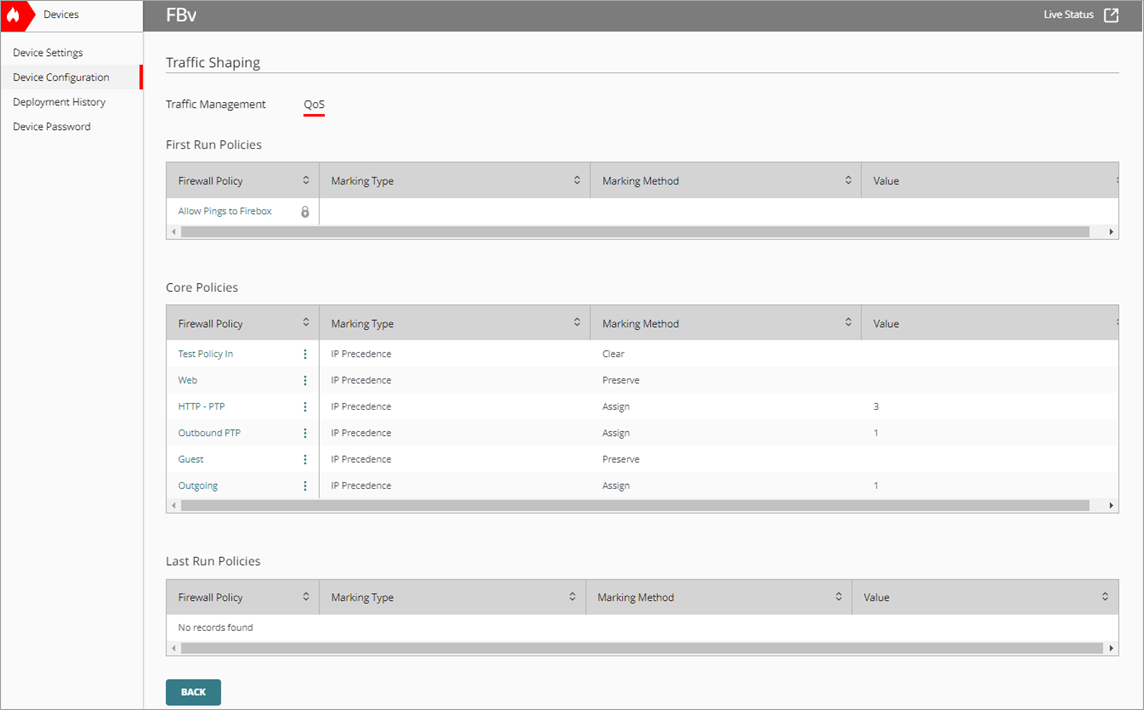
The Traffic Shaping page opens. - Select the QoS tab.
The QoS page opens.

- Select a policy to configure QoS marking for.
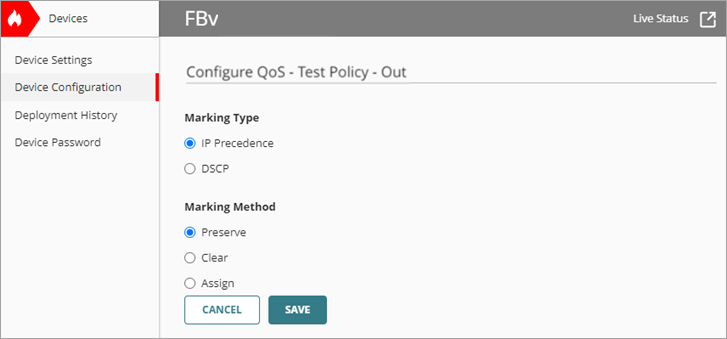
The Configure QoS page opens.

- In the Marking Type section, select either IP Precedence or DCSP.
- In the Marking Method section, select the marking method.
- Preserve — Makes no change to the current value of the bit. The Firebox bases prioritization of traffic on this value.
- Clear — Clear the value of the bit (set it to zero).
- Assign — Assign the bit a new value. The Firebox bases prioritization of traffic on this value.
If you assign a value of 0, it has the same effect as when you assign Clear.
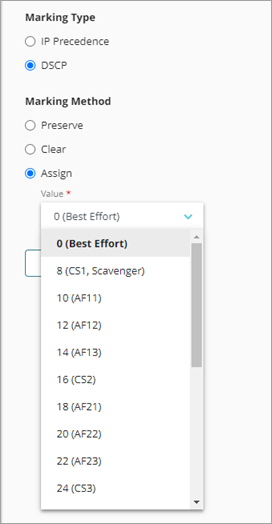
- If you select Assign in the previous step, select a marking value from the drop-down list.
- If you select the IP Precedence marking type, you can select values from 0 (normal priority) through 7 (highest priority).
- If you select the DSCP marking type, the available values are from 0 through 56.

- Click Save.
QoS marking details show for the selected policy.
If you want to create a QoS marking on a policy for multiple cloud-managed Fireboxes, you can add or edit a Firebox template. The Traffic Shaping feature is available from a Firebox template. For more information, go to About Firebox Templates.
If you use a template to create a QoS marking, you must also use the template to edit or delete the marking. If you disable a QoS marking in a template, the marking shows on the device as disabled, next to the policy.