Applies To: ThreatSync+ NDR
The ThreatSync+ NDR Collection Agent for Linux receives log data from switches and routers in your network and sends the data to WatchGuard Cloud.
The ThreatSync+ NDR Collection Agent listens on:
- Port 2055 for NetFlow log data from endpoints.
- Port 6343 for sFlow log data from endpoints.
- Port 514 for DHCP log data from the Windows Log Agent.
You can install the ThreatSync+ NDR Collection Agent on Linux computers that run Ubuntu 22.04 Server LTS or 24.04 Server LTS.
For detailed information about supported operating systems and virtualization environments for Linux, go to System Requirements.
Download and Install the WatchGuard Agent for Linux
The installation of the WatchGuard Agent for Linux and the ThreatSync+ NDR Collection Agent is a two-step process.
To add and configure a collector, you must first download the WatchGuard Agent installer for Linux and then run the installation wizard on a Linux computer you want to configure as a collector. When you install the WatchGuard Agent, it then installs the ThreatSync+ NDR Collection Agent or Windows Log Agent. Use the ThreatSync management UI to specify which Linux computers or servers to use as collectors.
Caution: You cannot install the ThreatSync+ NDR Collection Agent on endpoints that have Panda or Cytomic endpoint security products installed. The ThreatSync+ NDR Collection Agent is only compatible with WatchGuard Endpoint Security products.
Before You Begin
Before you download the WatchGuard Agent for Linux, make sure that:
- You have Ubuntu 22.04 Server LTS or 24.04 Server LTS installed on a computer that is dedicated for the ThreatSync+ NDR Collection Agent for Linux.
- You have root permissions for the Linux computer where you want to install the WatchGuard Agent. You must have sudo access.
- You run this command to check the firewall status in Ubuntu:
sudo ufw status verbose
If the firewall is active, an output message such as Status: active is returned. If the firewall status is active, you must run this command to allow ports in the firewall for the ThreatSync+ NDR Collection Agent to work:
sudo ufw allow 2055/udp
sudo ufw allow 6343/udp
sudo ufw allow 514/udp - You have Internet access from Ubuntu to connect to ThreatSync+ NDR. To verify Internet access, run this command:
ping -c 5 google.com
Example:
ping -c 5 google.com
PING google.com(142.250.195.14): 56 data bytes
64bytes from 142.250.195.14: icmp_seq=0 ttl=119 time=14.500 ms
64bytes from 142.250.195.14: icmp_seq=1 ttl=119 time=15.518 ms
64bytes from 142.250.195.14: icmp_seq=2 ttl=119 time=12.415 ms
64bytes from 142.250.195.14: icmp_seq=3 ttl=119 time=17.130 ms|
64bytes from 142.250.195.14: icmp_seq=4 ttl=119 time=15.416 ms
System Requirements
The ThreatSync+ NDR Collection Agent for Linux must meet these requirements:
- Ubuntu 22.04 Server LTS or 24.04 Server LTS (full) installed with:
- Minimum CPU cores: 2
- Minimum of 8 GB RAM and 128 GB of disk space
Only the full Ubuntu server installation is supported. The default (previously called minimal) installation is not supported.
We recommend Ubuntu 22.04 Server LTS. If you install Ubuntu 24.04 Server LTS on the same server as WatchGuard EPDR, make sure you upgrade your Linux protection to 3.0.5.00.0001 or higher.
For networks with a NetFlow rate greater than 500,000 per minute, more CPUs, RAM, and disk space are required.
- x86-64 architecture — To verify the architecture of your computer, run this command:
user@ndr-ubuntu24:~$ uname -m
x86_64
For more information about supported operating systems and virtualization environments, go to the Troubleshoot ThreatSync+ NDR Collection Agent for Linux section in this document, or the Operating System Compatibility for ThreatSync+ NDR Components in the ThreatSync+ NDR Release Notes.
Install the WatchGuard Agent for Linux
Install the WatchGuard Agent on each Linux computer you want to configure as a collector. Typically, you only have to install the ThreatSync+ NDR Collection Agent on one computer for each physical location in your network.
To install the WatchGuard Agent for Linux:
- Log in to your WatchGuard Cloud account.
- For Service Provider accounts, from Account Manager, select My Account.
- Select Configure > ThreatSync+ Integrations > Collectors.
- On the ThreatSync+ NDR Collection Agents tab, click Add Collector.
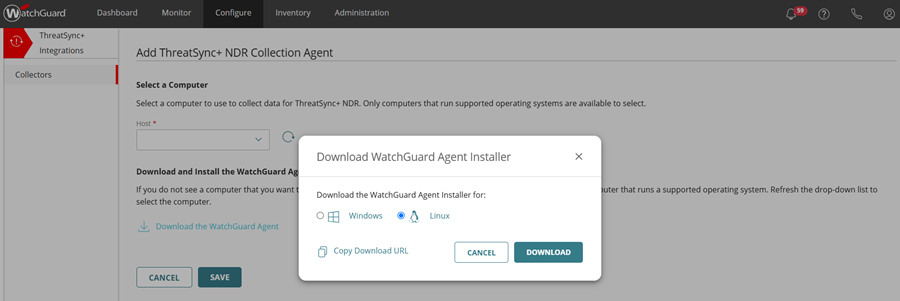
- In the Download and Install the WatchGuard Agent section, click Download the WatchGuard Agent.
The Download WatchGuard Agent Installer dialog box opens. - In the Download WatchGuard Agent Installer dialog box, select Linux.

- (Optional) Click Copy Download URL to save the download URL.
- Click Download.
The WatchGuard Agent.run file downloads. - Copy the .RUN file to the Linux computer or server you want to receive logs from.
- Log in to the Linux computer and verify the operating system version is supported. The Description and Release fields show the version.Example output:

ndr@ndr-ubuntu:~$ lsb_release -a
No LSB modules are available.
Distributor ID: Ubuntu
Description: Ubuntu 24.04.1 LTS
Release: 24.04
Codename: noble
ndr@ndr-ubuntu:~$
- Verify that you are in the directory where you copied the WatchGuard Agent.run file. Run the command ls -l to list the names of the files in the current directory and verify that WatchGuard Agent.run shows in the list.Example output:

ndr@ndr-ubuntu:~$ ls -1
total 2072
-rw-rw-r-- 1 ndr ndr 2121583 Oct 2 08:06 'WatchGuard Agent.run'
ndr@ndr-ubuntu:~$ - To install the WatchGuard Agent, run this command:
sudo bash "WatchGuard Agent.run"Example output:
ndr@ndr-ubuntu24:~$ sudo bash 'WatchGuard Agent.run'
[sudo] password for ndr:
Verifying archive integrity... 100% All good.
Uncompressing WatchGuard Agent Installer 100%
Desktop server detected
Installing debian repository
Removing debian repository
Repository installed
Hit:1 https://repository.pandasecurity.com/aether/qa-us1/installers/agent/linux/1.15.00.0000/default/deb/common stable InRelease
Hit:2 http://security.ubuntu.com/ubuntu noble-security InRelease
Hit:3 http://in.archive.ubuntu.com/ubuntu noble InRelease
Hit:4 http://in.archive.ubuntu.com/ubuntu noble-updates InRelease
Hit:5 http://in.archive.ubuntu.com/ubuntu noble-backports InRelease
Reading package lists... Done
Reading package lists... Done
Building dependency tree... Done
Reading state information... Done
apt-transport-https is already the newest version (2.7.14build2).
0 upgraded, 0 newly installed, 0 to remove and 21 not upgraded.
Reading package lists... Done
Building dependency tree... Done
Reading state information... Done
The following NEW packages will be installed: management-agent
0 upgraded, 1 newly installed, 0 to remove and 21 not upgraded.
Need to get 0 B/15.3 MB of archives.
After this operation, 130 MB of additional disk space will be used.
Selecting previously unselected package management-agent.
(Reading database ... 150921 files and directories currently installed.)
Preparing to unpack .../management-agent_1.15.00.0000-1.10.00-2000-g8ff98e0_amd64.deb ...
Running preinst script with params: install 1.15.00.0000-1.10.00-2000-g8ff98e0 1.15.00.0000-1.10.00-2000-g8ff98e0
Unpacking management-agent (1.15.00.0000-1.10.00-2000-g8ff98e0) ...
Setting up management-agent (1.15.00.0000-1.10.00-2000-g8ff98e0) ...
Running postinst script with params: configure 1.15.00.0000-1.10.00-2000-g8ff98e0
Created symlink /etc/systemd/system/multi-user.target.wants/management-agent.service → /usr/lib systemd/system/management-agent.service.
starting service
Management Agent installation successfully completed!
Succeeded
ndr@ndr-ubuntu24:~$
If you see output with this information, this means you already have the WatchGuard Agent installed:
Reading state information... Done
management-agent is already the newest version (1.15.00.0000-1.10.00-1988-gcffa169).
0 upgraded, 0 newly installed, 0 to remove and 15 not upgraded.
Succeeded
To verify that the WatchGuard Agent installed successfully, make sure that the ThreatSync+ NDR Collection Agents tab shows a Success status. The Linux collector shows real-time status that updates approximately every five minutes.

After you install the WatchGuard Agent on your Linux computer, verify that a directory is created at /opt/collector. For more information, go to Troubleshoot ThreatSync+ NDR Collection Agent for Linux.
For information about how to uninstall the WatchGuard Agent or the ThreatSync+ NDR Collection Agent, go to Delete the ThreatSync+ NDR Collection Agent for Linux.
Configure Collectors for ThreatSync+ NDR
To collect Active Directory DHCP logs, you must add and configure both types of collection agents in your network — first the ThreatSync+ NDR Collection Agent, and then the Windows Log Agent.

You configure ThreatSync+ NDR Collection Agents on the Collectors page.
The ThreatSync+ NDR Collection Agents tab shows these columns:
- Name — Name of the collector.
- IP Address — IP address of the computer where the collector is installed.
- Last Updated — The date and time the collector data was last updated.
- Last Activity — The date and time the collector last sent data to ThreatSync+ NDR.
- NetFlow Monitoring — Shows the status of NetFlow monitoring (whether the nfcapd process is running). For example, Running or Stopped.
- sFlow Monitoring — Shows the status of sFlow monitoring (whether the sfcapd process is running). For example, Running or Stopped.
- Status — Shows the status of the collector. Click the status to view more information. Status can include:
- Success — The collector is installed and receiving network data.
- No Information — Could not report the status of the collector.
- Offline — The collector is offline.
- Error — The collector encountered an error. For more information, go to Troubleshoot ThreatSync+ NDR Collection Agent for Linux.
- Initialization — The collector is being installed by the WatchGuard Agent. The status changes to Success after the collector starts to send heartbeat data (approximately five minutes).
Add a ThreatSync+ NDR Collection Agent for Linux
Typically, only one ThreatSync+ NDR Collection Agent is required for each physical location in your network. To collect DHCP data logs, you must add the ThreatSync+ NDR Collection Agent on a Linux computer with a static IP address.
To add a ThreatSync+ NDR Collection Agent:
- Log in to your WatchGuard Cloud account.
- For Service Provider accounts, from Account Manager, select My Account.
- Select Configure > ThreatSync+ Integrations > Collectors.
- On the ThreatSync+ NDR Collection Agents tab, click Add Collector.

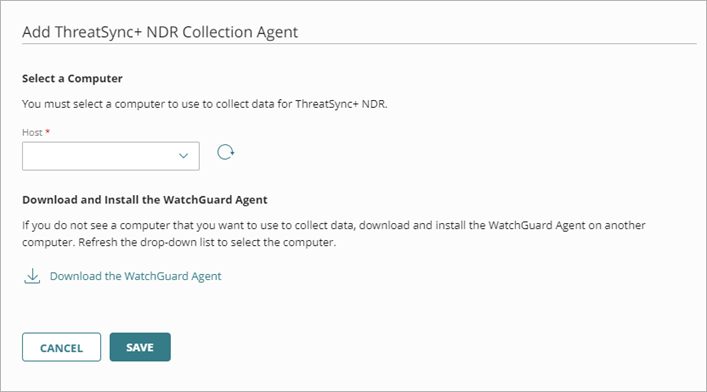
- From the Host drop-down list, select the Linux computer that you want to use as a ThreatSync+ NDR Collection Agent.
This list includes all computers with the WatchGuard Agent installed. To refresh the list of available computers and servers, click .
. - Click Save.
The collection agent starts to report data to ThreatSync+ NDR. You can view reported traffic information on the Network Summary page.
Record the IP address of the ThreatSync+ NDR Collect Agent. You must enter the IP address to configure the Windows Log Agent.
Delete the ThreatSync+ NDR Collection Agent for Linux
If you no longer want to use a specific ThreatSync+ NDR Collection Agent, you can delete it from the ThreatSync+ Integrations UI. When you delete the collection agent from the UI, the WatchGuard Agent automatically uninstalls the collection agent.
To delete a ThreatSync+ NDR Collection Agent from the UI:
- Log in to your WatchGuard Cloud account.
- For Service Provider accounts, from Account Manager, select My Account.
- Select Configure > ThreatSync+ Integrations > Collectors.
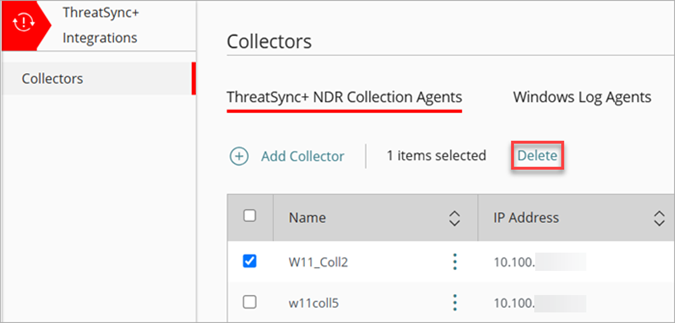
- On the ThreatSync+ NDR Collection Agents tab, select one or more collectors you want to delete.

- Click Delete.
The WatchGuard Agent uninstalls the ThreatSync+ NDR Collection Agent.
If you want to uninstall both the WatchGuard Agent and the ThreatSync+ NDR Collection Agent, you can uninstall the WatchGuard Agent from your Linux system.
To uninstall the WatchGuard Agent and the ThreatSync+ NDR Collection Agent from your Linux system, run this command:
/usr/local/management-agent/repositories/ma/install --remove
Example output:
sudo /usr/local/management-agent/repositories/ma/install --remove
Desktop server detected
Reading package lists... Done
Building dependency tree... Done
Reading state information... Done
The following packages will be REMOVED:
management-agent
0 upgraded, 0 newly installed, 1 to remove and 15 not upgraded.
After this operation, 130 MB disk space will be freed.
(Reading database ... 150989 files and directories currently installed.)
Removing management-agent (1.15.00.0000-1.10.00-1988-gcffa169) ...
Running prerm script with params: remove
Warning: The unit file, source configuration file or drop-ins of management-agent.service changed on disk. Run 'systemctl daemon-reload' to reload units.
Removed "/etc/systemd/system/multi-user.target.wants/management-agent.service".
Reporting agent uninstallation
nfcapd killed (pid 7985)
nfcapd killed (pid 7987)
sfcapd killed (pid 8022)
sfcapd killed (pid 8023)
Removing user's data
Running postrm script with params: remove
Succeeded
Install the Windows Log Agent
The Windows Log Agent is a collection agent that reads Windows DHCP server logs and then forwards them to the ThreatSync+ NDR Collection Agent. The ThreatSync+ NDR Collection Agent then forwards the DHCP logs to WatchGuard Cloud.
For the ThreatSync+ NDR Collection Agent for Linux to receive DHCP server logs, you must install and configure the Windows Log Agent in your network. You can install the Windows Log Agent on Windows Server 2019 or 2022. Some of these servers could also be domain controllers. For more information, go to Configure the Windows Log Agent.
To keep track of devices when they change their IP address, we recommend that you use the Windows Log Agent to collect Active Directory DHCP logs. Add and configure the Windows Log Agent on all DHCP servers.
Troubleshoot ThreatSync+ NDR Collection Agent for Linux
If reported traffic information does not show on the Network Summary page within 60 to 90 minutes, you can use the information in this section to troubleshoot collector issues.
To troubleshoot ThreatSync+ NDR Collection Agent for Linux:
- Make sure that the Linux computer meets the requirements described in the System Requirements section.
- To view diagnostics about the firewall status, Nfcapd status, Sfcapd status, last upload time, and to test connectivity to WatchGuard, run this command:
sudo /opt/collector/scripts/collectorDiagnostics.sh
Example output:
ndr@ndr-ubuntu24:/$ sudo /opt/collector/scripts/collectorDiagnostics.sh
[sudo] password for ndr:
Nfcapd is running
Sfcapd is running
Last upload occurred at Thu Oct 3 13:56:05 UTC 2024
Connectivity test to WatchGuard succeeded
Starting diagnostic data gathering...
collectorDiagnostics.sh also collects diagnostic data at /opt/collector/staging that can be shared with WatchGuard Support for further troubleshooting.
- View the ThreatSync+ NDR Collection Agent logs at /opt/collector/logs.
- Run the netstat -na command to confirm that the computer is able to listen on these ports:
- Port 2055 — NetFlow log data from endpoints
- Port 6343 — sFlow log data from endpoints
- Port 514 — DHCP log data from the Windows Log Agent
If you do not have netstat installed, run this command: sudo apt install net-tools
- Make sure that there is no firewall rule that blocks traffic from these ports: 2055, 6343, and 514. For a cloud-managed Firebox, remove the blocked port 514 on the Configure > Devices > Device Configuration > Network Blocking page in WatchGuard Cloud. For information about how to remove a blocked port for locally-managed Fireboxes, go to Block a Port in Fireware Help.
- Confirm you installed a supported virtualization environment. These virtualization environments are verified:
| ThreatSync+ NDR Collector Virtualization Environment | Ubuntu 22.04 LTS | Ubuntu 24.04 LTS |
|---|---|---|
| Hyper-V |

|

|
| VMware ESXi 7.0.3 |

|

|
| VMware ESXi 8.0 |

|

|
| KVM Hypervisor QEMU 9.0.0 |

|

|
| Oracle Virtual Box 7.0 |

|

|
- On the Configure > ThreatSync > ThreatSync+ NDR > Collectors page, review the Status column in the Collectors table. Click the status for more information:
- Success — The collector is installed and receiving network data.
- No Information — Could not report the status of the collector.
- Offline — The collector is offline.
- Error — The collector encountered an error.
- Initialization — The collector is being installed by the WatchGuard Agent. The status changes to Success after the collector starts to send heartbeat data (approximately five minutes).
To troubleshoot the Windows Log Agent, go to Troubleshoot Windows Log Agent Issues.
About ThreatSync+ NDR Collectors
Configure Collectors for ThreatSync+ NDR (Windows Computers)