Applies To: Cloud-managed Fireboxes
In WatchGuard Cloud, you can configure traffic shaping rules and QoS markings to control the bandwidth used for different types of traffic, users, and applications.
For more information about traffic shaping rules, QoS markings, and how to apply them to polices and applications in WatchGuard Cloud, go to Traffic Shaping and QoS Marking in WatchGuard Cloud.
Here are a few examples of how you can configure traffic shaping with policies, content filtering, and QoS.
Coffee Shop Guest Network
A busy coffee shop wants to limit the amount of bandwidth that customers can use on the guest network. You can use a traffic shaping rule and a policy to set limits for upload and download bandwidth.
For example, you can limit bandwidth traffic for all coffee shop customers to 20 Mbps maximum download and 20 Mbps maximum upload:
Add a Guest Network
For a cloud-managed Firebox, guest networks are private networks protected by the Firebox. These network types enable you to configure separate networks for guest users, with different firewall policies applied by default for traffic on the network.
To add a guest network, from WatchGuard Cloud:
- From Account Manager, select an account.
- Select Configure > Devices.
- Select the cloud-managed Firebox.
- Click Device Configuration.
- Click the Networks tile.
The Networks configuration page opens.

- On the Networks page, click Add Network.
- From the drop-down list, select Add Guest Network.
The Add Guest Network page opens.
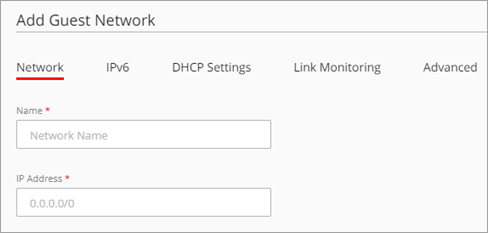
- In the Name text box, type a name for the network.
- Configure the network settings, as described in Configure a Firebox Internal or Guest Network.
- To save configuration changes to the cloud, click Save.
In the Network tab, you can configure the network IP address, VLAN settings, and associated interfaces. For a wireless Firebox, you can also add a wireless SSID. For more information about the wireless SSID, go to Configure Wireless Radio Settings
Add a Traffic Shaping Rule for Guests
In WatchGuard Cloud, you can use traffic shaping rules to control traffic handled by a policy. You can set the bandwidth limit available for different types of traffic or guarantee a minimum amount of bandwidth for specific traffic.
Outbound policies support settings appropriate for connections from internal networks to external networks. Outbound policies support all security services. For more information, go to Firewall Policy Types.
To add a traffic shaping rule for guests that sets a bandwidth limit, from WatchGuard Cloud:
- Click Device Configuration.
The Device Configuration page opens. - Click the Traffic Shaping tile.
The Traffic Shaping page opens. - To add a rule to the Outbound policy, select Firewall Polices > Add Traffic Shaping Rule.
The Add Traffic Shaping Rule page opens. - In the Core Policies section, select Outbound. Click Next.
- In the Rule Name text box, type a name. For example, Guest Wi-Fi Limit.
- In the Behavior section, select Limit Bandwidth.
- In the Method section, select All Users Combined.
- Set the Upload bandwidth to 20 Mbps.
- Set the Download bandwidth to 20 Mbps.
- In the Policies list, select the Guest policy.
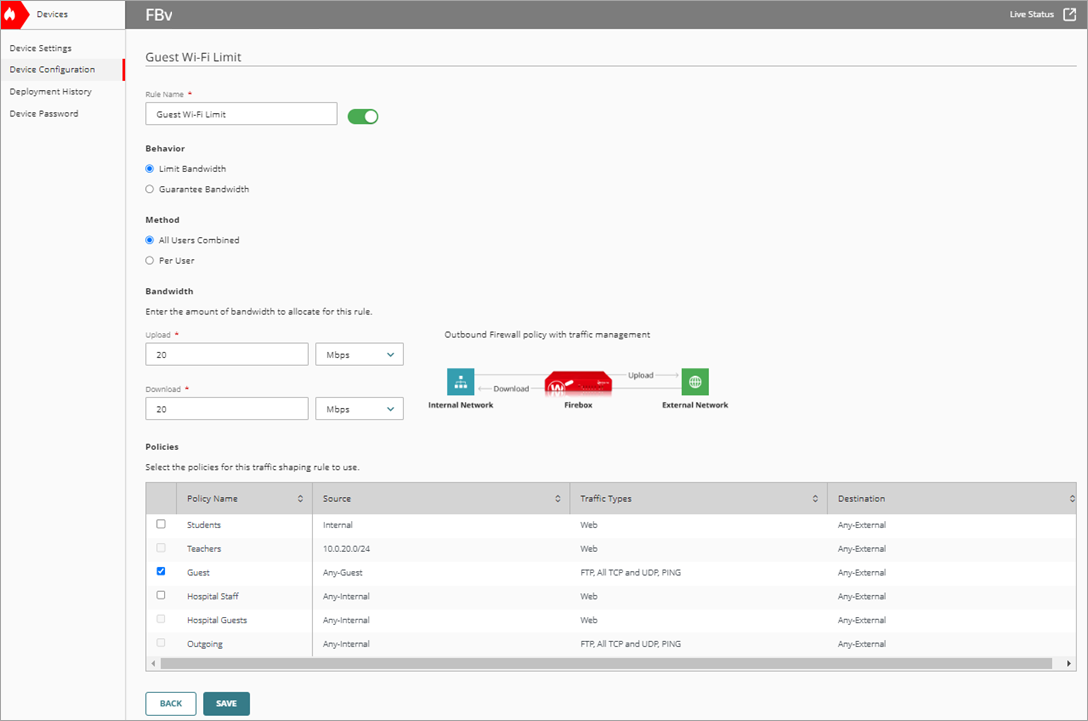
- To save configuration changes to the cloud, click Save.
- Deploy changes to the Firebox.
The traffic shaping rule shows in the list of rules on the Traffic Management page.

Guests at the coffee shop now have an upload bandwidth limit of 20 Mbps and a download bandwidth limit of 20 Mbps. These limits are for all guests combined.
High School Students and Teachers
A high school wants to limit the amount of bandwidth each student in a school can use for streaming media applications and guarantee the amount of bandwidth that teachers can use for administration duties.
With traffic shaping, you can guarantee or limit bandwidth used by specific users and applications. You configure a content filtering action, configure a policy to use the content filtering action, then use a traffic shaping rule on the policy.
For example, you can limit the amount of bandwidth that each student can use for streaming media applications over HTTP to 200 Kbps. At the same time, you can guarantee the amount of bandwidth that each teacher can use to 30 Mbps.
Add a Content Filtering for Media Streaming
You can configure multiple content filtering actions and assign specific actions to a policy. By default, if you select the option to create your own actions, all subcategories are initially set to Allow. If you select the option to use the WatchGuard Cloud recommendations, then a selection of subcategories is set to Block. For more information, go to Configure Content Filtering in WatchGuard Cloud.
To add a content filtering action that controls media streaming applications for students, from WatchGuard Cloud:
- From Account Manager, select an account.
- Select Configure > Devices.
- Select the cloud-managed Firebox.
- Click Device Configuration.
The Device Configuration page opens. - Click the Content Filtering tile.
The Content Filtering page opens. - Click Add Action.
The Add Action page opens. - Select I want to use WatchGuard Cloud recommendations. Click Next.
- In the Name text box, type a name for this action. For example, Student Streaming Apps.
- Select the Application Control tab.
- Configure the categories in the content filtering action to allow the Media Streaming Services application category only.
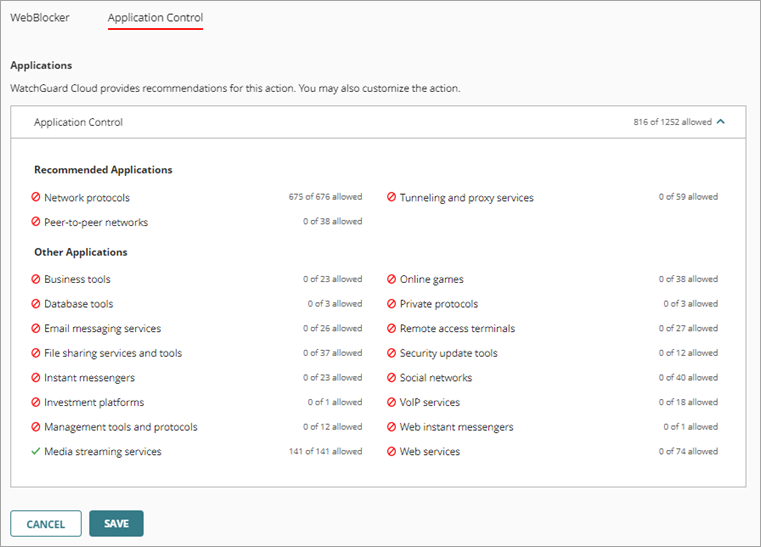
- From the Media Streaming Services application category, allow only the applications that you want to limit bandwidth for, and save the action.
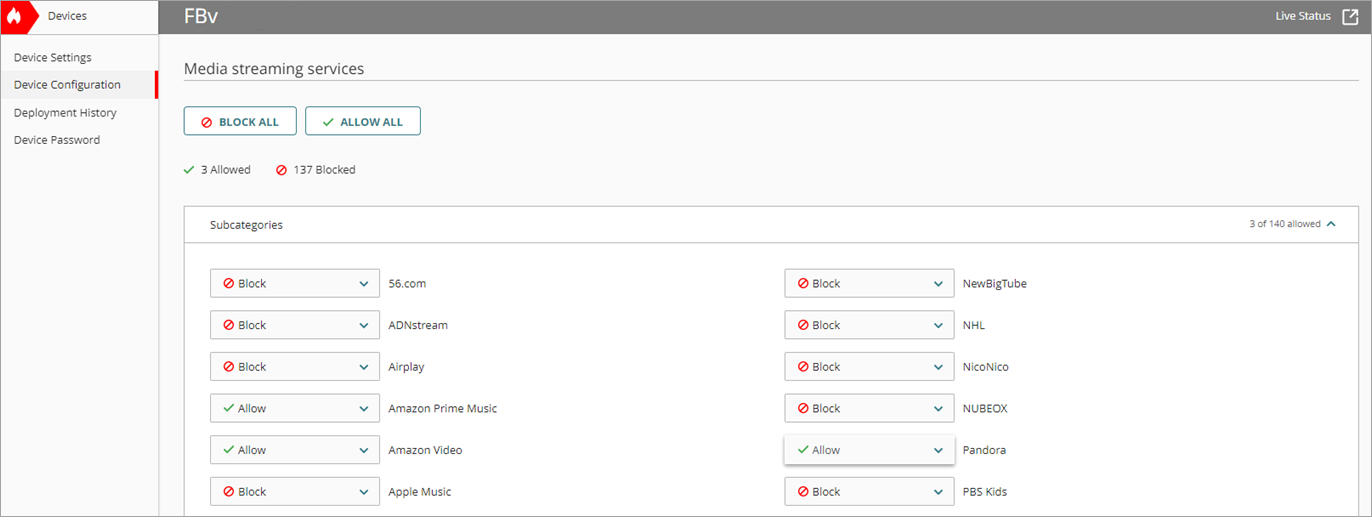
- To save configuration changes to the cloud, click Save.
Add Policies for Students and Teachers
To create new rules that control specific types of traffic through the Firebox, you can add firewall policies to the Firebox configuration. After you add or update a policy, you must deploy the configuration to the Firebox for your changes to take effect.
Outbound policies support settings appropriate for connections from internal networks to external networks. Outbound policies support all security services. For more information, go to Firewall Policy Types.
To add an Outbound policy for students, from WatchGuard Cloud:
- Click Device Configuration.
The Device Configuration page opens. - Click the Firewall Policies tile.
The Firewall Policies page opens. - On the Firewall Policies page, click Add Firewall Policy.
The Add Firewall Policy page opens. - In the Core Policy section, select Outbound. Click Next.
The Add Outbound Policy page opens. - In the Name text box, type a name for this policy. For example, Students.
- From the Action drop-down list, select Allow.
- In the Source and Destination section, click Add Source.
The Add Source Address dialog box opens. - From the Type drop-down list, select Firebox Networks.
- From the Firebox Networks list, select Internal.
- Click Add.
- In the Source and Destination section, click Add Destination.
The Add Destination Address dialog box opens. - From the Type drop-down list, select Built-in Aliases.
- From the Built-in Aliases list, select Any-External.
- Click Add.
- In the Security Services section, from the Content Filtering drop-down list, select your content filtering action.
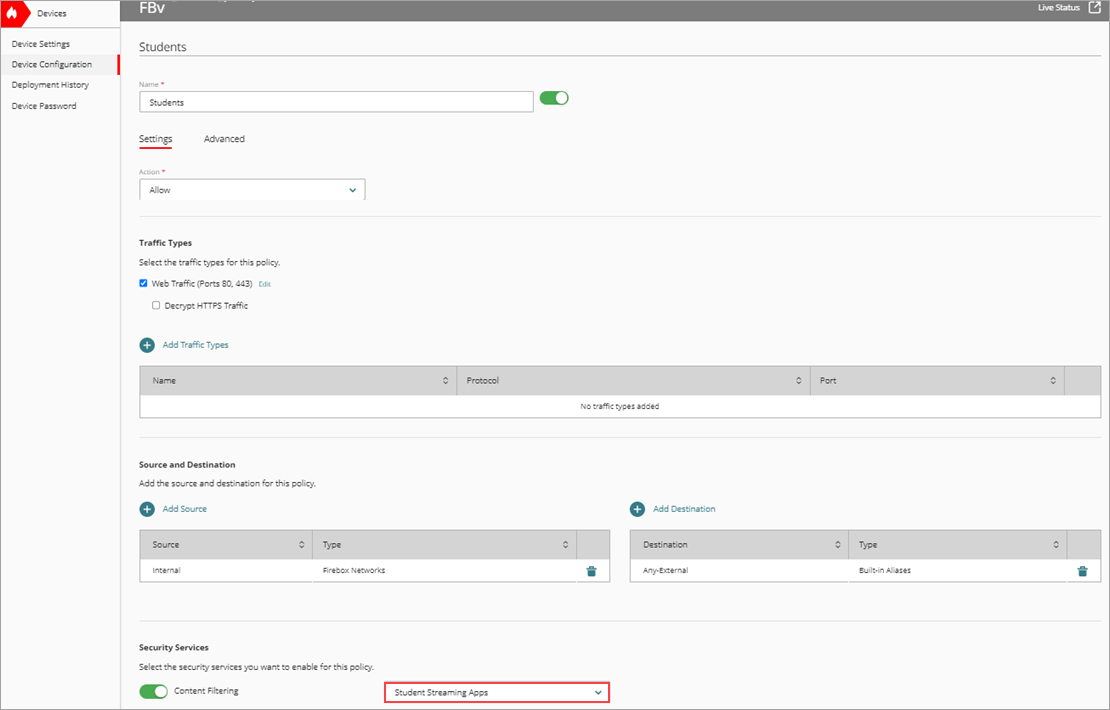
- To save configuration changes to the cloud, click Save.
To add an Outbound policy for teachers, from WatchGuard Cloud:
- Click Device Configuration.
The Device Configuration page opens. - Click the Firewall Policies tile.
The Firewall Policies page opens. - On the Firewall Policies page, click Add Firewall Policy.
The Add Firewall Policy page opens. - In the Core Policies section, select Outbound. Click Next.
- In the Name text box, type a name for this policy. For example, Teachers.
- From the Action drop-down list, select Allow.
- In the Source and Destination section, click Add Source.
The Add Source Address dialog box opens. - From the Type drop-down list, select Network IPv4.
- In the Network IP Address text box, type an IP address.
- Click Add.
- In the Source and Destination section, click Add Destination.
The Add Destination Address dialog box opens. - From the Type drop-down list, select Built-in Aliases.
- From the Built-in Aliases list, select Any-External.
- Click Add.
- In the Security Services section, in Content Filtering, select Default.
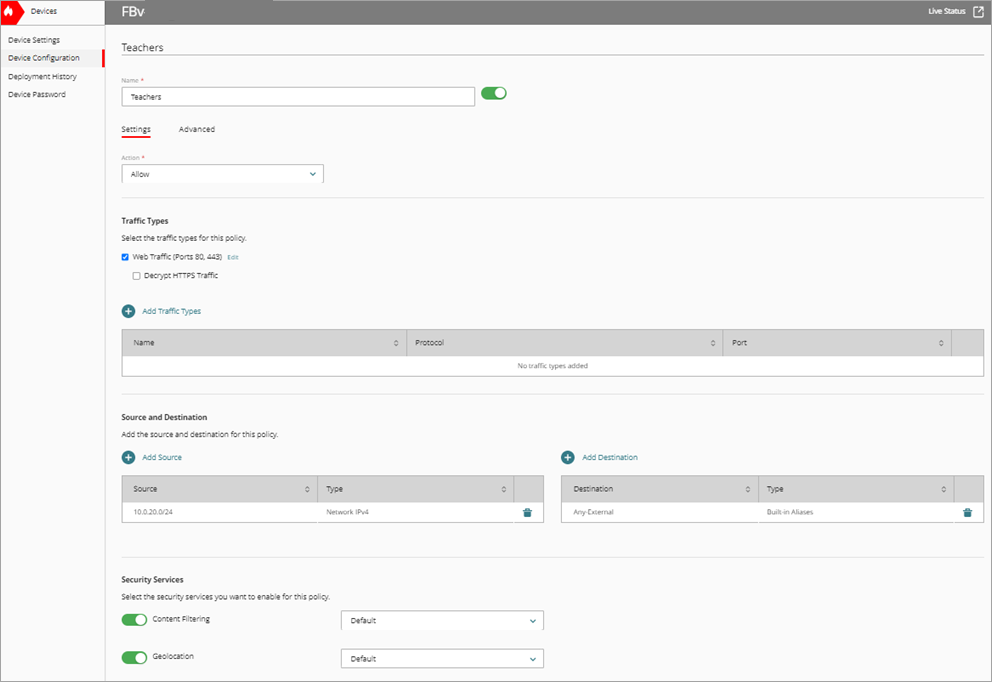
- To save configuration changes to the cloud, click Save.
Add Traffic Shaping Rules
In WatchGuard Cloud, you can use traffic shaping rules to control traffic that each policy handles. You can set the available bandwidth limit for different types of traffic or guarantee the minimum bandwidth for specific traffic flows.
To add a traffic shaping rule for students that limits bandwidth, from WatchGuard Cloud:
- Click Device Configuration.
The Device Configuration page opens. - Click the Traffic Shaping tile.
The Traffic Shaping page opens. - To add a rule to the student policy, select Application Control > Add a Traffic Shaping Rule.
- Select the content filtering action you created. Click Next.
The Add Traffic Shaping Rule page opens. - In the Rule Name text box, type a name. For example, Student Limit.
- In the Behavior section, select Limit Bandwidth.
- In the Method section, select Per User.
- In the Maximum Users text box, type the maximum number of students that can share the bandwidth.
- Set the Total Bandwidth to 200 Kbps.
- In the Applications section, select the applications to limit bandwidth for.
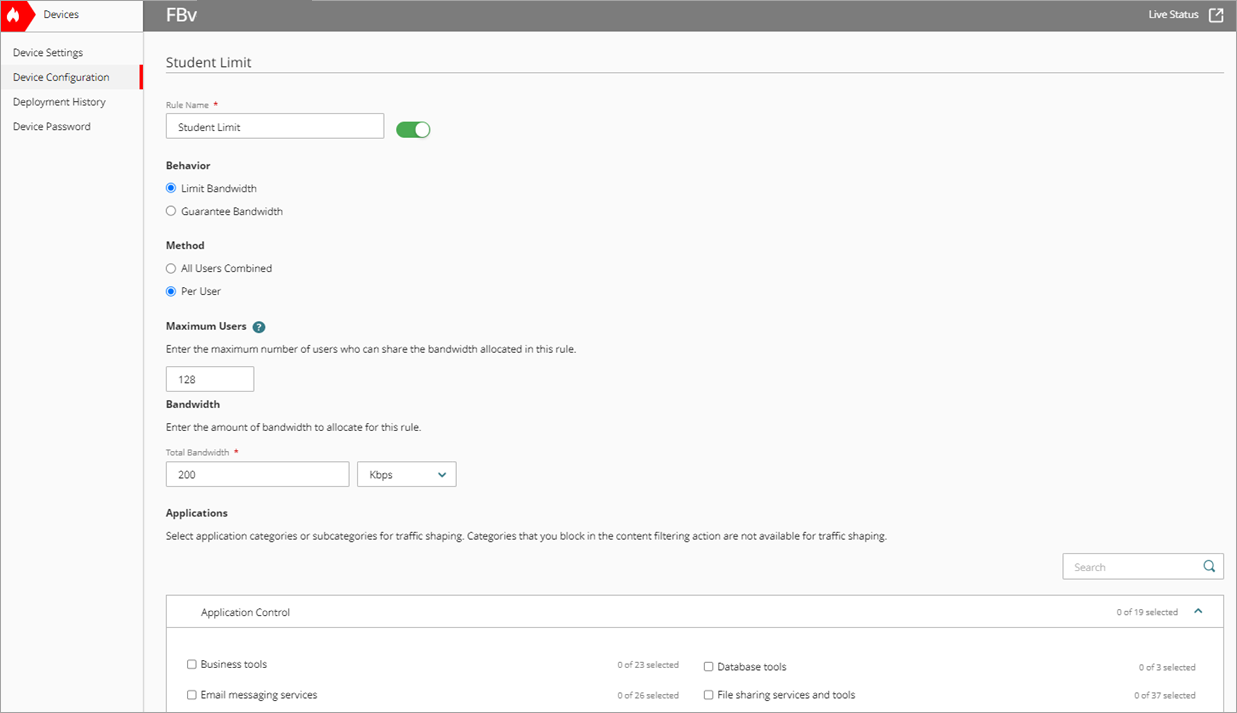
- To save configuration changes to the cloud, click Save.
To add a traffic shaping rule for teachers that guarantees bandwidth, from WatchGuard Cloud:
- Click Device Configuration.
The Device Configuration page opens. - Click the Traffic Shaping tile.
The Traffic Shaping page opens. - To add a rule to the Outbound policy, select Firewall Polices > Add Traffic Shaping Rule.
The Add Traffic Shaping Rule page opens. - In the Core Policies section, select Outbound. Click Next.
- In the Rule Name text box, type a name. For example, Teachers Guarantee.
- In the Behavior section, select Guarantee Bandwidth.
- In the Method section, select Per User.
- In the Maximum Users text box, type the maximum number of teachers who can share the bandwidth.
- Set Bandwidth > Upload to 30 Mbps to guarantee uploads.
- Set Bandwidth > Download to 30 Mbps to guarantee downloads.
- In the Policies list, select the policy you created for teachers.
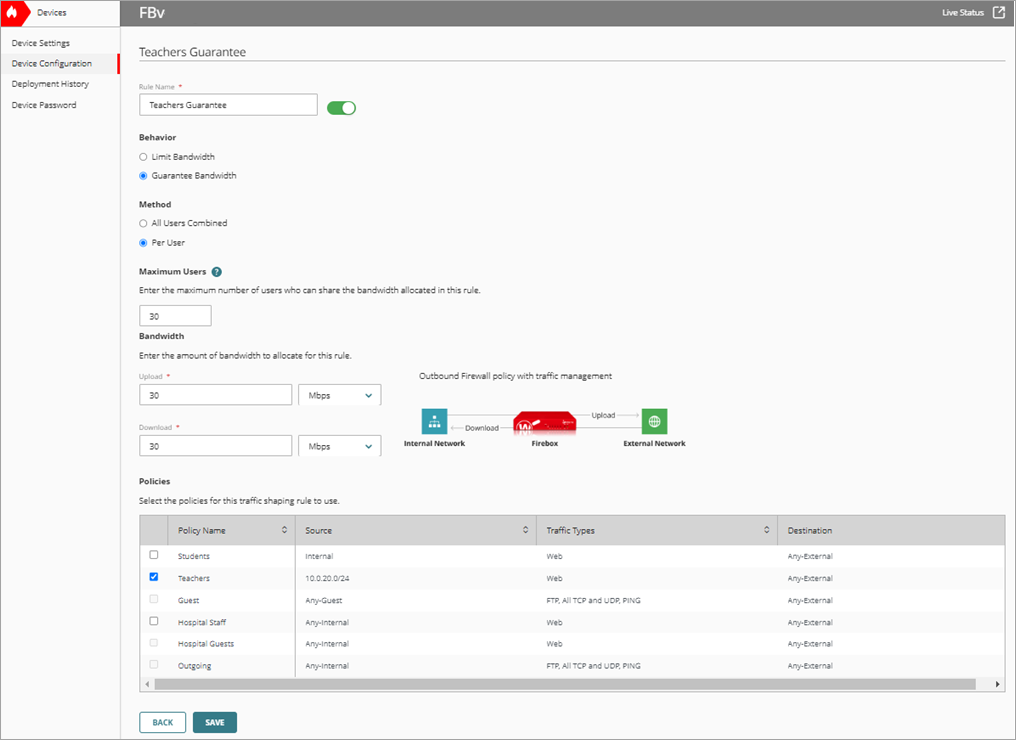
- To save configuration changes to the cloud, click Save.
- Deploy changes to the Firebox.
The traffic shaping rules show in the list of rules on the Traffic Management page.
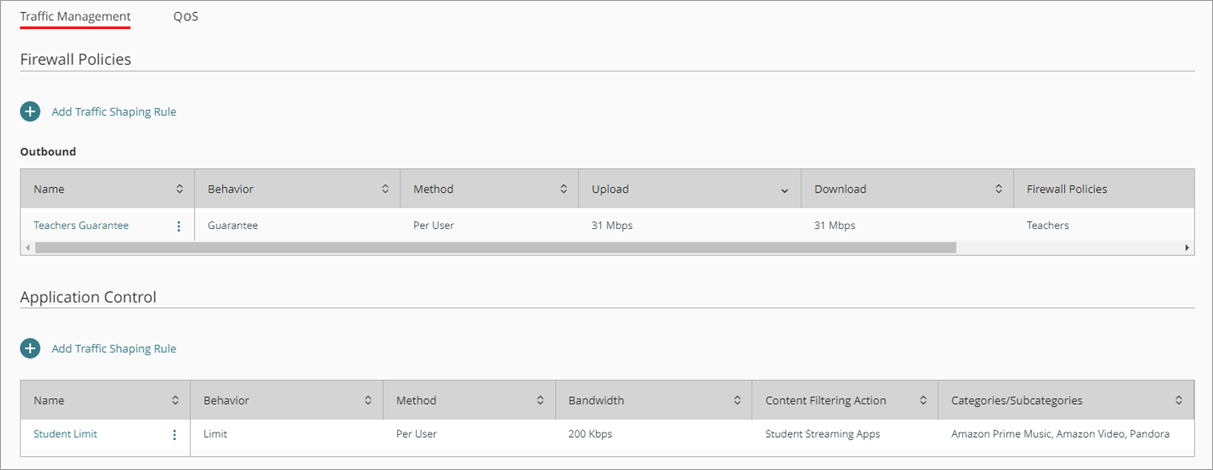
Students at the school now have a download bandwidth limit of 200 Kbps each. Teachers at the school now have a bandwidth guarantee of 30 Mbps each.
Retail Store Point-of-Sale Devices
A retail store must guarantee an amount of bandwidth for point-of-sale (POS) devices on the network. You can use a traffic shaping rule applied to a policy to guarantee bandwidth for a device with an IP address.
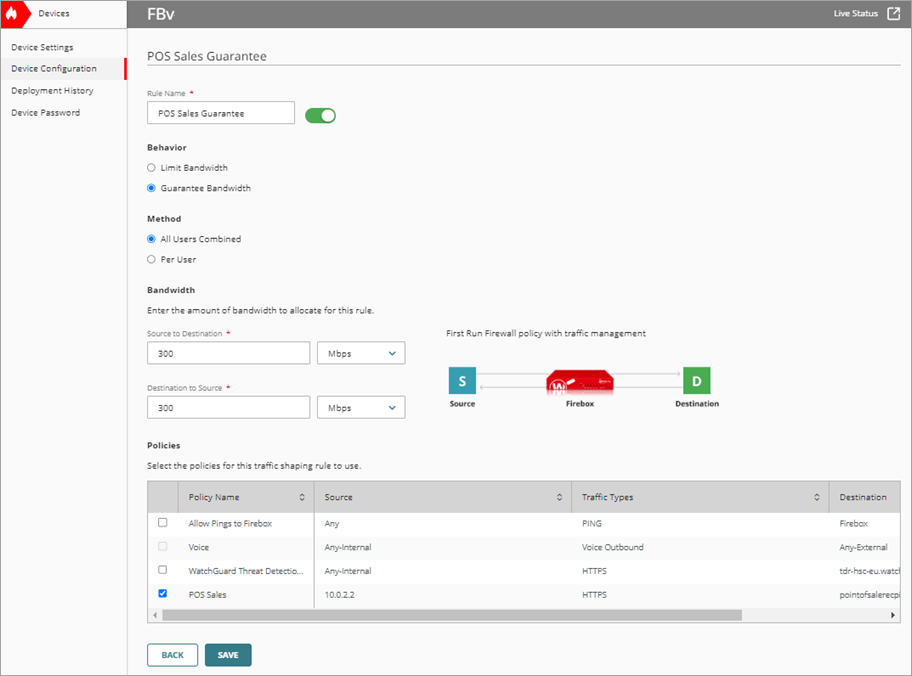
For example, you can use a traffic shaping rule and policy to guarantee 300 Mbps of bandwidth for POS devices on the network that must connect to a domain to operate.
Add a First Run Policy for a Point-of-Sale Device
To create new rules for specific types of traffic through the Firebox, you can add firewall policies to the Firebox configuration. After you add or update a policy, you must deploy the configuration to the Firebox for your changes to take effect.
You must add a First Run policy when you want the policy to apply before the Core policies, and you do not want to use Content Scanning or WebBlocker services. For more information, go to Firewall Policy Types.
To add a First Run policy for POS devices, from WatchGuard Cloud:
- From Account Manager, select an account.
- Select Configure > Devices.
- Select the cloud-managed Firebox.
- Click Device Configuration.
The Device Configuration page opens. - Click the Firewall Policies tile.
The Firewall Policies page opens. - On the Firewall Policies page, click Add Firewall Policy.
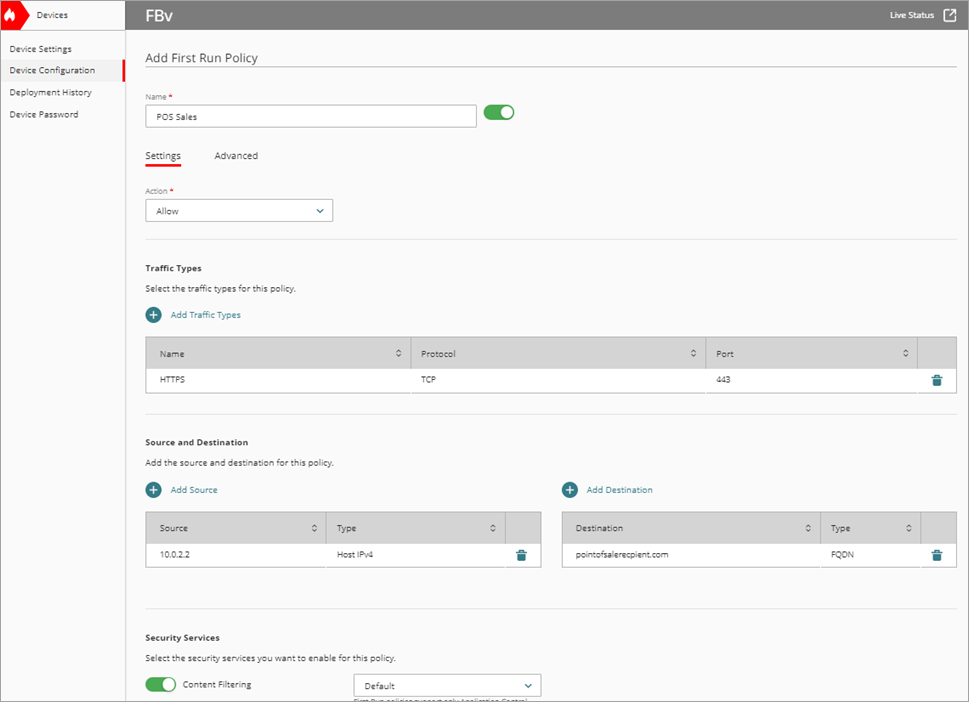
The Add Firewall Policy page opens. - In the Name text box, type a name for this policy. For example, POS Sales.
- From the Action drop-down list, select Allow.
- In the Traffic Types section, click Add Traffic Types.
The Add Traffic Type page opens. - Select HTTP.
- Click Add.
- In the Source and Destination section, click Add Source.
The Add Source Address dialog box opens. - From the Type drop-down list, select Network IPv4.
- In the Network IP Address text box, type the IP address of the POS device.
- Click Add.
- In the Source and Destination section, click Add Destination.
The Add Destination Address dialog box opens. - From the Type drop-down list, select FQDN.
- In the FQDN text box, type a fully qualified domain name for the POS to send traffic to.
- Click Add.
- To save configuration changes to the cloud, click Save.
Add a Traffic Shaping Rule
In WatchGuard Cloud, you can use traffic shaping rules to control traffic that each policy handles. You can set the available bandwidth limit for different types of traffic or guarantee the minimum bandwidth for specific traffic.
To add a traffic shaping rule that guarantees bandwidth for POS devices, from WatchGuard Cloud:
- Click Device Configuration.
The Device Configuration page opens. - Click the Traffic Shaping tile.
The Traffic Shaping page opens. - To add a rule to the First Run policy, select Firewall Polices > Add Traffic Shaping Rule.
The Add Traffic Shaping Rule page opens. - In the Exception Policies section, select First Run. Click Next.
- Select Behavior > Guarantee Bandwidth.
- Select Method > All Users Combined.
- Set Bandwidth > Upload to 300 Mbps to guarantee the upload bandwidth.
- Set Bandwidth > Download to 300 Mbps maximum to guarantee the download bandwidth.
- In the Policies list, select the POS policy that you created.
- To save configuration changes to the cloud, click Save.
- Deploy changes to the Firebox.
The traffic shaping rule shows in the list of rules on the Traffic Management page.

POS devices on the network that must connect to a domain to operate, now have a guarantee of 300 Mbps of bandwidth.
Hospital Staff and Hospital Guests
A hospital wants to limit the amount of bandwidth that guests can use on the network and guarantee the amount of bandwidth that staff and business applications can use.
You can guarantee or limit bandwidth that specific users and applications use. You can configure a content filtering action to use a traffic shaping rule, then configure a policy to use the content filtering action.
For example, you can guarantee the amount of bandwidth that all hospital staff can use for medical applications over HTTP to 500 Mbps. At the same time, you can limit the amount of bandwidth that patients can use to 100 Mbps combined.
Add a Content Filtering Action
In WatchGuard Cloud, you add content filtering services to configure multiple filtering actions and assign specific actions to a policy. By default, if you select the option to create your own actions, all actions are set to Allow. If you select to use the WatchGuard Cloud recommendations, then the actions for a selection of subcategories are set to Block. For more information, go to Configure Content Filtering in WatchGuard Cloud.
To add a content filtering action for hospital devices, from WatchGuard Cloud:
- From Account Manager, select an account.
- Select Configure > Devices.
- Select the cloud-managed Firebox.
- Click Device Configuration.
The Device Configuration page opens. - Click the Content Filtering tile.
The Content Filtering page opens. - Click Add Action.
The Add Action page opens. - Select I want to use WatchGuard Cloud recommendations. Click Next.
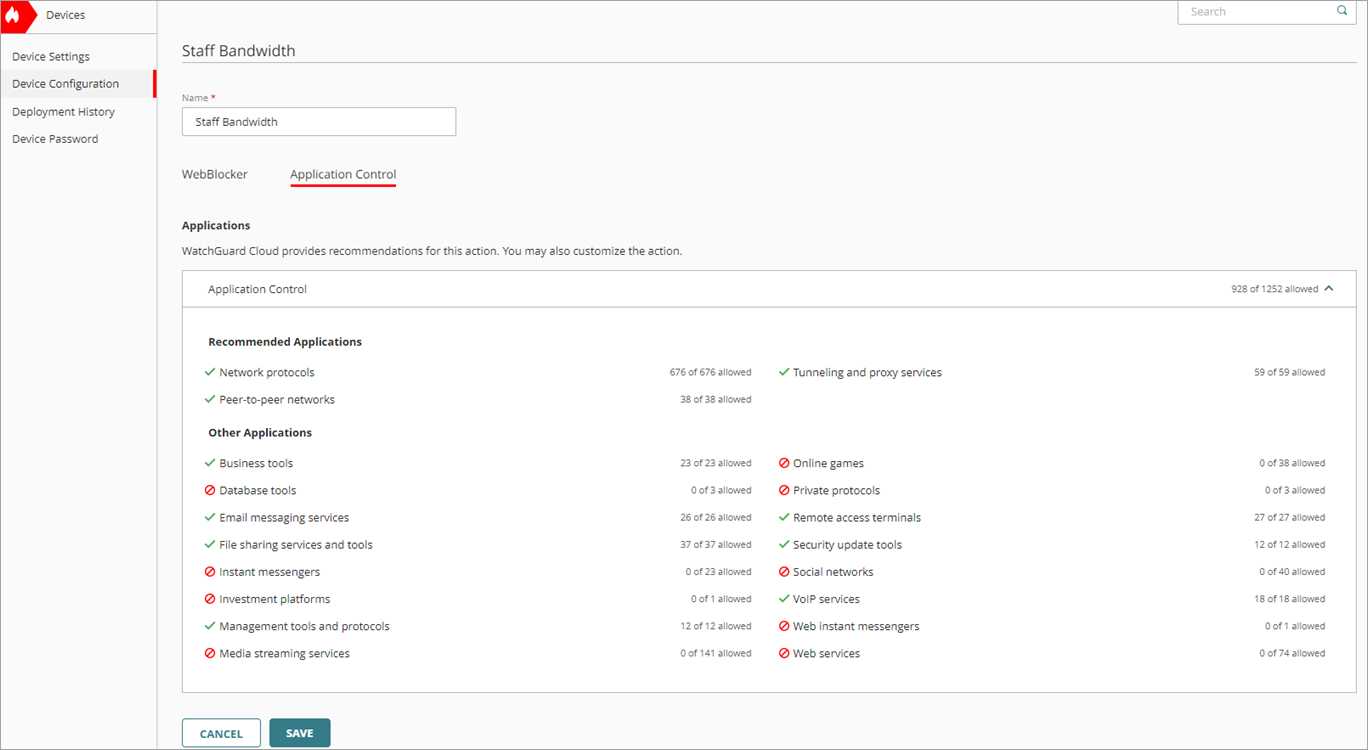
- In the Name text box, type a name for this action. For example, Staff Bandwidth.
- From Application Control, in the Applications section, allow only the applications that you want to guarantee bandwidth for.
- To save configuration changes to the cloud, click Save.
Add an Outbound Policy for Hospital Staff and Guests
To create new rules for specific types of traffic through the Firebox, you can add firewall policies to the Firebox configuration. After you add or update a policy, you must deploy the configuration to the Firebox for your changes to take effect.
Outbound policies support settings appropriate for connections from internal networks to external networks. Outbound policies support all security services. For more information, go to Firewall Policy Types.
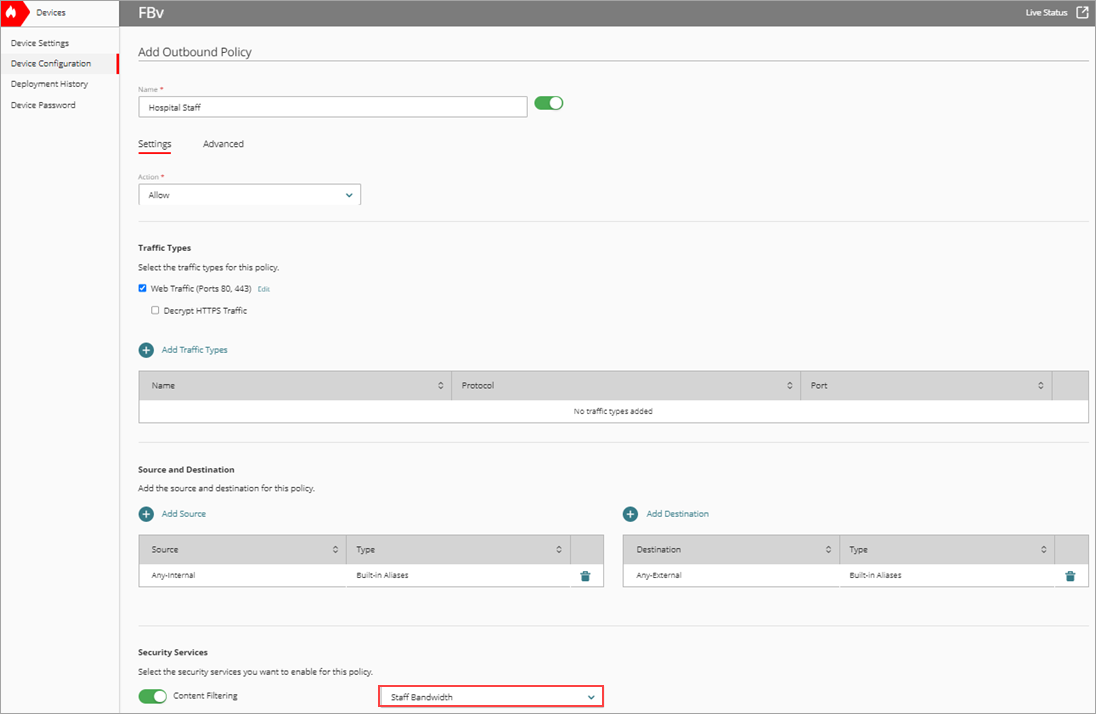
To add an Outbound policy for hospital staff, from WatchGuard Cloud:
- Click Device Configuration.
The Device Configuration page opens. - Click the Firewall Policies tile.
The Firewall Policies page opens. - On the Firewall Policies page, click Add Firewall Policy.
The Add Firewall Policy page opens. - In the Core Policy section, select Outbound. Click Next.
- In the Name text box, type a name for this policy. For example, Hospital Staff.
- From the Action drop-down list, select Allow.
- In the Source and Destination section, click Add Source.
The Add Source Address dialog box opens. - From the Type drop-down list, select Built-in Aliases.
- From the Built-in Aliases list, select Any-Internal.
- Click Add.
- In the Source and Destination section, click Add Destination.
The Add Destination Address dialog box opens. - From the Type drop-down list, select Built-in Aliases.
- From the Built-in Aliases list, select Any-External.
- Click Add.
- In the Security Services section, from the Content Filtering drop-down list, select the content filtering action you created for hospital staff.
- To save configuration changes to the cloud, click Save.
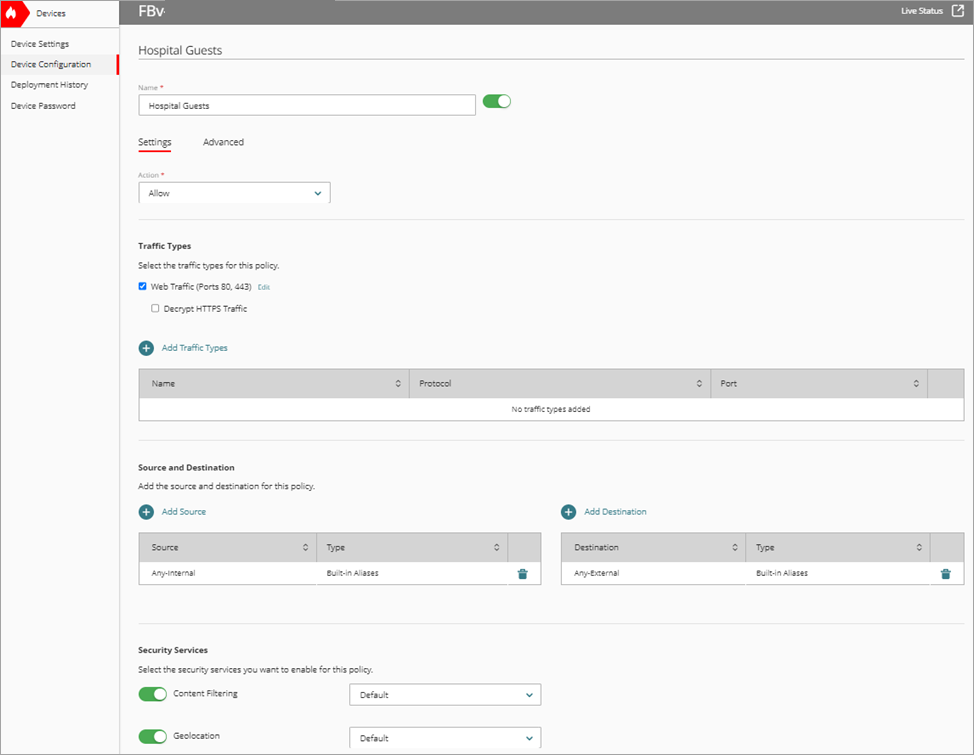
To add an Outbound policy for hospital guests, from WatchGuard Cloud:
- Click Device Configuration.
The Device Configuration page opens. - Click the Firewall Policies tile.
The Firewall Policies page opens. - On the Firewall Policies page, click Add Firewall Policy.
The Add Firewall Policy page opens. - In the Name text box, type a name for this policy. For example, Hospital Guests.
- From the Action drop-down list, select Allow.
- In the Source and Destination section, click Add Source.
The Add Source Address dialog box opens. - From the Type drop-down list, select Built-in Aliases.
- From the Built-in Aliases list, select Any-Internal.
- Click Add.
- In the Source and Destination section, click Add Destination.
The Add Destination Address dialog box opens. - From the Type drop-down list, select Built-in Aliases.
- From the Built-in Aliases list, select Any-External.
- Click Add.
- In the Security Services section, from the Content Filtering drop-down list, select Default.
- To save configuration changes to the cloud, click Save.
Add Traffic Shaping Rules
In WatchGuard Cloud, you can use traffic shaping rules to control traffic handled by each policy. You can set the bandwidth limit available for different types of traffic or guarantee a minimum amount of bandwidth for specific traffic.
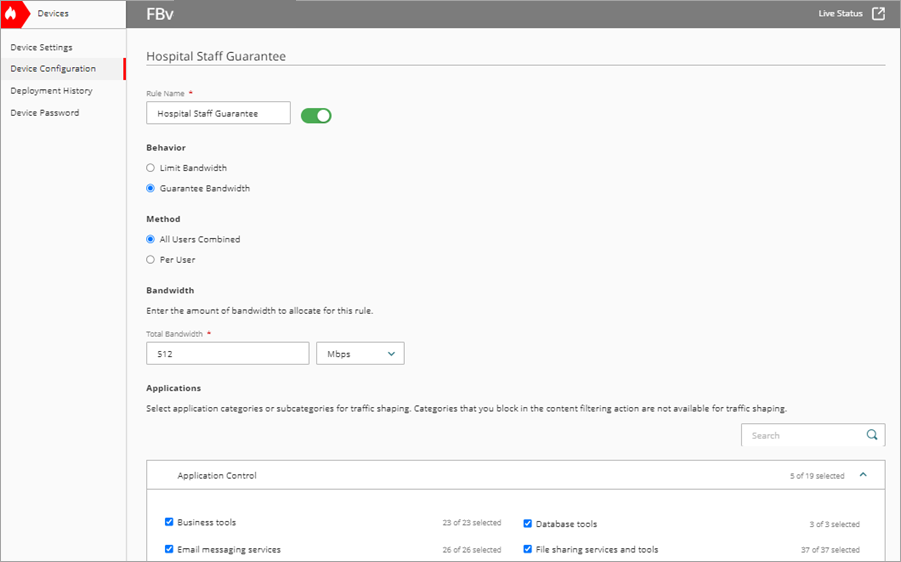
To add a traffic shaping rule for hospital staff that guarantees bandwidth, from WatchGuard Cloud:
- Click Device Configuration.
The Device Configuration page opens. - Click the Traffic Shaping tile.
The Traffic Shaping page opens. - To add a rule to the hospital staff policy, select Application Control > Add Traffic Shaping Rule.
The Add Traffic Shaping Rule page opens. - Select the content filtering action you created. Click Next.
- In the Rule Name text box, type a name. For example, Hospital Staff Guarantee.
- In the Behavior section, select Guarantee Bandwidth.
- In the Method section, select All Users Combined.
- Set Total Bandwidth to 500 Mbps.
- In the Applications section, select the applications to guarantee bandwidth for.
- To save configuration changes to the cloud, click Save.
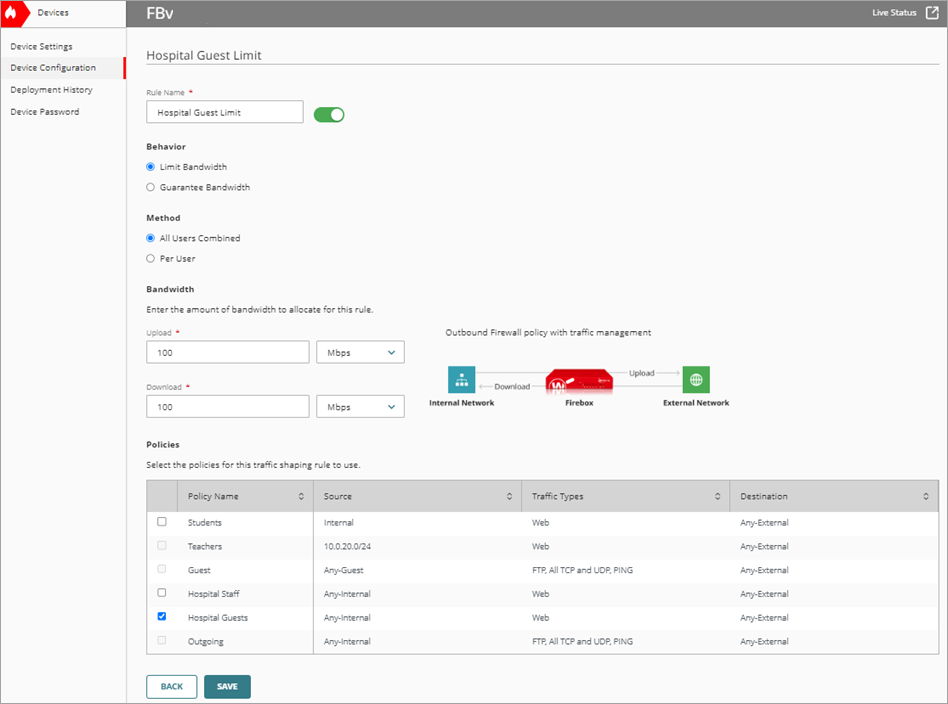
To add a traffic shaping rule for hospital guests that limits bandwidth, from WatchGuard Cloud:
- Click Device Configuration.
The Device Configuration page opens. - Click the Traffic Shaping tile.
The Traffic Shaping page opens. - To add a rule to the Outbound policy, select Firewall Polices > Traffic Shaping Rule.
The Add Traffic Shaping Rule page opens. - In the Core Policies section, select Outbound. Click Next.
- In the Rule Name text box, type a name. For example, Hospital Guest Limit.
- In the Behavior section, select Limit Bandwidth.
- In the Method section, select All Users Combined.
- Set Total Bandwidth to 100 Mbps.
- In the Policies list, select the hospital guest policy.
- To save configuration changes to the cloud, click Save.
- Deploy changes to the Firebox.
The traffic shaping rules show in the list of rules on the Traffic Management page.
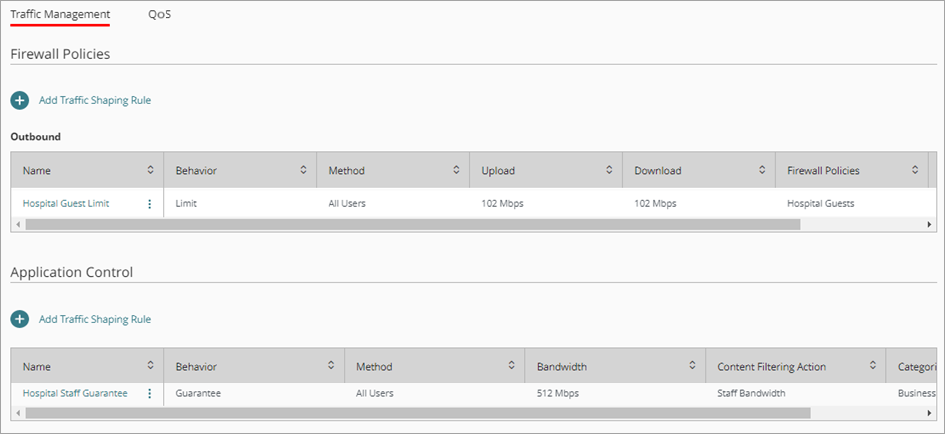
Guests at the hospital now have a download bandwidth limit of 100 Mbps. This amount is for all guests combined. Staff at the hospital have a guarantee of 500 Mbps. This amount is for all staff combined.
Network for VoIP Devices
An office wants to guarantee bandwidth for its Voice Over IP (VoIP) devices on the network. VoIP traffic is sensitive to network conditions because fluctuations in bandwidth might affect audio quality or cause a call to drop. Traffic shaping enables a Firebox to control how the traffic flows through the box as it transits out to the Internet.
To guarantee bandwidth used by VoIP devices, you can configure a content filtering action to use a traffic shaping rule, then configure policies to use the content filtering action.
For example, you can guarantee that each VoIP device on a network can use 200 Kbps of bandwidth.
Add an Internal Network for VoIP
A cloud-managed Firebox protects an internal private network. With this type of network, you can configure separate networks for trusted users or hosts, with different firewall policies applied by default for traffic for each network.
DHCP (Dynamic Host Configuration Protocol) is a method to assign IP addresses automatically to network clients. For more information, go to Configure Firebox Network DHCP Settings.
To add an internal network with DHCP for VoIP devices, from WatchGuard Cloud:
- From Account Manager, select an account.
- Select Configure > Devices.
- Select the cloud-managed Firebox.
- Click Device Configuration.
The Device Configuration page opens. - Click the Networks tile.
The Networks page opens. - Click Add Network.
- From the drop-down list, select Add Internal Network.
The Add Internal Network page opens. - In the Name text box, type a name for the VoIP network.
- In the IP Address text box, type the IP address range for the network.
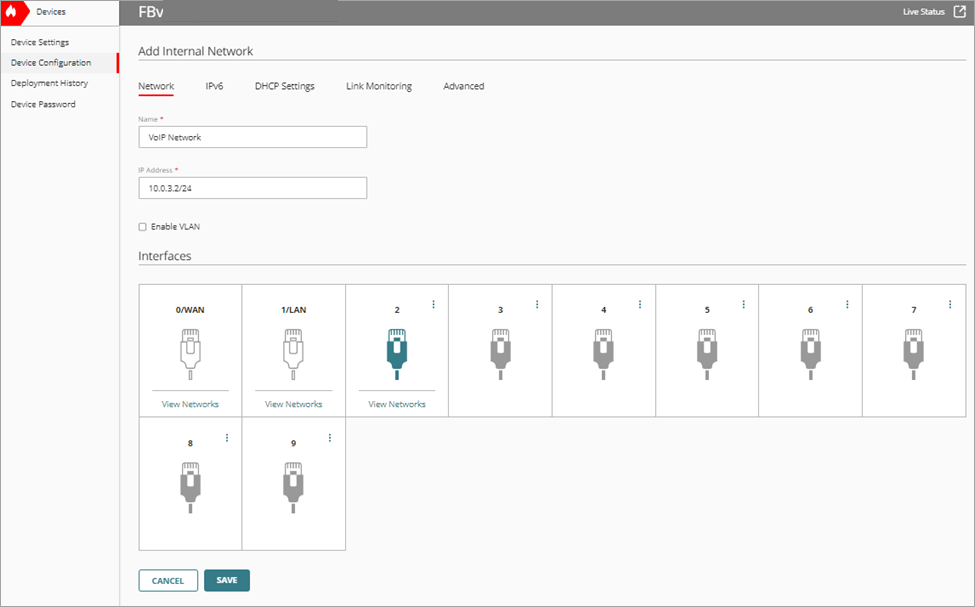
- Select the DHCP Settings tab.
- From the DHCP Mode drop-down list, select DHCP Server.
- In the DHCP Options section, click Add DHCP Options.
The Add DHCP Options page opens.
DHCP options, also known as vendor extensions, might be VoIP provider specific.
In most cases, VoIP hardware manufacture provide DHCP option codes.
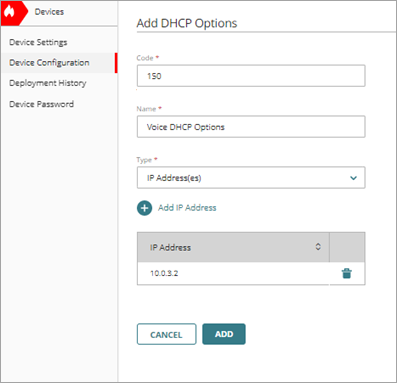
- In the Code text box, type the DHCP option code.
- In the Name text box, type a name to describe this DHCP option.
- From the Type drop-down list, select IP Address(es).
- Click Add IP Address and add the IP address of the local server that hosts the configuration file.
A network administrator provides the VoIP configuration file. A VoIP device must contact a server or cloud-managed device to receive the configuration file.
- Click Add.
The Add IP Address Range dialog box opens. - In the Starting IP Address text box, type the starting IP address in the range.
- In the Ending IP Address text box, type the ending IP address in the range.
- Click Add.
The Add Internal Network page opens.
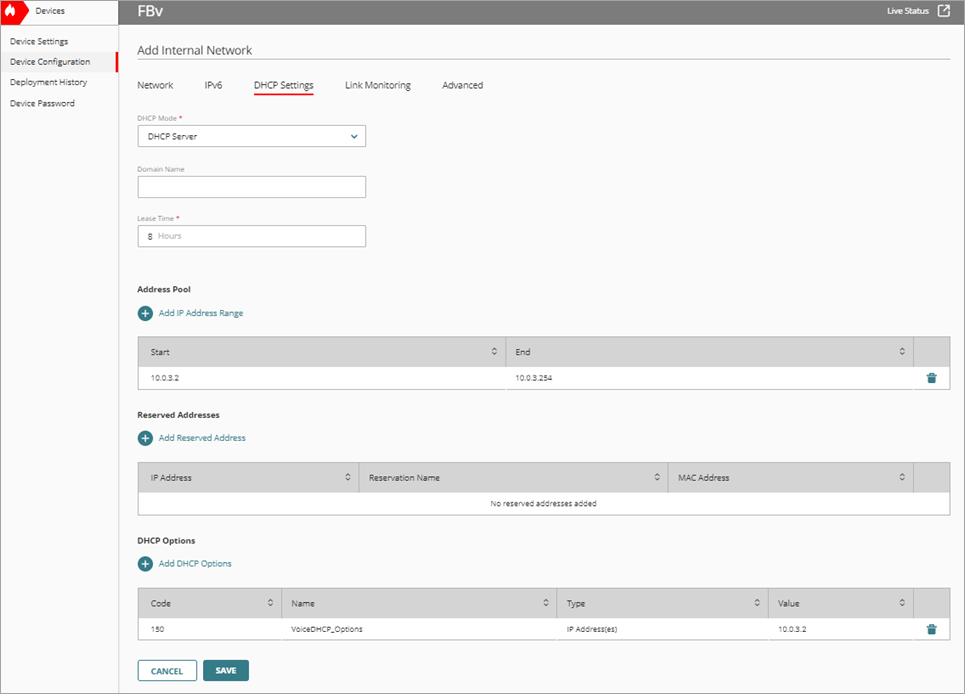
- To save configuration changes to the cloud, click Save.
Add a First Run Policy for VoIP
To create new rules for specific types of traffic through the Firebox, you can add firewall policies to the Firebox configuration. After you add or update a policy, you must deploy the configuration to the Firebox for your changes to take effect.
You must add a First Run policy when you want the policy to apply before the Core policies, and you do not want to use Content Scanning or WebBlocker services. For more information, go to Firewall Policy Types.
To add a VoIP firewall First Run policy, from WatchGuard Cloud:
- Click Device Configuration.
The Device Configuration page opens. - Click the Firewall Policies tile.
The Firewall Policies page opens. - Click Add Firewall Policy.
The Add Firewall Policy page opens. - Select First Run and click Next.
- In the Name text box, type a name for this policy. For example, Voice.
- From the Action drop-down list, select Allow.
- in the Traffic Types section, click Add Traffic Type.
The Add Traffic Type page opens. - Click Add Custom Traffic type.
The Add Custom Traffic Type page opens. - In the Name text box, type a name for this traffic type. For example, Voice Outbound.
- From the Protocol drop-down list, select TCP.
- From the Port drop-down list, select Port Range.
- In the first port range text box, type 5060.
This is a common SIP port range. Review your third-party documentation for the range of ports used by your VoIP solution. - In the second port range text box, type 5061.
This is a common SIP port range. Review your third-party documentation for the range of ports used by your VoIP solution. - Click Add.
- From the Protocol drop-down list, select UDP.
- From the Port drop-down list, select Port Range.
- In the first port range text box, type 20000.
This is a common RTP port range. - In the second port range text box, type 30000.
This is a common RTP port range. - Click Add.
The TCP and UDP port range might be specific to your VoIP provider.
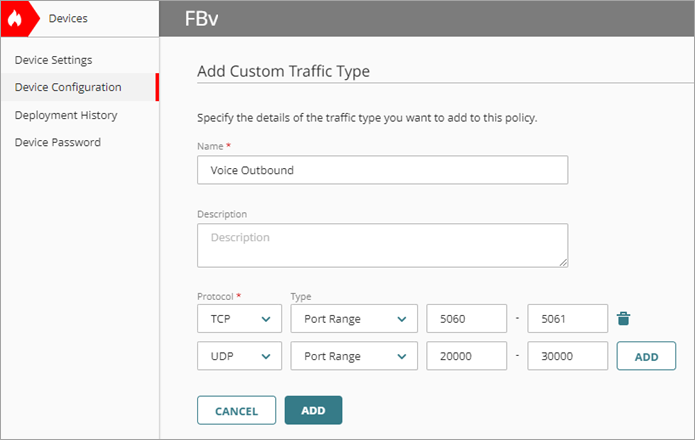
- Click Add.
The policy configuration page opens. - In the Source and Destination section, click Add Source.
The Add Source Address dialog box opens. - From the Type drop-down list, select Built-in Aliases.
- Select Any-Internal and click Add.
- In the Source and Destination section, click Add Destination.
The Add Destination Address dialog box opens. - From the Type drop-down list, select Built-in Aliases.
- Select Any-Internal and click Add.
- Repeat Steps 24 - 25, select Any-External and click Add.
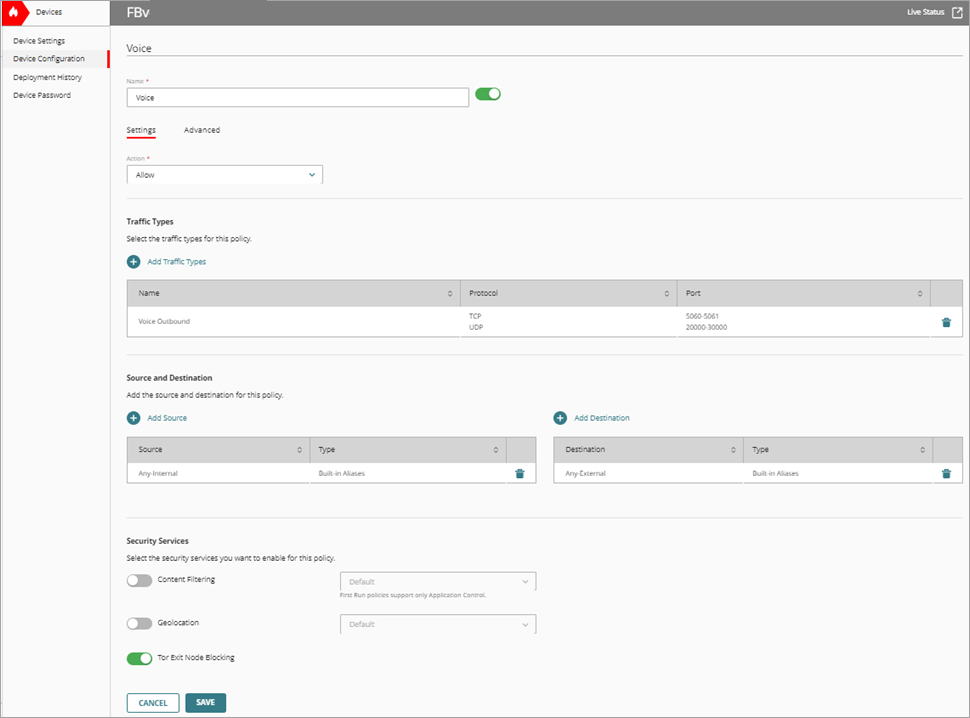
- To save configuration changes to the cloud, click Save.
Add a Traffic Shaping Rule for VoIP
In WatchGuard Cloud, you can use traffic shaping rules to control traffic handled by each policy. You can set the bandwidth limit available for different types of traffic or guarantee a minimum amount of bandwidth for specific traffic. Traffic shaping enables the Firebox to control the traffic flow as traffic travels through the Firebox and out to the Internet.
To add a traffic shaping rule for VoIP that guarantees bandwidth, from WatchGuard Cloud:
- Click Device Configuration.
The Device Configuration page opens. - Click the Traffic Shaping tile.
The Traffic Shaping page opens. - To add a rule to a First Run policy, select Firewall Polices > Add Traffic Shaping Rule.
- In the Exception Policies section, select First Run. Click Next.
- In the Rule Name text box, type a name. For example, VoIP Traffic.
- In the Behavior section, select Guarantee Bandwidth.
- In the Method section, select Per User.
- In the Maximum Users text box, type the maximum number of VoIP devices.
- Set Upload to 200 Kbps to guarantee the upload bandwidth.
- Set Bandwidth > Download to 200 Kbps maximum to guarantee the download bandwidth.
- In the Policies list, select the VoIP policy.
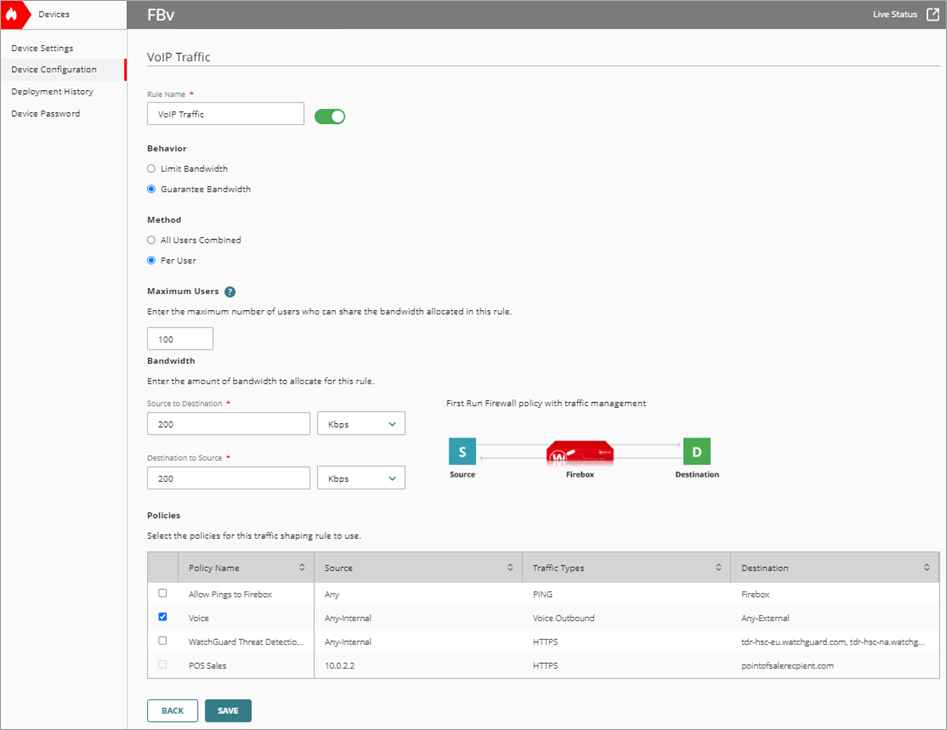
- Click Save.
Add QoS Marking for VoIP Traffic
In WatchGuard Cloud, you can enable QoS marking for an individual policy. When you define QoS marking for a policy, all traffic that uses that policy is marked. You can use QoS marking to prioritize packets inside your network.
For QoS marking to prioritize traffic, your internal switches and routers must support QoS.
To enable QoS marking and prioritize traffic on a VoIP policy:
- Click Device Configuration.
The Device Configuration page opens. - Click the Traffic Shaping tile.
The Traffic Shaping page opens. - Select the QoS tab.
The QoS page opens. - From the policy list, click the VoIP policy to configure QoS.
The Configure QoS page opens. - In the Marking Type section, select IP Precedence.
- In the Marking Method section, select Preserve.
The Preserve method makes no change to the current value of the bit.
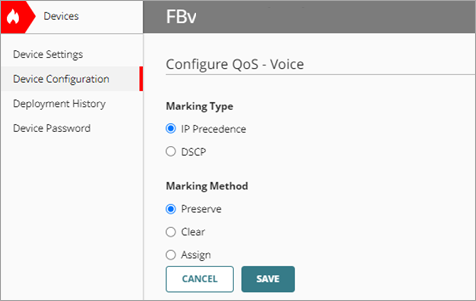
- Click Save.
- Deploy changes to the Firebox.
The traffic shaping rule shows in the list of rules on the Traffic Management page.

The QoS marking shows on the QoS page.

VoIP devices now have a guaranteed bandwidth of 200 Kbps. The network prioritizes VoIP packets inside your network. This amount of bandwidth is suitable for voice only VoIP calls. You must increase the amount for VoIP calls with video.