
Related Topics
TDR Deployment Best Practices
A TDR Host Sensor can automatically quarantine files, stop processes, and delete registry entries if it identifies a file or process as ransomware or another type of threat. Because the Host Sensor takes actions that could affect other applications installed on your hosts, we recommend you consider these best practices for your TDR deployment.
To complete the procedures described in this topic you must log in to TDR as a user with Operator privileges.
Phased Host Sensor Deployment
If the Host Sensor identifies a file or process as a threat, and active TDR policies allow remediation action, the Host Sensor automatically takes action to disable it. To identify potential interactions with other installed software that you trust, we recommend that you first deploy and test Host Sensors on a small set of hosts that run applications commonly used on your network. A small pilot deployment can enable you to identify any interactions between the Host Sensor and other applications, so that you can add exceptions to resolve any interoperability or performance issues before wider deployment.
You must decide how many and what types of hosts to include in your pilot deployment. For each host, install the Host Sensor, and then use other software on the host. Monitor the indicators in your TDR account to see threats and actions reported by the Host Sensors.
If a Host Sensor identifies a threat, you can look at the details in the indicator to see the name of the file or process and why it was considered a threat.
To see indicators for a host:
- Select ThreatSync > Indicators.
The Indicators page appears. - Clear all filters and then filter or search by the host name.
- To see more information about an indicator, in the Indicator column, click Additional Information.
For more information about the Indicators page, see Manage TDR Indicators.
If the Host Sensor identifies a trusted application as a threat, you can add the MD5 value to the Signature Overrides as a Whitelist item. TDR does not generate indicators for files you add to the Whitelist.
To add a file to the Whitelist:
- On the Indicators page, find the indicator for the application you want to add to the Whitelist.
- Select the check box adjacent to the indicator.
- From the Actions drop-down list, select Whitelist.
The Confirm Action dialog box appears. - Click Execute Action.
If the Host Sensor causes performance issues or conflicts with other software that cause the Host Sensor or other software to not function, you can add an exclusion for the installation path of the software. An exclusion causes the Host Sensor to ignore the files in the specified path.
To add an exclusion:
- Select Configure > Exclusion.
- Click Add.
- Specify the path to exclude.
For more information about how to add an exclusion, see Configure TDR Exclusions.
If the Host Sensor quarantines a file, it encrypts the file and stores it in the quarantine directory on the host. To remove a file from quarantine:
- On the Indicators page, find the indicator. For an indicator with a successful Quarantine action, the threat score is 1.
- Select the indicator.
- Select the Unquarantine file or Unquarantine HRP action. The available action depends on whether the file was quarantined by Host Ransomware Prevention (HRP) or as the result of the Quarantine File action.
For more information about how to remove a file from quarantine, see Remove a File from Quarantine.
Add Exclusions for Desktop AV
The TDR Host Sensor and desktop antivirus both detect and prevent threats. To prevent conflicts between the Host Sensor and desktop antivirus software, we recommend that you add exclusions in TDR and your desktop AV software.
Configure Desktop AV Software to Exclude TDR File Paths
In the desktop antivirus software configuration, add the TDR Host Sensor installation directory to the exclusion list or whitelist.
The directories to exclude are:
c:\Program Files (x86)\WatchGuard\Threat Detection and Response\
c:\Program Files\WatchGuard\Threat Detection and Response\
See the documentation from your antivirus software vendor for instructions to edit the exclusions list or whitelist.
Configure TDR to Exclude Desktop AV File Paths
In TDR, add exclusions for the locations where your antivirus software is installed. The paths to exclude are different for each desktop AV vendor and might be different for each OS or AV software version. Test the Host Sensor with your desktop AV solution to make sure you have excluded all necessary paths.
For links to integration guides for TDR and popular desktop AV vendors, see Integration Guides.
For more information about how to add a TDR exclusion, see Host Sensors and AV Software Exclusions.
Configure Host Groups
By default, the global Host Sensor settings and default TDR policies apply to all deployed Host Sensors. We recommend that you configure Host Groups so that you can easily configure different Host Sensor settings and policies for each group. You can use Host Groups to group together hosts that have a similar OS version, hardware, applications or user type. For example, you could create groups for Servers, Windows 7 Desktops, Laptops, Sales, Finance, Support, and so on. After you configure Host Groups you can change the Host Sensor settings for each group, and you can use the groups names in your TDR policies. We recommend that you test a few hosts in each group as part of your initial deployment phase.
You can manage host group membership from the Hosts page or the Groups page. From the Hosts page you can select multiple hosts from a list to add them to a new or existing Host Group.
To change the Host Group for one or more Hosts:
- Select Devices > Hosts.
- Select the check box adjacent to one or more hosts in the list.
- From the Actions drop-down list, select Change Host Group.
The Change Host Group dialog box appears.

- Start to type the name of the group. This can be an existing group or a new group.
As you type. the names of existing groups and the option to add a new group appear below the text box. - Select the group, or select the option to add the new group with the name you typed.
The selected hosts are added to the group you selected. If you selected the option to add a new group, the Host Group is added.
To remove one or more Host Sensors from a Host Group.
- Select the check box adjacent to one or more hosts in the list.
- From the Actions drop-down list, select Change Host Group.
The Change Host Group dialog box appears. - Select No Group.
Each selected host is removed from the Host Group it was previously a member of.
For more information about the Hosts page, see Manage TDR Hosts and Host Sensors.
Configure Host Sensor Settings for Host Groups
For each Host Group you can configure the Host Sensor settings to use for hosts in that group. In the Host Group configuration, you can override the global Host Sensor settings, and specify different Host Sensor settings for the group.
To configure Host Sensor settings for a Host Group:
- Select Configuration > Groups.
- Adjacent to the group name, click
 .
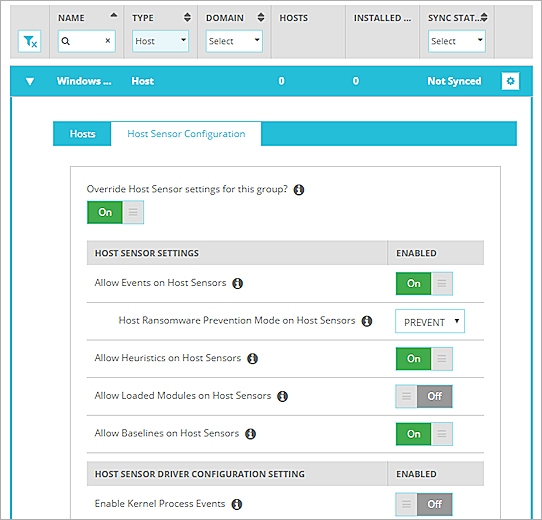
. - Select the Host Sensor Configuration tab.
- Click the Override Host Sensor settings for this group switch.
- Configure the Host Sensor settings for the group.
WatchGuard provides recommended Host Sensor configuration settings for some types of hosts as a guideline. We recommend you test these settings with a small set of hosts first, to identify any issues.
The best Host Sensor settings to use for your hosts might be different based on the installed OS and applications, physical or virtual hardware, and other aspects of your host environment.
To avoid conflicts with server software, we recommend that you disable Host Ransomware Prevention and do not enable driver configuration settings.
Host Sensor Settings
- Allow Events on Host Sensors: ON
- Host Ransomware Prevention Mode: OFF
- Allow Heuristics on Host Sensors ON
- Allow Loaded Modules on Host Sensors: OFF
- Allow Baselines on Host Sensors: OFF
Host Sensor Driver Configuration Settings:
- All driver configuration settings: OFF
Recommended Host Sensor Settings for Windows 7
On some Windows 7 computers, particularly those with older hardware, the Host Sensor performs better without Host Sensor driver configuration settings enabled.
Host Sensor Settings:
- Allow Events on Host Sensors: ON
- Host Ransomware Prevention Mode: PREVENT
- Allow Heuristics on Host Sensors ON
- Allow Loaded Modules on Host Sensors: OFF
- Allow Baselines on Host Sensors: OFF
Host Sensor Driver Configuration Settings:
- All driver configuration settings: OFF
Recommended Host Sensor Settings for Most Other Hosts
Host Sensor driver configuration settings control whether some Host Sensor actions occur in user space or kernel space. For the best Host Sensor performance on most hosts, we recommend that you enable and test Host Sensor driver configuration settings. These settings are not enabled by default in the global Host Sensor settings, to avoid problems with Host Sensors deployed on servers.
Host Sensor Settings:
- Allow Events on Host Sensors: ON
- Host Ransomware Prevention Mode: PREVENT
- Allow Heuristics on Host Sensors ON
- Allow Loaded Modules on Host Sensors: OFF
- Allow Baselines on Host Sensors: OFF
Host Sensor Driver Configuration Settings:
- All driver configuration settings: ON
For more information about Host Sensor Settings, see Configure TDR Host Sensor Settings.
Configure Policies for Host Groups
Each TDR account has default policies enabled by default. These policies enable Host Sensors to take automated remediation actions for different levels of threats based on the Cybercon level you set in your TDR account. The default TDR policies apply to the built-in All Hosts group and define automated actions that the Host Sensor can perform for all hosts. For more granular control over automated actions, you can add policies for specific Host Groups or even specific hosts to change the actions Host Sensors can perform.
For example, if you have a Servers group, and do not want the Host Sensors on servers in that group to make changes to the registry, you can add a policy for the Servers group that specifies that Host Sensors cannot perform the Delete Registry Value action. Or, if you do not want Host Sensors for a group to take any automated remediation action, add a policy for that group which specifies Host Sensors cannot perform the Quarantine File, Kill Process, or Delete Registry Value actions.
If you add a policy for a Host Group, make sure that policy has a higher priority in the policy list than other policies that apply to All Hosts.
For information about the default and recommended TDR policies, see Recommended TDR Policies