
Related Topics
Create Device Configuration Templates
A Device Configuration Template is a collection of configuration settings that multiple Fireboxes can use. When you manage your Fireboxes with the WatchGuard Management Server, you can create Device Configuration Templates that are stored on the Management Server. You can then use these templates with your managed Fireboxes.
You can apply a template to a single managed Firebox, to a device folder, or to a Management Group folder. If you apply a template to a folder, the template is only applied to the compatible devices in the folder (devices with the same OS version range as the template). For example, if you apply a Fireware v11.9.4 or later template to a folder that includes a Fireware OS v11.12 Firebox, a Fireware OS v11.10 Firebox, and a Fireware XTM v11.4.x Firebox , the template is only applied to the v11.12 and v11.10.5 Fireboxes.
For more information about Management Groups, see Configure Management Groups.
The templates that you create on the Management Server are located in the Device Configuration Templates tree. You can use Device Configuration Templates to easily configure standard firewall filters, change the configuration of your licensed Subscription Services, configure logging settings, or apply other policy settings to one or more fully managed devices. There are two different scenarios for how to use templates:
- Create complete Device Configuration Templates, which include all the settings for your Fireboxes.
- Create multiple Device Configuration Templates, each with specific settings that you apply in layers to your Fireboxes, as appropriate for each Firebox.
For example, you could create a template that includes only the SMTP proxy settings for a group of Fireboxes deployed in the northern region of your territory.
To help you easily identify the contents of each template you create, make sure to specify a unique, descriptive name for each template.
For Device Configuration Templates created in v11.3.x or lower, the policies you add in a template appear in Policy Manager with T_ before the policy name (for example, T_WatchGuard). When you upgrade a v11.3.x or lower template to v11.4 or higher, any policy names that included T_ keep the same name after the upgrade. New policies that you add to v11.4 or higher templates do not include a T_ before the policy name.
When you configure a template, you can also specify whether settings in the template take precedence over settings in an individual device configuration file. By default, template settings automatically override settings in an individual configuration file.
- Fireware XTM v11.0–11.3.x templates can only be applied to devices that run OS versions 11.0–11.3.x
- Fireware XTM v11.4–11.9.3 templates can only be applied to devices that run OS versions 11.4–11.9.3
- Fireware XTM v11.9.4–11.12.x templates can only be applied to devices that run OS versions 11.9.4–11.12.x
- Fireware v12.0 or higher templates can only be applied to devices that run OS versions 12.0 or higher
- Fireware OS v12.0 or higher — Fireboxes
- Fireware XTM
- Fireware XTM v11.9.4–11.12.x — Firebox or XTM devices
- Fireware XTM v11.4–11.9.3 — Firebox or XTM devices
- Fireware XTM v11.0–11.3.x — Firebox X Edge e-Series, Core e-Series, and Peak e-Series devices
- Firebox X Edge
- Edge v10.x
- Edge v8.x
- Edge v7.5
You can make changes to a Device Configuration Template at any time. When you make a change to a configuration template for a Firebox that runs v11.3.x or higher, the Management Server saves the change in the template configuration history, but the Fireboxes that use that template are not automatically updated. You must reapply the template to your Fireboxes for the template changes to appear in the configuration file for your Fireboxes.
After a Device Configuration Template is applied to a Firebox, you can open Policy Manager from the Management Server to connect directly to the Firebox and change the policies and settings in the device configuration file. The Management Server saves the changes you make in the configuration history for the Firebox.
For more information about the device configuration history, see About Configuration History and Template Application History.
Create a New Device Configuration Template
- Open WatchGuard System Manager and connect to your Management Server.
- Select the Device Management tab.
The Management Server page appears. - In the left navigation menu, select Device Configuration Templates.
The Device Configuration Templates page appears with the list of currently available templates.
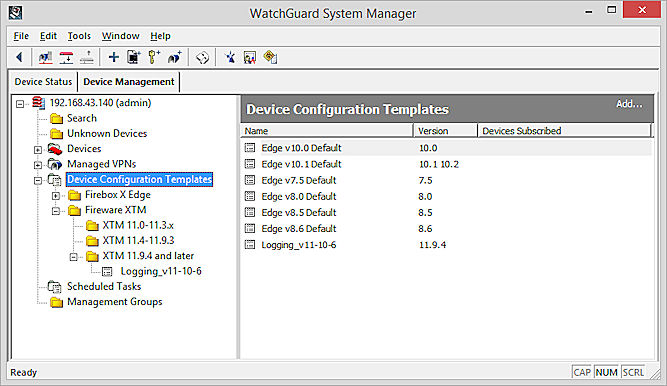
- To see the available templates, expand the Device Configuration Templates list.
- Right-click Device Configuration Templates and select Insert Device Configuration Template.
Or, click Add at the top right of the Device Configuration Templates page.
The Product Version dialog box appears. - Select the product line and version from the drop-down list. Click OK.
If you selected a Firebox or XTM device, you select a name for the template and then Policy Manager opens with a blank configuration file. - Complete the procedures in the next sections to configure the template for the type of Firebox you selected.
Configure a Template for a Device
To create a template for a Firebox, you use a streamlined version of Policy Manager to define the settings in the template.

When you configure a template, you can:
- Add, modify, and delete policies and policy types
- Set up policy highlighting
- Set up feature key synchronization and feature key expiration alarms (Fireware v11.10.1 or higher)
- Set up aliases TipWhen you add an alias, you can specify a Host IPv4, Wildcard IPv4, Network IPv4, Host Range IPv4, Host IPv6, Network IPv6, Host Range IPv6, or Host Name (DNS lookup), or import a list of FQDN addresses.
- Configure settings for logging in a policy and global device logging settings
- Configure diagnostic log level settings
- Configure NTP server settings
- Configure SNMP Settings
- Configure authentication settings:
- Set up automatic updates of trusted CA certificates (Fireware v11.10 or higher)
- Set up actions for:
- Traffic Management
- Proxies
- Content (Fireware v12.0 or higher)
- TLS Profiles (Fireware v12.1 or higher)
- WebBlocker
- Schedules
- SNAT (Fireware v11.4 or higher)
- Quotas ( Fireware v11.10 or higher)
- Configure Technology Integrations for:
- ConnectWise (Fireware v11.12 or higher)
- Autotask (Fireware v12.0.1 or higher)
- Configure Subscription Services settings:
- Configure Inheritance Settings for your devices
- Configure objects to be deleted from your device configuration files
After you apply a template to a Firebox, you can make changes to the aliases in your device configuration file to correctly define the value of the aliases for your Firebox.
If you apply a template to a Firebox that runs Fireware OS v11.7 or higher, and the template includes an alias name that is already used by an interface on the Firebox, because you cannot have duplicate alias names in any configuration file, the alias name does not appear correctly in the Aliases list after the template is applied.
Because you can apply a template to more than one fully managed device, it is helpful to be able to automatically delete certain settings from a device configuration file when the template is applied. You can configure the deletion settings when you set up your template configuration file. You can delete policies, services, aliases, proxy actions, WebBlocker settings, Application Control settings, and schedules. You cannot delete tunnels or license keys, which are stored on the Management Server.
When you configure the WebBlocker settings in your template, if you select to use the WatchGuard hosted WebBlocker server, the template can only be applied to XTM 2 Series and XTM 33 devices. To quickly determine if a template is restricted for use with only certain Firebox models, look at the template information that appears at the bottom of the template in Policy Manager. If (Model Restriction) appears, the template can only be applied to certain devices.
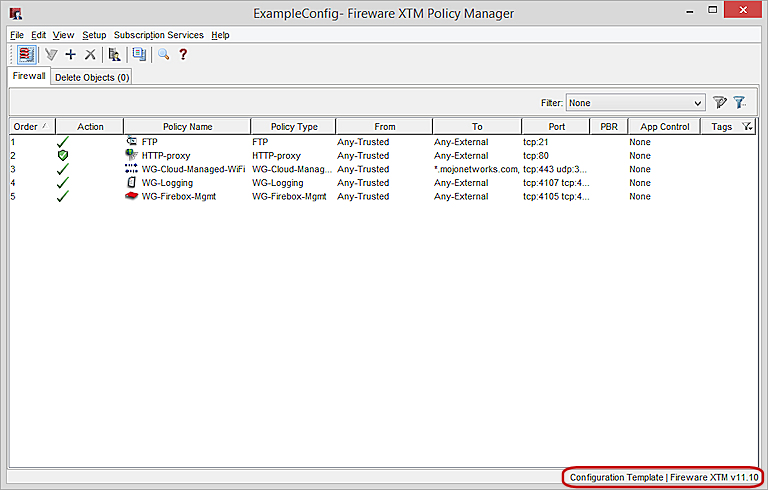
For more information about how to configure WebBlocker servers, see Configure WebBlocker and Configure WebBlocker Servers.
Add Policies to a Template
From Policy Manager:
- Select the Firewall tab.
- Click
 .
.
Or, select Edit > Add Policy.
The Add Policies dialog box appears. - Expand the folder for the type of policy you want to add.
A list of the selected policies appears. - Select a policy.
- Click Add.
The New Policy Properties dialog box appears. - Configure the policy.
For more information about how to configure a new policy, see Add a Proxy Policy to Your Configuration. - Repeat Steps 3–5 to add more policies to your configuration.
Configure Policy Precedence
After you add policies to your template, you can change to manual-order mode and set the policy precedence for your template. When you apply the template to a Firebox, the order you specify for the policies in the template is maintained only if the configuration file of the Firebox is also set to manual-order mode.
- Select View > Auto-Order Mode.
The check mark disappears and a confirmation message appears. - Click Yes to confirm that you want to switch to manual-order mode.
When you switch to manual-order mode, the Policy Manager window changes to the Details view. You cannot change the order of policies if you are in Large Icons view. - To change the order of a policy, select it and drag it to the new location.
- Click
 .
. - Open the configuration file for the device in Policy Manager.
- If the file is in auto-order mode, repeat Steps 1–4 to change the device to manual-order mode.
- Close Policy Manager for the device.
- Apply the Device Configuration Template to your device.
- Open the device configuration file in Policy Manager and review the policy order.
The policies from the Device Configuration Template have the same order in the device configuration file that you specified in the template.
Specify Objects for Deletion
When you apply a template to a device, there are a few settings in a device configuration file that you can specify to be deleted. This enables you to make sure that you do not have duplicate items in your device configuration after a template is applied.
You can select to add items in these categories to the Objects To Be Deleted list:
- Policies
- Policy Types
- Aliases
- Proxy Actions
- WebBlocker
- Application Control
- Data Loss Prevention
- Traffic Management
- Schedules
- SNAT
- Authentication Domains
- Authorized Users / Groups
- Quota Rule
- Quoata Action
Because Mobile VPN policies include two policies that appear as one policy (an .in policy and an .out policy), we recommend that you do not add Mobile VPN policies to this list. If you must specify in your template a Mobile VPN policy to be deleted, make sure to add both the .in policy and the .out policy. For example, for a Mobile VPN policy named MVPN-North, you add the MVPN-North.in and MVPN-North.out policies to the Objects To Be Deleted list.
If you specify objects for deletion that are linked to items that remain in your configuration file after the template is applied, the link to the deleted items is removed from the items that remain. For example, if you specify an alias to be deleted and that alias is used in a policy that is not specified for deletion, when the template is applied to the device, the policy is not removed but the alias is removed from the policy. Make sure to verify that the items you specify for deletion do not create errors in your configuration files, such as a policy without a From or To address.
To specify objects to be deleted from the device configuration file when the template is applied:
- Select the Delete Objects tab.

- From the Objects To Be Deleted tree, select the type of object to delete from the device configuration file.
- Right-click the object and select Add Object.
The Add Object dialog box appears.
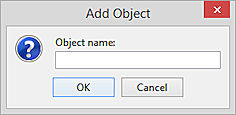
- In the Object Name text box, type the name of the object to delete.
For example, to delete the FTP-Proxy policy, type FTP-proxy. - Click OK.
The object you specified appears in the list for the type of object you selected.
You can also specify objects for deletion when you remove any object from the template, or if you change the name of a policy after you add it to the template. When you make these changes to the template, Policy Manager prompts you to add the object or policy to the Objects to be Deleted list. If you select to add to the list any objects you have removed or changed, when you apply the template to a Firebox, the objects you specify are removed. If you add the name of a renamed policy to the list, the policy with the new name is added to the configuration file and the original policy is removed.
- Delete an object from the template or change the name of a policy.
The Delete Object(s) dialog box appears.
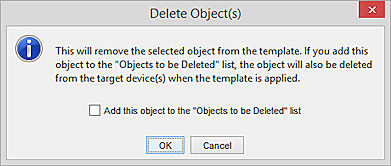
- To remove the object or policy name from the device configuration file when the configuration template is applied to the Firebox, select the Add this object to the "Objects to be Deleted" list check box.
To delete the object but not add it to the Objects to be Deleted list, clear the Add this object to the "Objects to be Deleted" list check box. - Click OK.
Configure Global Settings
When you create a new configuration template, you can configure the settings for Device Feedback, Fault Reports, Traffic Management and QoS, and Device Administrator connections.
By default, the template is configured to enable your Firebox to send feedback to WatchGuard. All Device Feedback that is sent to WatchGuard is encrypted. Use of the Device Feedback feature is voluntary. You can disable it at any time.
Device feedback helps WatchGuard to improve products and features. It includes information about how your Firebox is used and issues you encounter with your Firebox, but does not include any information about your company or any company data that is sent through the Firebox. Because of this, your Firebox data is anonymous. All device feedback that is sent to WatchGuard is encrypted.WatchGuard uses the information from the device feedback data to understand the geographic distribution of Fireware OS versions. The data WatchGuard collects includes summarized information about which features and services are used on Fireboxes, about threats that are intercepted, and about device health and performance. This information helps WatchGuard to better determine which areas of the product to enhance to provide the most benefits to customers and users.Use of the device feedback feature is entirely voluntary. You can disable it at any time.When device feedback is enabled, feedback is sent to WatchGuard once every six days and each time the Firebox reboots. Device feedback is sent to WatchGuard in a compressed file. To conserve space on the Firebox, the feedback data is removed from the Firebox after it is sent to WatchGuard.Device feedback includes this information from your Firebox:Device detailsFirebox serial numberFireware OS version and build numberFirebox modelFirebox uptime since the last restartStart and end time stamps for the feedback data sent to WatchGuard Device sizing detailsCount of policiesNumber of enabled interfacesNumber of BOVPN tunnelsNumber of Mobile VPN tunnelsNumber of VLANs Configuration file sizePerformance detailsMaximum number of concurrent sessionsMaximum number of proxy connectionsMaximum amount of packet filter throughputMaximum VPN throughputMaximum CPU usageMaximum memory usagePeak proxy connection limit usageFeature usage detailsWhich WatchGuard user interface sent feedback to WatchGuard: Fireware Web UI, WatchGuard System Manager, or the Command Line InterfaceWhether the Firebox is under Centralized Management and the management mode for the FireboxNumber of Access Points (AP) configured on the FireboxAuthentication options configured on the FireboxWhether the Firebox is a member of a FireCluster and in Active/Active or Active/Passive modeWhether VoIP security feature is enabledWhether Intrusion Prevention Service (IPS) is enabledLogging options configured on the FireboxNumber of proxy actions with Subscription Services enabled in the configurationSubscription Services details
For each service, the details include whether the service is enabled, counts of the number of events for each service enabled on the Firebox, and a list of the events triggered on the Firebox for each service (includes the source IP address, protocol, and threat level of the event). Intrusion Prevention Service (IPS)Gateway AntiVirus (GAV)WebBlockerspamBlockerData Loss Prevention (DLP) APT BlockerDefault Threat ProtectionAccess Point detailsWhether the Gateway Wireless Controller is enabledNumber of AP devices configured on the FireboxNumber of SSIDs configured on the FireboxWhether the Wireless Hotspot is enabledFully Qualified Domain Name (FQDN) detailsWhether FQDN is in useHow many FQDNs are configuredHow many FQDNs use specific domain namesHow many FQDNs use wildcardsHow many FQDNs are configured in packet filter policiesHow many FQDNs are included in the Blocked Sites exception listHow many FQDNs are included in quota exceptionsHow many packet filter policies include FQDN in a policy filterHow many sanctioned DNS servers are in useQuota detailsWhether quotas are configured on the FireboxHow many quota rules are configuredHow many quota actions are configuredHow many quota exceptions are configuredMobile Security detailsWhether Mobile Security is configuredHow many mobile devices are connectedHow many Android devices are connectedHow many iOS devices are connectedHow many mobile devices are connected through a VPNNetwork Visibility detailsHow many interfaces have Active Scan enabledThe schedule interval configured for Active ScanHow many devices were found on your networkHow many devices were found by Mobile SecurityHow many devices were found by Active ScanHow many devices were found by Exchange MonitorHow many devices were found by HTTP detectionHow many devices were found by the iked processHow many devices were found by the SSL VPN processRADIUS SSO detailsWhether quota statistics are configured for RADIUS SSOMobile Security detailsWhether Mobile Security is enabledHow many policies include a Mobile Security device groupHow many connections were denied by a policy with Mobile Security enabledBotnet Detection detailsWhether Botnet Detection is enabledHow many traffic source addresses have been testedHow many traffic source addresses were from botnets and were droppedHow many traffic destination addresses were testedHow many traffic destination addresses that were sent to botnets were dropped
This feature is only available for Firebox or XTM devices that run Fireware XTM v11.7.3 or higher.
Your Firebox collects and stores information about the faults that occur on your device and generates diagnostic reports of the fault. Faults are collected for these categories:
- Failed assertions
- Program crashes
- Kernel exceptions
- Hardware problems
When you enable the Fault Reports feature, information about the faults is sent to WatchGuard once each day. WatchGuard uses this information to improve the device OS and hardware. You can also review the list of Fault Reports, manually send the reports to WatchGuard, and remove Fault Reports from your Firebox.
This feature is only available for Firebox or XTM devices that run Fireware OS v11.9.3 or higher.
For performance testing or network debugging purposes, you can enable all the traffic management and QoS features on your Fireboxes.
If you have added, or plan to add, more than one user with Device Administrator credentials to your Firebox configuration, in the template settings, you can enable more than one user with Device Administrator credentials to log in to the Firebox at the same time. For more information about how to add users with Device Administrator credentials to your Firebox, see Manage Users and Roles on Your Firebox.
To configure the global settings in the template:
- Select Setup > Global Settings.
The Global Settings dialog box appears.
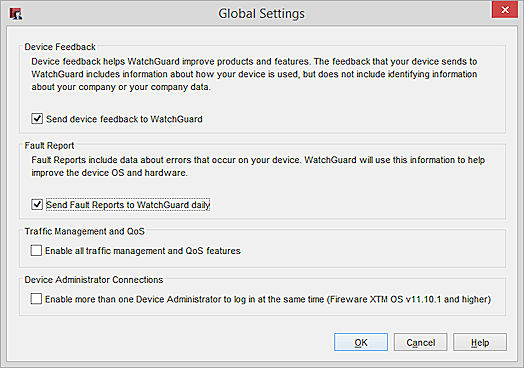
- To disable the Device Feedback feature, clear the Send device feedback to WatchGuard check box.
- To enable the Fault Reports feature, select the Send Fault Reports to WatchGuard daily check box.
- To enable the Traffic Management and QoS features, select the Enable all traffic management and QoS features check box.
- To enable more than one user with Device Administrator credentials to log in to the Firebox at the same time, select the Enable more than one Device Administrator to log in at the same time check box.
Configure Inheritance Settings
By default, if you apply a template to a Firebox with a configuration file that already includes the same policies and settings as the template, most of the template settings take precedence and override the Firebox configuration settings.
If you change the name of a policy or another object in the template, when you apply the template to your Firebox, the new policy or object is added to the Firebox configuration and does not replace the older policy or object that you renamed. If you do not want to keep the older policy or object in your configuration file, you must manually delete it.
For Inheritance Settings to work correctly, the policies and settings in the template must have exactly the same name and use the same configuration options as the policies and settings in the device configuration file. For example, in the Authorized Users and Groups settings, if you add an authorized user with the name Admin 1 to your template and apply the template to a Firebox with an authorized group named Admin 1, the Inheritance Settings do not apply because the template instance of Admin 1 is a group and the Firebox instance is a user.
After you have added policies and configured other settings in your template, you can configure your template to specify which settings the template can override, and for which settings the device configuration file settings take precedence over the template settings. Each category of settings appears on a different page:
- Policies
- Policy Types
- Schedules
- Aliases
- Proxy Actions
- Content Actions
- TLS Profiles
- HTTPS Exception Overrides
- Application Control
- Data Loss Prevention
- WebBlocker
- Traffic Management
- SNAT
- Authentication Servers
- Authorized Users/Groups
- Quotas Rule
- Quotas Action
- Other
There are two exceptions to the default Inheritance settings behavior: most options on the Other page and specific aliases for wireless devices. By default, the Allow Override check box is selected for most of the options on the Other page (except for Policy Tags, Policy Filters) and for the specific wireless aliases. This is to make sure that the Firebox settings automatically override the settings in the template, which prevents the template from changing the settings for these options, which you have already configured on your Firebox.
Options on the Other page include:
| Settings | Fireware Version | Comment |
|---|---|---|
| Account Lockout settings for Firebox authentication | v11.12.2 or higher | |
| APT Blocker settings | This option configures the inheritance settings for only the settings you configure for APT Blocker, not the settings inside a proxy action for APT Blocker. Inheritance settings for a proxy action are configured on the Proxy Action page and include all the settings in that proxy action, not only APT Blocker. | |
| Automatic feature key synchronization setting | ||
| Autotask Settings | v12.0.1 or higher | |
| Botnet Detection | v11.11 or higher | |
| ConnectWise Settings | v11.12 or higher | |
| Device Administrator Connections setting | v11.10.1 or higher | |
| Device Feedback setting | ||
| Diagnostic Log Level | ||
| DLP Global Settings | ||
| Enable automatic update of trusted CA certificates | v11.10 or higher | |
| Enable feature keys expired notification | v11.10.1 or higher | |
| Fault Report setting | ||
| Gateway AntiVirus decompression settings | ||
| Geolocation | v11.12 or higher | |
| Global Firewall Authentication settings | ||
| Intrusion Prevention settings | ||
| Mobile Security | v11.11 or higher | |
| NTP Settings | ||
| Policy Filters | Not selected by default | |
| Policy Tags | Not selected by default | |
| Quarantine Server settings | ||
| Quotas Settings | v11.10 or higher | |
| Reputation Enabled Defense feedback settings | ||
| Send log messages to Firebox internal storage | ||
| Send log messages when the configuration for this device has changed | ||
| Signature Update settings | ||
| Single Sign-On settings | ||
| SNMP Settings | ||
| spamBlocker settings | ||
| Syslog Server | ||
| Terminal Services settings | ||
| Threat Detection & Response | v11.12 higher | |
| Traffic Management settings | ||
| WatchGuard Log Server settings | ||
| WebBlocker Settings | v11.12 higher |
When you configure the settings for any of the options on the Other page that are selected by default, a message might appear that asks you if you want to change the Inheritance Settings selection for that option, so that the setting from the template replaces the setting that is configured on your Fireboxes. If you click Yes, the Allow Override check box for that option is cleared and the setting in the template overrides the setting on your Firebox when you apply the template to your Fireboxes.
The aliases for wireless devices that are overridden by default are:
- WG-Wireless-Guest
- WG-Wireless-Access-Point1
- WG-Wireless-Access-Point2
- WG-Wireless-Client
Because proxy actions and Subscription Services have some related settings, the Inheritance Settings for proxy actions and Subscription Services can affect each other and cause unexpected results when you apply a template to your device. To avoid this problem, when you configure the Inheritance Settings for either proxy actions or a Subscription Service, check the Inheritance Settings for the related Subscription Service or proxy action and make sure there are no conflicts in the settings.
To configure Inheritance Settings for a Device Configuration Template:
- Select View > Inheritance Settings.
The Inheritance Settings dialog box appears, with the Policies category selected by default.
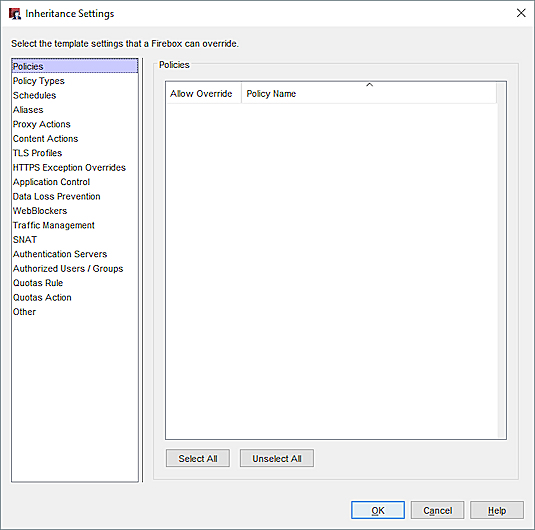
- Select a category.
The settings configured in the template for the selected category appear. - To enable the Firebox settings to override a template setting, select the check box for that setting.
Most of the check boxes on the Other tab are selected by default. - Repeat Steps 2–3 to specify additional override settings.
- Click OK.
Save the Template
- Click
 .
.
Or, select File > Save > To Management Server.
The Schedule Template Update Wizard appears. - Click Next to start the wizard.
The Select the Time and Date page appears. - Select an option: Update the template immediately or Schedule template update.
- If you selected Schedule template update, select the Date and Time that you want the update to occur.
- Click Next.
The Schedule Template Update Wizard is complete page appears. - Click Finish to exit the wizard.
If your Management Server configuration requires that you add a comment when you save your configuration, the Save Comment dialog box appears. - If the Save Comment dialog box appears, type a comment about your configuration changes.
- Click OK.
The new template appears in the Device Configuration Templates list.
Review Template Settings
After you have configured all the settings for your Device Configuration Template, select the template in the Device Configuration Templates list. The Template Settings page for the template appears with all the settings you configured.
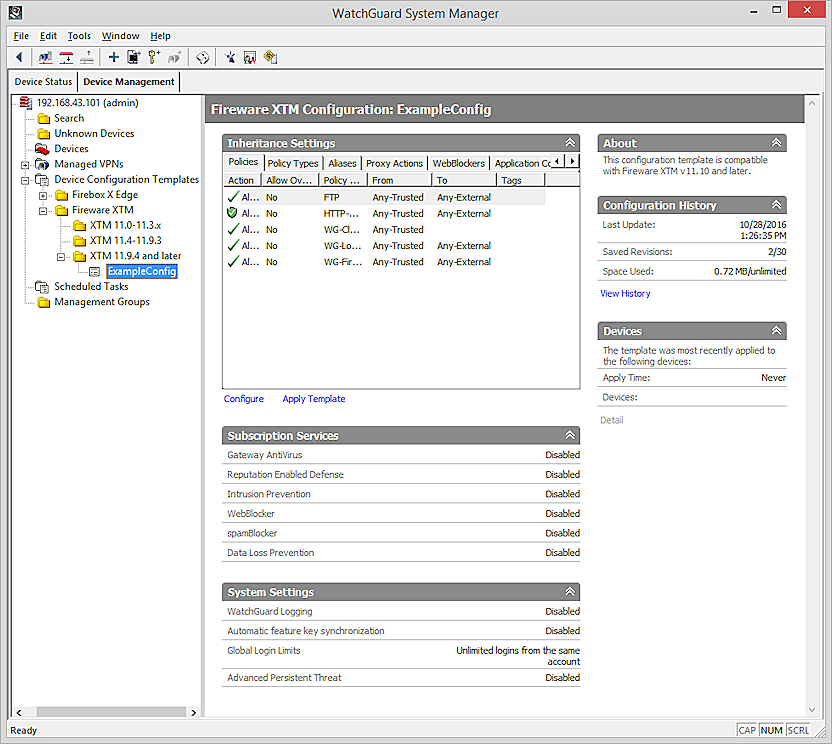
From this page, you can review the template settings, apply the template to a Firebox, and view the configuration history of the template.
The available template settings include:
Inheritance Settings
In the Inheritance Settings section, select a tab to review the settings for these options:
- Policies
- Policy Types
- Aliases
- Proxy Actions
- Content Actions
- TLS Profiles
- HTTPS Exception Overrides
- WebBlocker
- Application Control
- Traffic Management
- Data Loss Prevention
- Schedules
- SNAT
- Authentication Servers
- Authorized Users / Groups
- Quota Rules
- Quota Actions
- Delete Objects
Subscription Services
The Subscription Services section includes the status and general configuration details for each available service.
System Settings
The System Settings section includes the current settings in the template for:
- WatchGuard Logging — The IP address of the WSM Log Server or instance of Dimension, or Disabled.
- Automatic feature key synchronization — Enabled or Disabled
- Global Login Limits — Current setting for login limits
- Advanced Persistent Threat — Enabled or Disabled
About
The About section includes Firebox compatibility information for this template.
Configuration History
The Configuration History section includes details about when the template was last updated, how many revisions the Management Server currently has saved for the template, and the amount of space the revisions have used on the Management Server.
To see more details in the configuration history for a template, click View History.
Devices
The Devices section includes the time the template was most recently applied and a list of Fireboxes that the template was applied to.
To see more information about the template application history, click Detail.
You cannot make changes to the settings on the Template Settings page, but you can open Policy Manager from this page to change a Device Configuration Template. For more information, see the section, Create Device Configuration Templates.
To apply the template to a Firebox, run the Apply Template Wizard. For more information, see the Apply a Template to a Firebox section.
To view the configuration history of the template, open the Configuration History dialog box. For more information, see About Configuration History and Template Application History.
Apply a Template to a Firebox
After you have completed the configuration for your Device Configuration Template, you can apply it to your fully managed devices of the same OS version range. For more information about how to apply a template to a Firebox, see Apply Device Configuration Templates to Managed Devices.
Change a Configuration Template
To modify a setting in a Device Configuration Template:
- From the left navigation menu, select the template.
The Template settings page appears. - In the Inheritance Settings section, click Configure.
Policy Manager opens the selected template configuration file. - To modify a policy, select the policy and click
 .
.
Or, select Edit > Modify Policy.
The Edit Policy Properties dialog box appears. - Configure the policy.
For more information about how to modify a policy, see About Policy Properties or Add a Proxy Policy to Your Configuration. - Make any other changes to settings in the template.
- Click
 .
.
Or, select File > Save > To Management Server.
The template changes are saved to the Management Server.
For your changes to take effect in your individual device configuration files, you must apply your template changes to your Fireboxes with the Apply Template Wizard. For more information, see the previous section.
See Also
About Centralized Management Modes
Clone a Device Configuration Template